ako zachrániť staré vodotlače?
Jak na staré inverzní, lakem fixované obtisky, aneb znovuzrození firemního emblému „Štěpař Hanák a spol.“
How to cope with old inverse, varnish fixed decals or how the company logo of „Štepař Hanák a spol.“ was reborn.
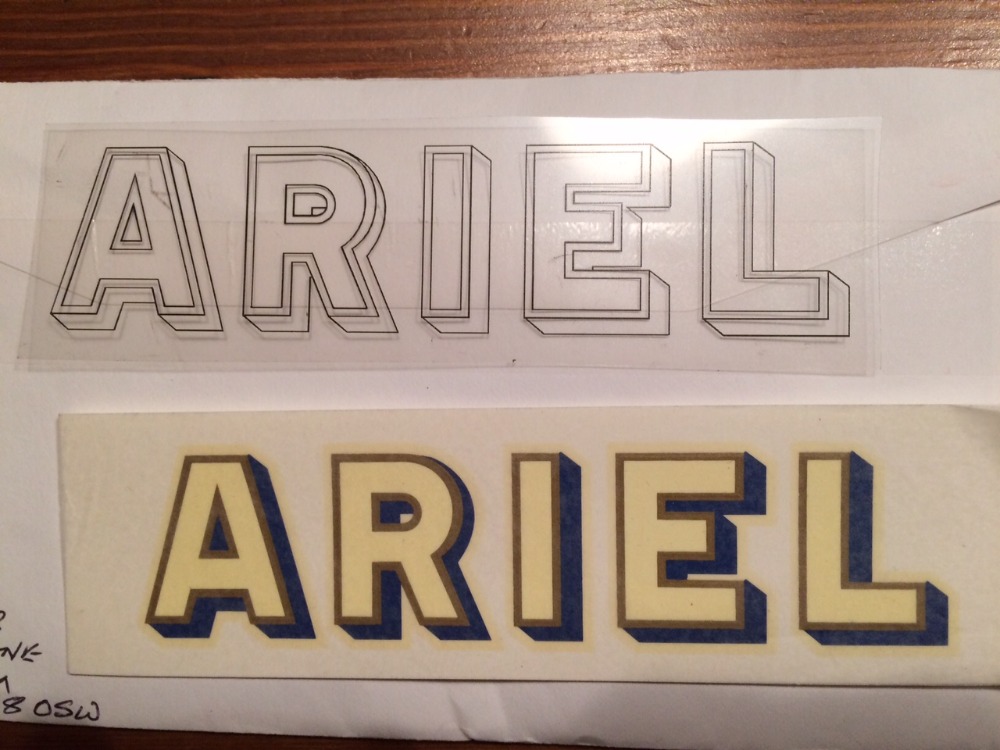
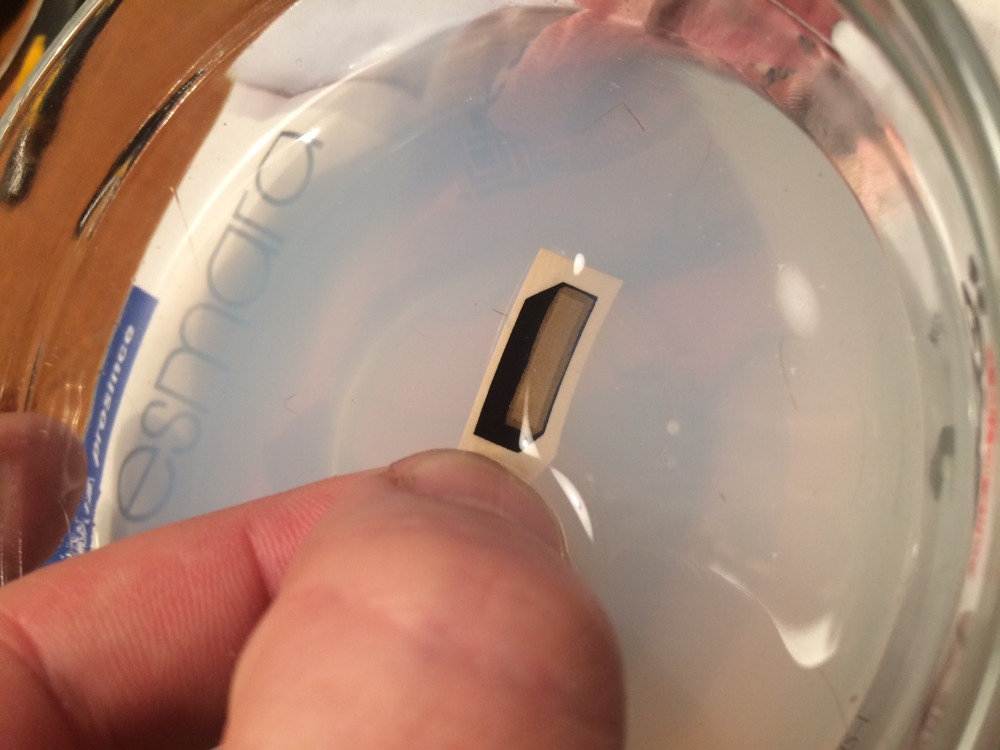
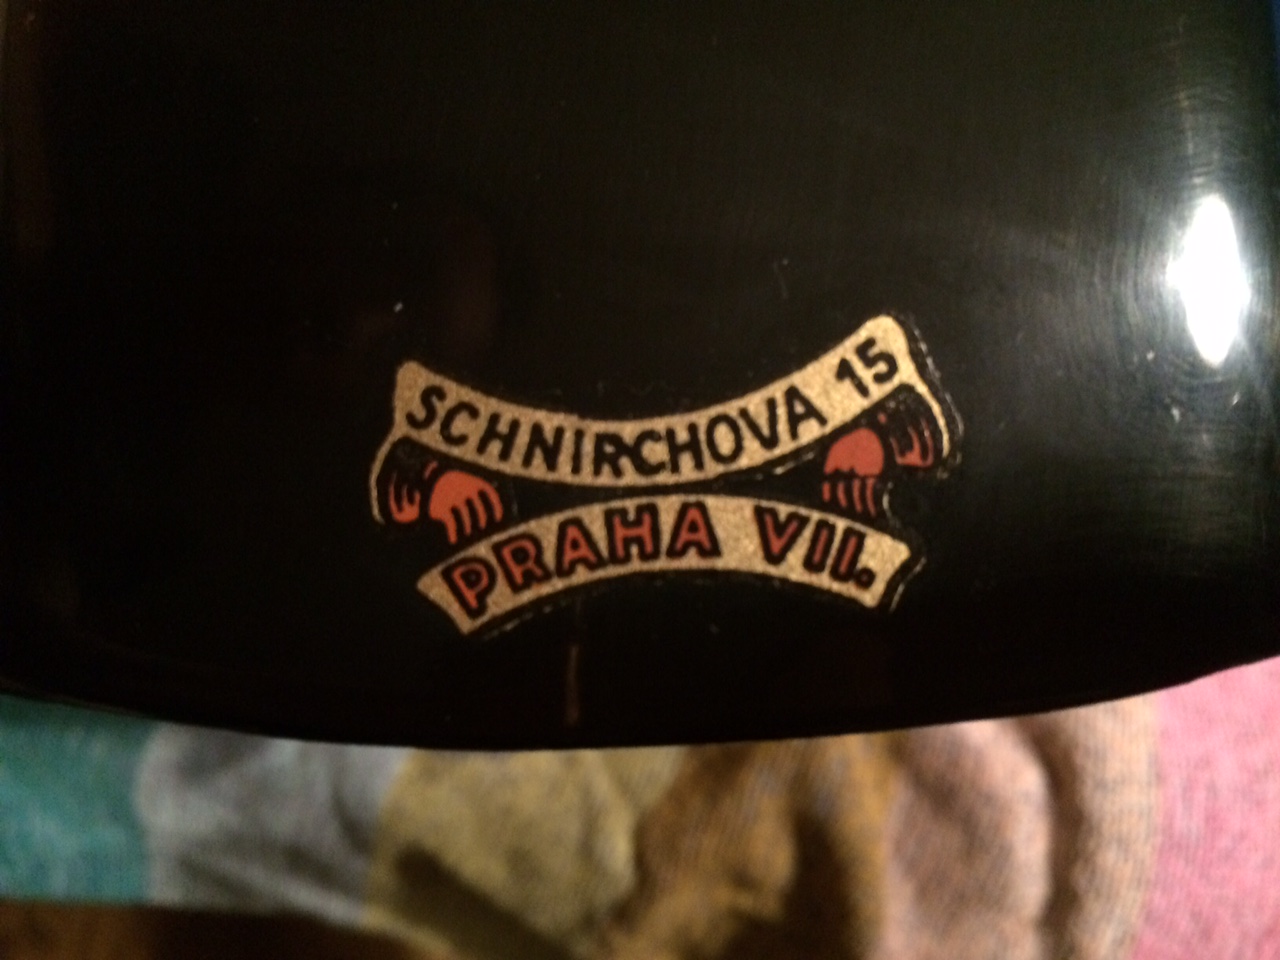
Díky příteli Karolu Burgerovi se mi dostaly do rukou původní, lakem fixované firemní obtisky československého arielského zastoupení, odhadem tak z přelomu dvacátých a třicátých let. Bylo jasné, že jejich sejmutí a nanesení na odpovídající podklad je velice těžkou úlohou i pro zkušeného modeláře a že nebezpečí jejich zničení, nebo minimálně poškození je velmi vysoké. Na druhou stranu z nesejmutých obtisků nikdo nikdy nic neuvidí (viz.foto obtisku před aplikací v příloze) a jejich tvary, barvy, nápisy – to vše by zůstalo pro další generace nepoznáno. Takže padlo rozhodnutí pustit se do pokusu i přes nemalé riziko z toho plynoucí.
Thanks to my friend Karol Burger I got a hold of original varnish fixed company logo decals of czechoslovakian Ariel dealership from I suppose 1920s to 1930s. It was absolutely clear that removing them and applying them on a matching surface would be a great issue even for an experienced modeller and that a great risk of the damage is too high. On the other hand there is no chance that anyone could enjoy the view on these decals if they remained attached to a transfer paper (see the enclosed photo of the decals before application) and their shape, colours and prints – all of that would remain unknown for the next generations. So a decision was made to give it a try even despite the great risk resulting from it.
V následujícím článku zkusíme popsat zvolený postup a podíváme se na dosažené výsledky.
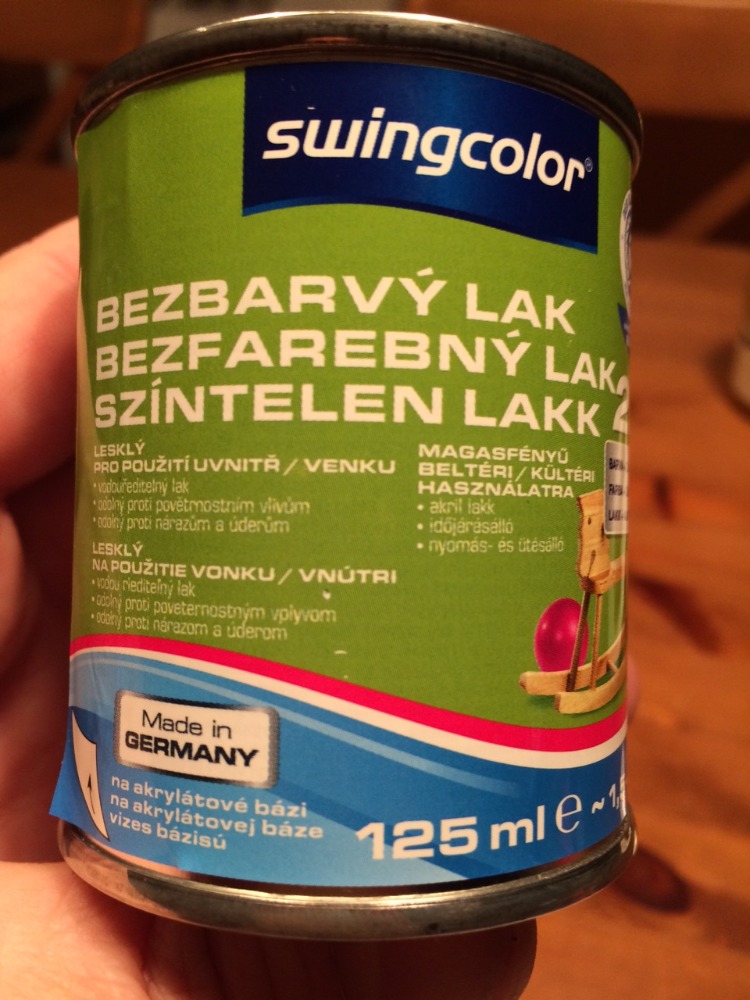
V první fázi jsem si prošel doporučené postupy snímání inverzních obtisků. Literatura uvádí de-facto dva základní typy – tzv. „Spirit Fix“ (lihem přilepený) a „Varnish Fix“ (lakem upevněný). Základním problémem je chybějící popis složení daných snímacích a lepicích lakových směsí a také fakt, že dnes na našich motocyklech používáme jiné nátěrové hmoty, nežli tehdy a hrozí tedy reálné nebezpečí narušení nalakovaného povrchu dílů, případně i obtisku samotného. Laky na lihové bázi jsem zavrhnul pro riziko napadení akrylátového laku (bohužel líh dokáže v některých případech překvapivě napadnout i povrch dvousložkového akrylátového laku), u nitrolaků jsem se obával možnosti rozrušení vlastního obtisku, který je velmi pravděpodobně právě nitrolaky vytvořen a také příliš rychlého zasychání a tím i kriticky krátké doby na práci s obtiskem. V druhé fázi jsem se tedy řídil spíše „selským rozumem“ a pokračoval postupnými drobnějšími kroky, aby se toho nezničilo příliš mnoho najednou. Vzhledem k tomu, že na nosném papíru je obtisk nanesen obráceně, tedy „zády k nám“, bylo jasné, že v první řadě je nutné najít lak, který nenaruší ani obtisk, ani barvu, a který vytvoří na zadní straně obtisku tu žádoucí lepivou vrstvu, která jej pak spojí s povrchem dílu. Zvolil jsem tedy vodou ředitelný, lesklý akrylátový lak značky Swingcolor, který se pro dané účely plně osvědčil. Dále bylo nutné zjistit, v jakém médiu se dokáže obtisk odlepit z nosného papíru tak, aby jím šlo posouvat. Začal jsem vodou, jako nejjednodušší volbou bez rizika a vyšlo to hned napoprvé, obtisky se po namočení uvolnily a šlo s nimi pracovat. Jako první část pokusu jsem zvolil nápis ARIEL a teprve po získání potřebných praktických zkušeností jsem se poté pustil do velmi komplikovaného emblému zastoupení fy. Štěpař a Hanák.
In the following article we will try to describe the procedures we chose and see the results we came up to.
In the first step I went through procedures recommended for applying the inverse decals. The literature de-facto mentions two basic types of decals – so called „Spirit Fix“ or „Varnish Fix“. The main problem is a missing description of the applying and fixing varnish compounds and a fact that there are completely different types of coating materials used on motorcycles of these days. Therefore a great risk of damaging the surface of the original decals or the motorcycle surfaces may be an issue. I rejected the spirit based varnishes for the risk of damaging the acrylic varnish (unfortunately the spirit based varnish is able to savage even a two component acrylic varnish) and with the nitrocelulose varnishes I worried about damaging the decals themselfs. The decals are possibly made by using nitrocelulose materials and also the fast drying of these nitro varnishes make the work critical. During the second phase I rather used my common sense and continued by taking small steps so the damage would be rather small when something would go wrong. Considering that the decal is applied to the carrying paper inversely it was clear that I have to find a varnish that will not damage the decal or the paintwork and which will create the sticky layer that will hold the decal on the motorcycle part surface. So I chose clear glossy acrylic varnish from Swingcolor what came out to be a good choice. Then I had to find out in which medium would the decal become free of the base layer so it could be easy to move around. I began with water as an easiest choice with no risk and it worked fine right away. The decals became free to move after being soaked in water and it was possible to work with them. As a first try I chose the Ariel sign and only after I gained some experiences I started to work on the highly complicated logo of Štěpař a Hanák company.
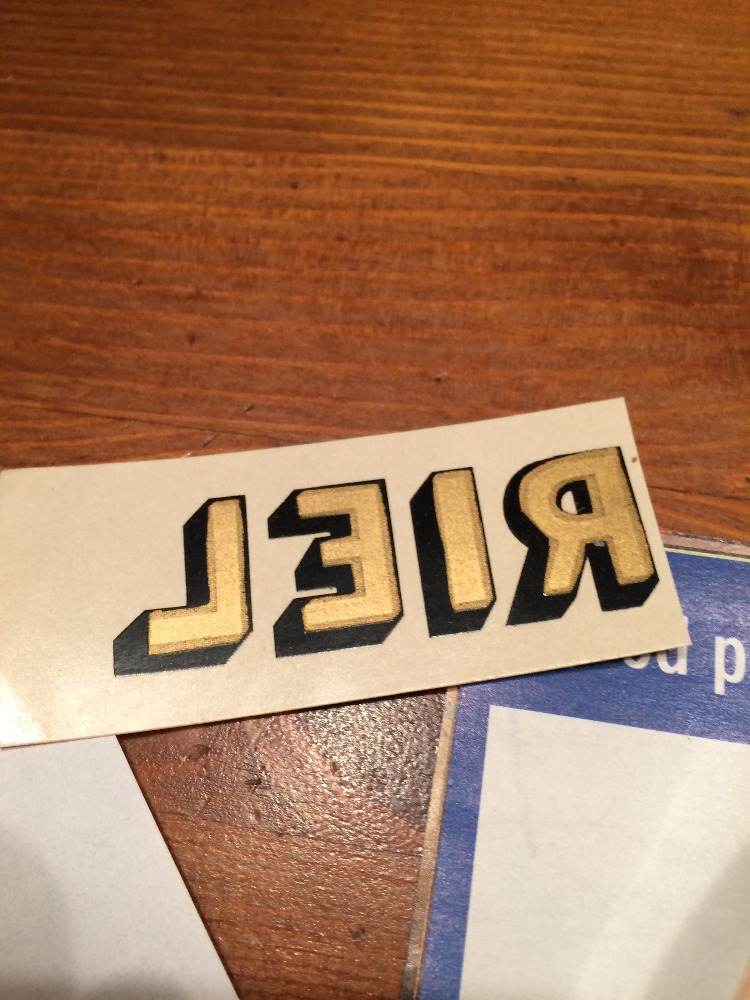
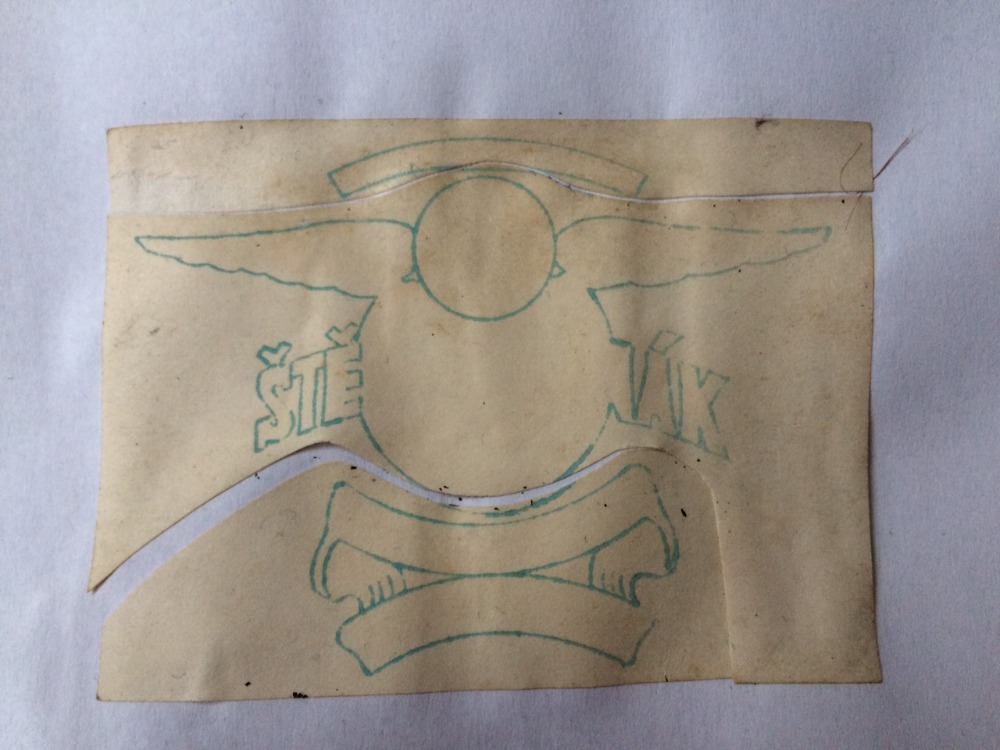
V případě nápisu je nutné počítat s tím, že jednotlivá písmena nemusí být svázána nějakou spojovací lakovou blánou a že tedy každé písmeno se bude muset usazovat individuálně. Tak tomu dříve také většinou bylo, očekával jsem to a nebyl pak překvapen. Jako pomoc při usazování písmen (výška, mezery mezi jednotlivými písmeny apod.) nám velice v takovém případě pomůže pomocná šablona, kterou si můžeme vytvořit na průhlednou fólii a jejímž opakovaným přikládáním si můžeme výsledek naší práce průběžně kontrolovat.
In case of letter sign it is necessary to count with a possibility that the letters are not attached together with any varnish layer and that each letter would be applied individually. That´s how it was earlier, so I was ready for that and it did not surprise me. As a helping tool a stencil made an a transparent foil can be used and by attaching during our work we can check the result continually.
Nyní tedy heslovitě pracovní postup:
Do teplé vody v misce namočíme obtisk a pečlivě jej sledujeme a kontrolujeme. Papír s obtiskem se nejprve většinou trochu zkroutí a poté se začíná narovnávat – otevírat.
And now the whole procedure in the following steps:
Place the decal into a luke warm water and watch it carefully. The paper with the decal will usually start to twist and then it begins to straighten – open
V této fázi musíme opakovaně a jemně vzájemným pohybem palce a ukazováčku opakované zkoušet, zda se již obtisk začíná uvolňovat a zda jím bude možné po nosném papíru posouvat. Kdo příliš pospíchá, obtisk přetrhne. Kdo čeká příliš dlouho, tomu může obtisk ve vodě z nosného papíru odplavat a shrnout se. Doba je u každého obtisku trochu jiná a může se pohybovat řádově mezi ca. 3 – 8 minutami od prvního namočení do misky. Nezapomínejte, že se zvyšující se teplotou vody se tato doba výrazně zkracuje – horká voda může dobu uvolnění obtisku zkrátit i na polovinu. Při posouvání obtiskem po papíru si musíme dát pozor, aby okraj obtisku nepřešel přes okraj ústřižku nosného papíru, protože se jinak okamžitě přehne a při narovnávání mu pak téměř jistě ublížíme.
During this step we have to repeatedly try if the decal starts to loosen from the paper and it is then possible to move it on the base paper by using the fingers. If you hurry you can damage the decal. If you wait too long the decal may loosen from the paper completely, swim away and got creased. The time needed may vary from 3 to 8 minutes from the moment you put the decal into the water. Do not forget that higher the temperature of the water the shorter time for decal to become loose. Hot water can reduce the time even to a half as normal. While moving the decal on the transfer paper we have to be careful not to move it accross the edge of the paper or it would bend and we would damage it surely while trying to pull it back.
Pokud lze obtiskem po papíru hladce posouvat, vyjmeme papír s obtiskem z vody a přetřeme jeho zadní rubovou stranu štětcem bezbarvým lakem, který máme připraven. Lak můžeme v touze po dokonalosti naředit s vodou v poměru ca. 75% laku a 25% vody. Štětcem vrstvu laku na obtisku jemně uhlazujeme a čekáme, až tato trochu zavadne a začne velice mírně lepit. Poté se pokusíme obtisk na díl usadit.
If it is possible to move the decal on the paper smoothly we can take it out of the water and apply a coat of clear varnish with a soft paintbrush. We have to have the varnish already prepared and for the best results prepare a mixture of 75% varnish and 25% of water. We gently smoothen the varnish layer with a paintbrush on the surface of the decal and wait till the layer begins to dry just a little bit and becomes slightly sticky. Then we can try to apply the decal on the desired part of the motorcycle.
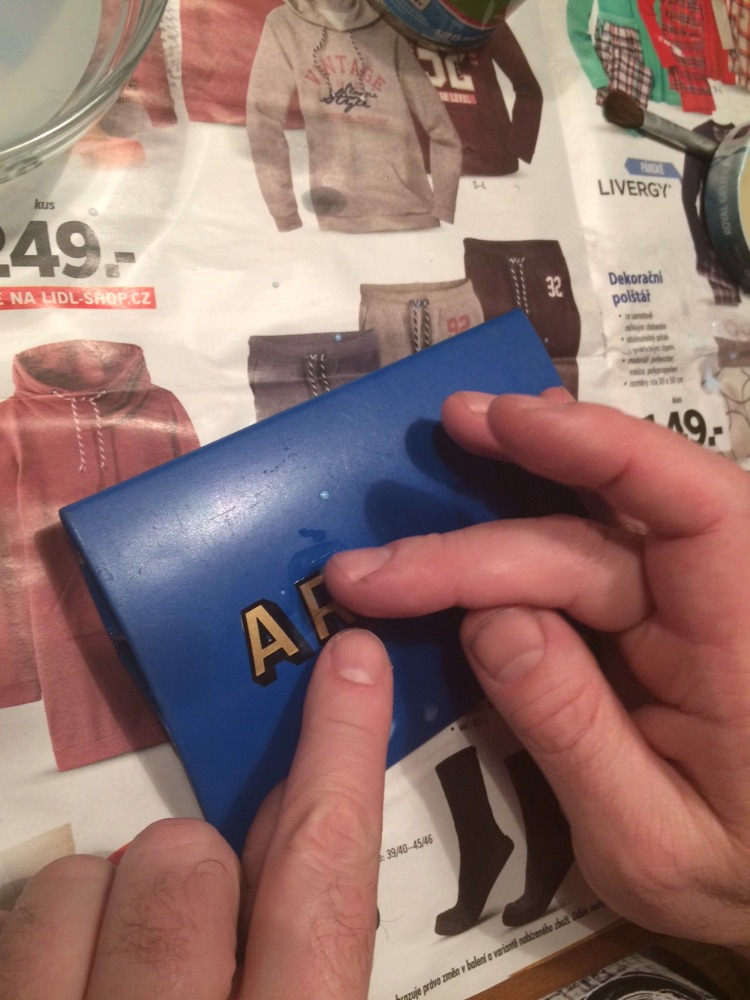
Na předem odmaštěný a prachu zbavený povrch lakovaného dílu, na který má obtisk přijít, naneseme do místa budoucího usazení obtisku štětcem vrstvu laku tak, aby tato byla spojitá a povrch dílu byl lakem lokálně smáčen. Poté překlopíme obtisk tak, aby rubová strana obtisku si sedla na povrch dílu a směrem k nám směřoval neprůhledný nosný papír, který nám bohužel nyní znemožňuje přesně vidět, kde se obtisk přesně nachází. Nosný papír přitiskneme jemně, ale důrazně na povrch dílu a doufáme, že se obtisk rubovou stranou přilepí na díl a nosný papír nám při jeho odlupování zůstane čistý v ruce. Téměř nikdy se to nestane napoprvé a tak musíme toto zkoušet opakovaně, případně pomoci velice opatrně uvolnění obtisku z nosného papíru konečky prstů. Příliš mokrý povrch podkladové vrstvy laku způsobí, že obtisk lpí na papíru a nechce přilnout k povrchu dílu. Příliš suchý a lepkavý povrch má za následek, že obtisk krásně přilne na díl, ale je možné, že s ním již poté nepůjde hýbat a tedy ho nedostaneme do jeho přesné žádoucí pozice. Hledejte optimum mezi suchým a lepkavým a mokrým a smáčeným povrchem a hlavně neztrácejte klid.
The surface of the motorcycle part where the decal would be applied must be clean of dust or any grease residues. On the place where we want the decal to be placed we apply a coat of varnish and the layer of it should be monolithic. Then we flip the decal so front side touches the part surface and the back side of the transfer paper is heading towards us. This will unfortunately cause that we cannot see clearly the position of the decal. We press the transfer paper gently but firmly to the surface of the part and hope the decal will stick to it and the clean transfer paper will be the only thing that will remain in our hand after the decal peeling down from it. It almost never goes perfectly for the first time so we just have to keep on trying. We can also use our fingers to gently move the decal from the transfer paper. When the surface is too wet it can cause that the decal will stick to the transfer paper and not to the surface. On the other hand when the surface is too dry or sticky the decal will stick to it and it would not be possible move it to a desired position. You have to find an optimum between dry and sticky or too wet or damp surface, just do not loose your temper and be patient.
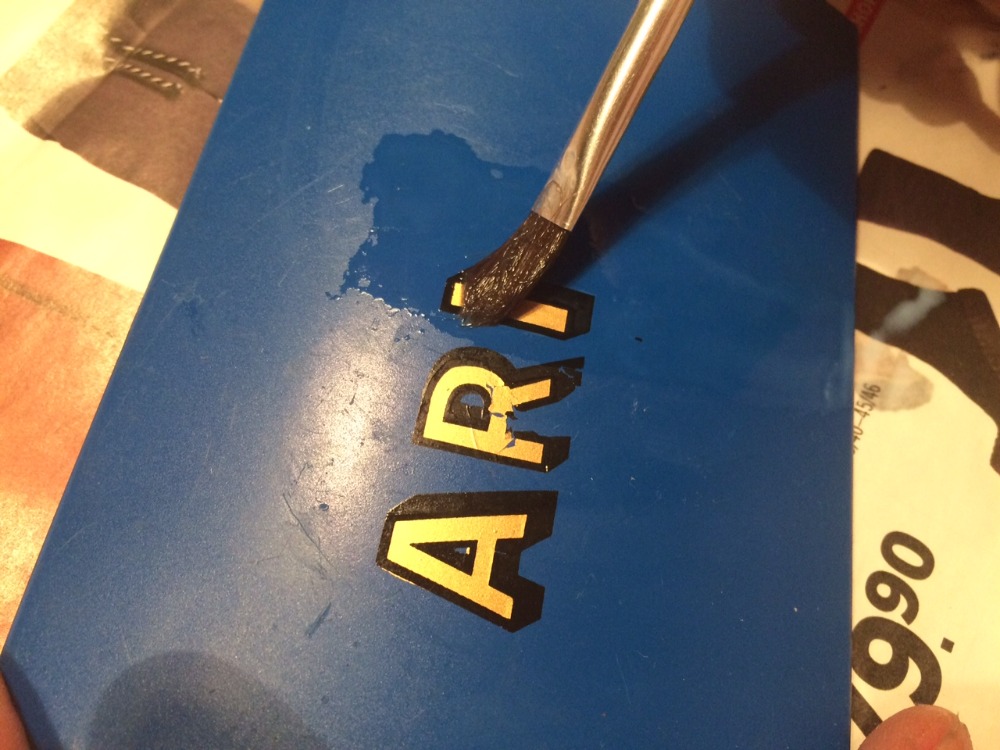
Po sejmutí obtisku na povrchu dílu jej dopravíme pomocí mokrého štětce na jeho přesné místo a odsajeme přebytečnou vrstvu laku druhým suchým štětcem, rohem čistého textilního hadříku apod. Po případném přiložení kontrolní šablony a potvrzení správné polohy obtisku pak můžeme ještě opatrně uhladit povrch čerstvě usazeného obtisku na dílu hadříkem s cílem vytěsnit případně vzduchové bublinky mezi obtiskem a dílem. Obtisk stíráme a uhlazujeme vždy od středu ke kraji, abychom jej náhodou neshrnuli.
After placing the decal onto the surface and removing the transfer paper you can move the decal using a wet paintbrush and remove the excess water with a dry paintbrush or a corner of a clean cloth. We can check the position using the transparent stencil we have prepared and then we can smoothen the surface of the decal gently with a clean cloth and also remove any air bubbles that may be between the decal and the surface. We wipe and smoothen the decal from its centre towards its edges carefully so we do not damage it.
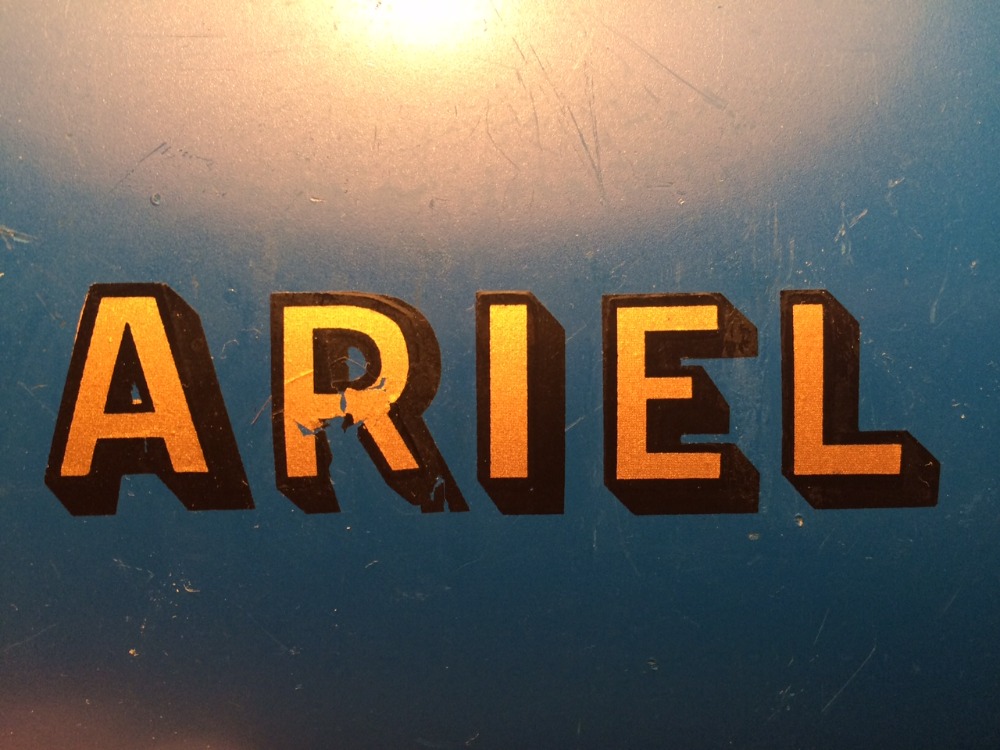
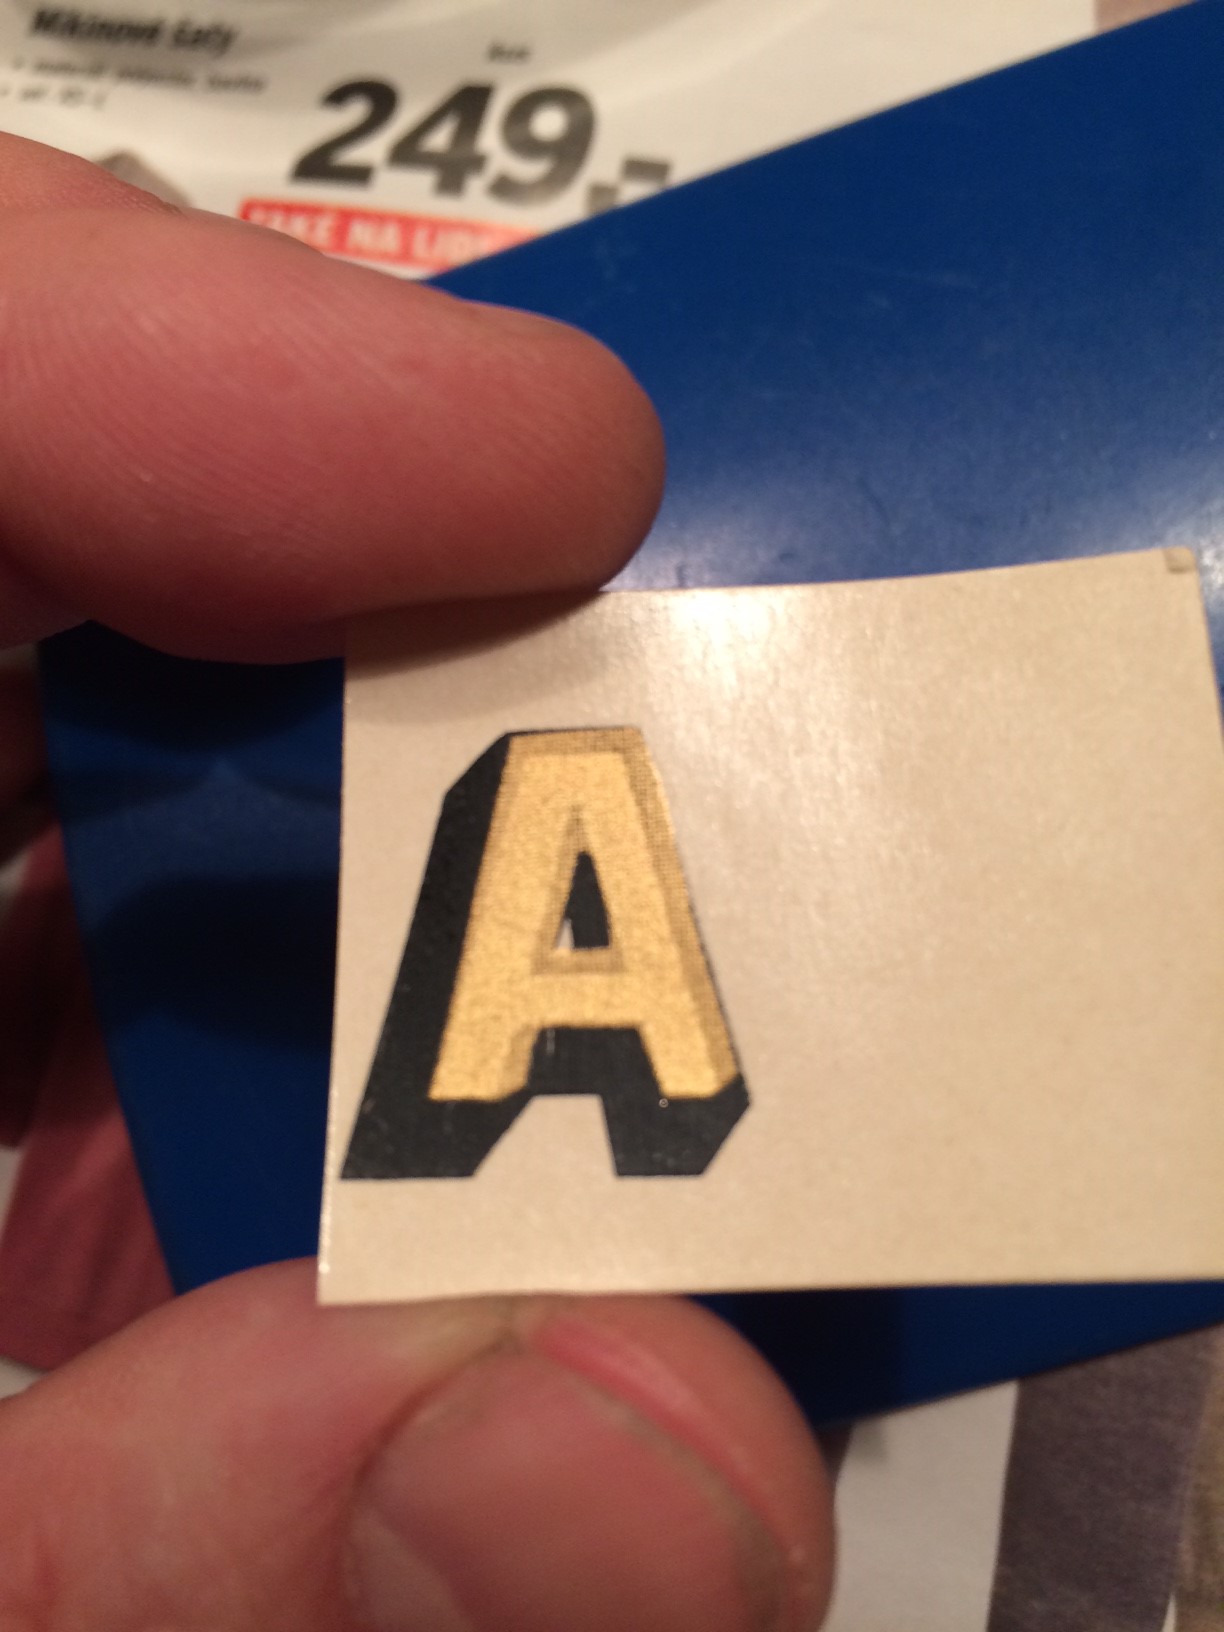
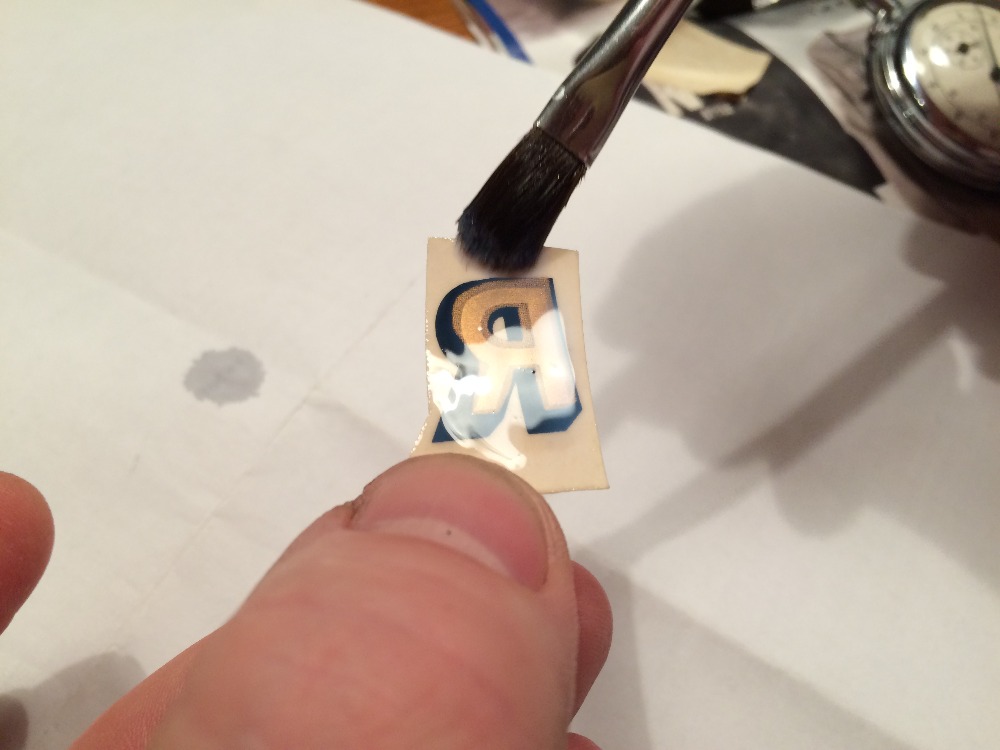
Kdo si věří, může ještě extrémně opatrně omýt nejbližší okolí písmene vlhkým hadříkem vodou od přebytečné vrstvy zasychajícího laku tak, aby byl povrch dílu bez map a nepěkných nánosů zbytků vodou ředitelného usazovacího laku.Vše opakujeme až do dokončení celého nápisu. Při poškození některého z písmen (v našem případě to bylo tvarově složité „R“) nezoufáme, protože hodně se toho dá ještě zachránit jemným kápnutím kapičky laku do daného místa a narovnáním překlopeného okraje, nebo přisunutím odtržené části písmene zpět. Uděláme-li to šikovně, nikdo nepozná, že je písmeno sestaveno z několika částí. Budou-li trhlinky a nepřesnosti vidět, je to historie a tu přeci ctíme. Při nehorším se dá něco opravit i jemným štětečkem (00) a vhodně zvolenými a dobře rozmíchanými syntetickými modelářskými barvami (Humbrol, Revell apod.). To je ale už trochu vyšší level a nemusí to nutně dopadnout vždy lépe nežli původní stav, záleží na naší jisté ruce a šikovnosti. Po nanesení kompletního celého nápisu Ariel a očištění okolí od zbytků nanášecího vodou ředitelného laku si zhluboka oddychneme a pokračování práce necháme až na druhý den, až bude lak spolehlivě zatvrdlý a obtisk dobře fixován. Pak přistoupíme k fixaci obtisku bezbarvým lakem tak, aby byl zranitelný povrch starého obtisku chráněn před povětrností a mechanickým poškozením otěrem apod. Zvolil jsem osvědčený jemný a vysoce kvalitní japonský modelářský bezbarvý akrylátový lak ve spreji Mr. Super Clear fy. Mr.Hobby. Dobře by posloužil jistě i např. lak Tamiya apod. Nejprve foukneme jemnou mlhu a postupně přidávám tak, aby se povrch začal slévat a nebyl krupičkovitý. Nesmí se ovšem naplavit tak moc, aby začal stékat, nebo tvořil příliš tlustou vrstvu. Stříkanou plochu musíme ukončit buď rozstřikem do vytracena (na velké ploše), nebo u drobných dílů na nejbližší hraně tak, aby přechod mezi originálním lakem a nově nastříkanou bezbarvou krycí lakovou vrstvou byl pokud možno neznatelný. Díl po nastříkání odložíme na bezpečné místo, kde se nepráší a počkáme opět do druhého dne.
If you get confident you can carefully clean the area around the letter with a wet cloth from the varnish residues so the part surface would be free of nasty maps and layers of water based varnish. We repeat these steps till the whole letter logo is finished. If a damage to some of the letters occur (in our case it was a difficult letter „R“) please do not panic, because there is a lot to be saved by a light drop of varnish to the defected spot and putting the wrinkled edge or a part of the letter that may have been torn back to its place. If we do it right noone will ever know that the letter is made of several parts. If some cracks or imperfections may appear do not worry either, it´s a history and we appreciate that. At worst some things may be repaired by using a really thin paintbrush (00) and well chosen modelling paints (Humbrol, Revell or other). But that is a little higher level of restoration and the result may not come out better than the original state, it really depends on ones capabilities and a firm hand. After applying all of the letters and cleaning the surrounding area from the water based warnish we take a break to relax and to let the decal dry out properly till the next day. Then we can proceed to fixing the decal with a clear varnish so the surface of the decal would be protected against weather and mechanical damage. I chose my favourite fine and high quality modelling clear acrylic varnish in a spray can called Mr. Super Clear from a japanese Mr. Hobby. I am sure that also varnishes from other manufacturers like Tamiya or other would work fine too. First of all we spray just a mist and slowly we add more so the surface would start to merge and not be grainy. On the other hand it is not good to spray too much material because the coating may start to flow down or the layer would be too thick. If we apply the varnish on big surfaces we have to finish the coat by transition to an original coating or spraying to the closest edge in case of small motorcycle parts. This way the new coating will be impossible to recognize from the original one. After we´re done we put the whole part to a safe place without any dust falling to it and wait again till the next day.

Pomocí voskové lešticí pasty v tubě Tempo na staré nátěry opatrně čistým hadříkem rozlešťujeme okraje lakované plochy tak, aby byl rozstřik co nejméně patrný a nově zalakované místo s obtiskem se stalo organickou součástí povrchu a nepůsobilo cizorodě.
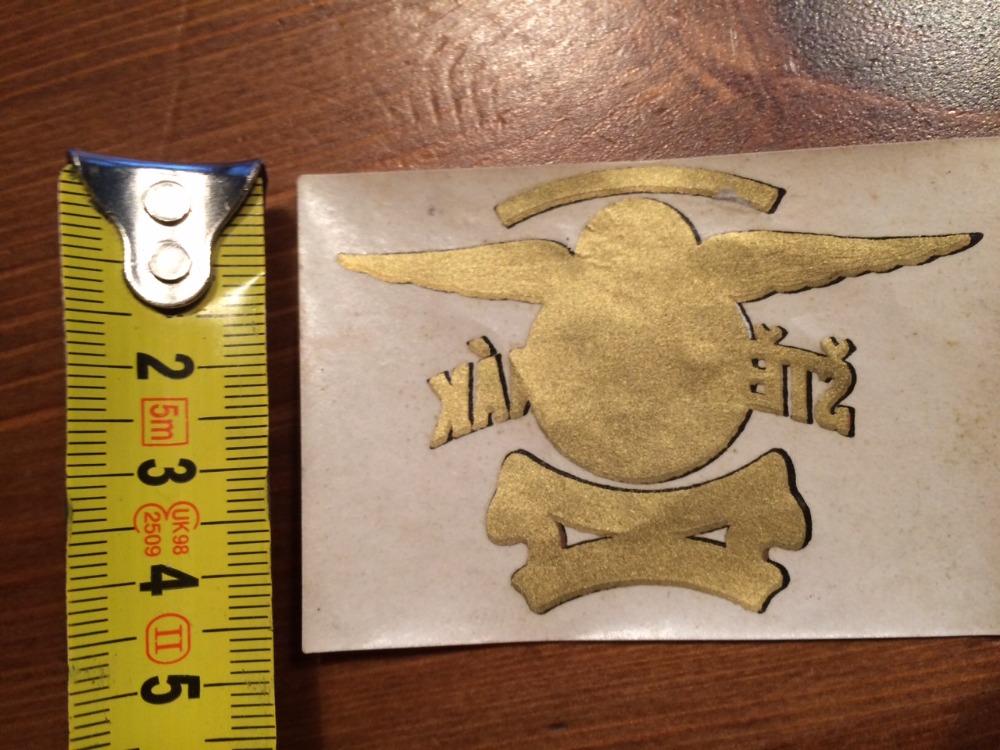
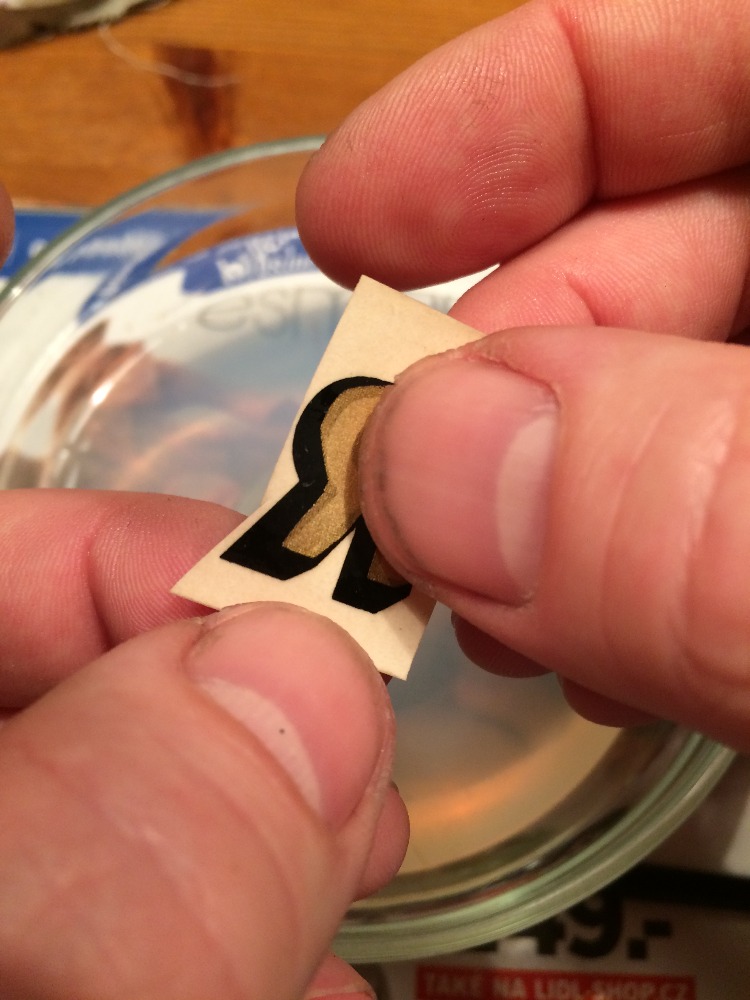
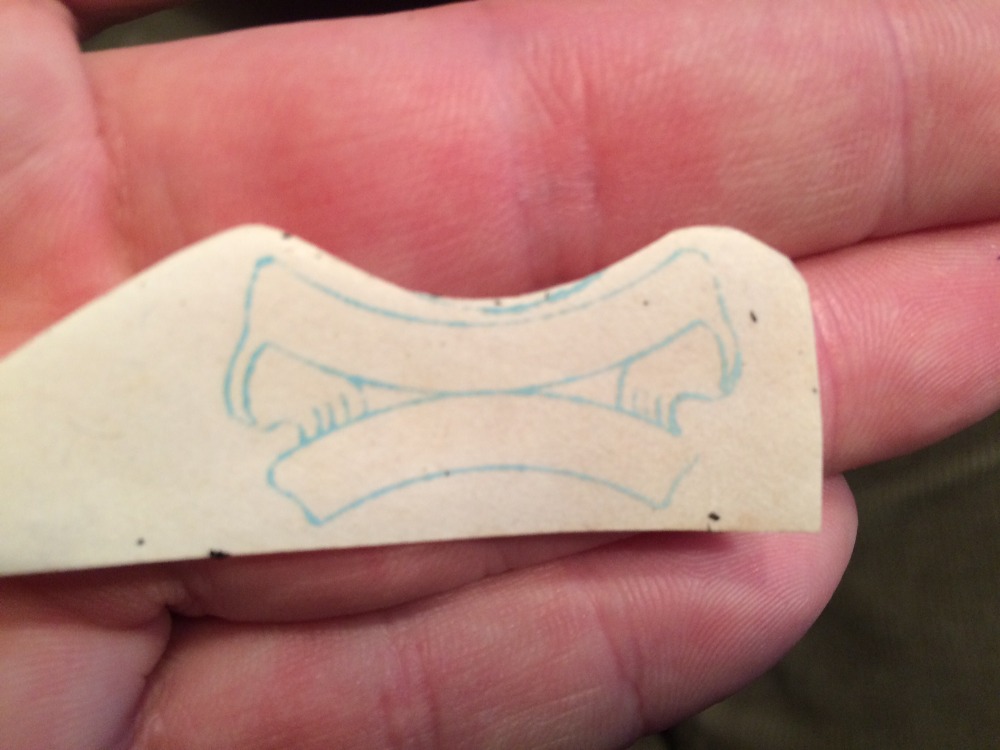
Po relativně úspěšném nanesení kompletního nápisu ARIEL jsem se pln optimismu pustil následně do snímání obtisku se znakem Štěpař a Hanák. Zde mne ovšem zaskočilo několik věcí, a to zejména fakt, že ani tento velice tvarově komplikovaný a zranitelný znak nebyl vzájemně svázán lakovou vrstvou a začal se tedy v okrajových částech, kde nápis přečnívá středový kruh, rozpadat hned po namočení ve vodě na jednotlivá písmena. Kritická byla tedy zejména samostatná písmena „ŠTĚ“ a také „NÁK“. Aby toho nebylo málo, starý a léty zkřehlý obtisk se začal navíc trhat na drobné kousky. Výsledkem tedy bylo, že např. písmeno A bylo nutné složit z celkem čtyřech částí a přidat ještě jako část pátou příslušnou čárku nad tímto písmenem. Naštěstí jsem prozíravě před vlastním nanášením rozdělil emblém obtisku na celkem tři části – na ozdobný nápis dole, na vlastní emblém a na ozdobnou stuhu s nápisem nahoře. Věc tedy měla řešení, protože šla řešit po částech. Nicméně i tak byla opravdu velice komplikovaná a náročná na pečlivost a trpělivost při usazování jednotlivých střípků této „obtiskové mozaiky“. V případě takovéhoto tvarově složitého útvaru bych tedy přidal ještě dva dodatečné body pracovního postupu, který bych vložil před bod 1) a také mezi body 2) a 3) textu:
Using a Tempo wax polishing paste intended for old coatings we carefully polish the edges of the new coating so the transition to an original layer would become invisible. Then the newly varnished place with a decal should become an organical part of the surface and not appear unnatural.
After I relatively succesfully applied the complete ARIEL letter logo I began to work on the „Štěpař a Hanák“ logo. But working on it I got surprised by many things especially that this complicated and vulnerable decal wasn´t connected together by any varnish layer and it began to desintegrate to individual letters right after it got immersed in water. The biggest issue were the edge parts of the logo where the central circle overhangs and the most critical were the letters „ŠTĚ“ and „NÁK“. To make it even more difficult the old and fragile decal began to tear to tiny pieces. The result was that for example letter A was then put together from four parts and still I had to add the accent on the top of the letter which was the fifth part. Fortunately I shrewdly divided the whole logo to three separate parts – letters in lower part, central logo and the upper ribbon with letters. So the problem could be solved part by part. Anyway it was really complicated and demanding for carefulness and patience to put the decal puzzle together. In such case of a complicated shape I would add two more procedure points which I would place before the point 1) and also between points 2) and 3) of the article:
Před zahájením prací přestříkáme celou rubovou plochu obtisku kvalitním bezbarvým akrylátovým lakem ve spreji (např. Mr.Hobby), který necháme zaschnout do druhého dne. Poté obtiskový papír ostřihneme tak, aby okolo vlastního tvaru obtisku byl jenom menší okraj lakové vrstvy – stačí přídavek tak 3 – 6 mm.
Before begining of work spray the whole reverse side of the decal with a high quality acrylic varnish in a spray form (e.g. Mr. Hobby) and let it dry till the next day. Then cut the transfer paper around the decal –add 3 – 6mm.
Protože díky ostřihnutí není plocha pro posouvání obtisku příliš veliká, můžeme si pomoci ještě jedním tzv. manipulačním obtiskovým papírem z klasických nám již známých vodových obtisků, na který můžeme náš starý inverzní obtisk po jeho uvolnění od nosného papíru přetáhnout. Tento postup s pomocným manipulačním papírem je vhodný zejména pro práci s drobnými útržky obtisku, s jednotlivými písmeny, která se oddělila apod.
Thanks to cutting the transfer paper smaller the area for moving the decal is not so big and we can help ourselves by another piece of transfering paper where we can slide the old inverse decal after getting loose from its own transfer paper. This method of using additional transfer paper is especially useful when working with tiny parts of the decal, with individual letters and so on.
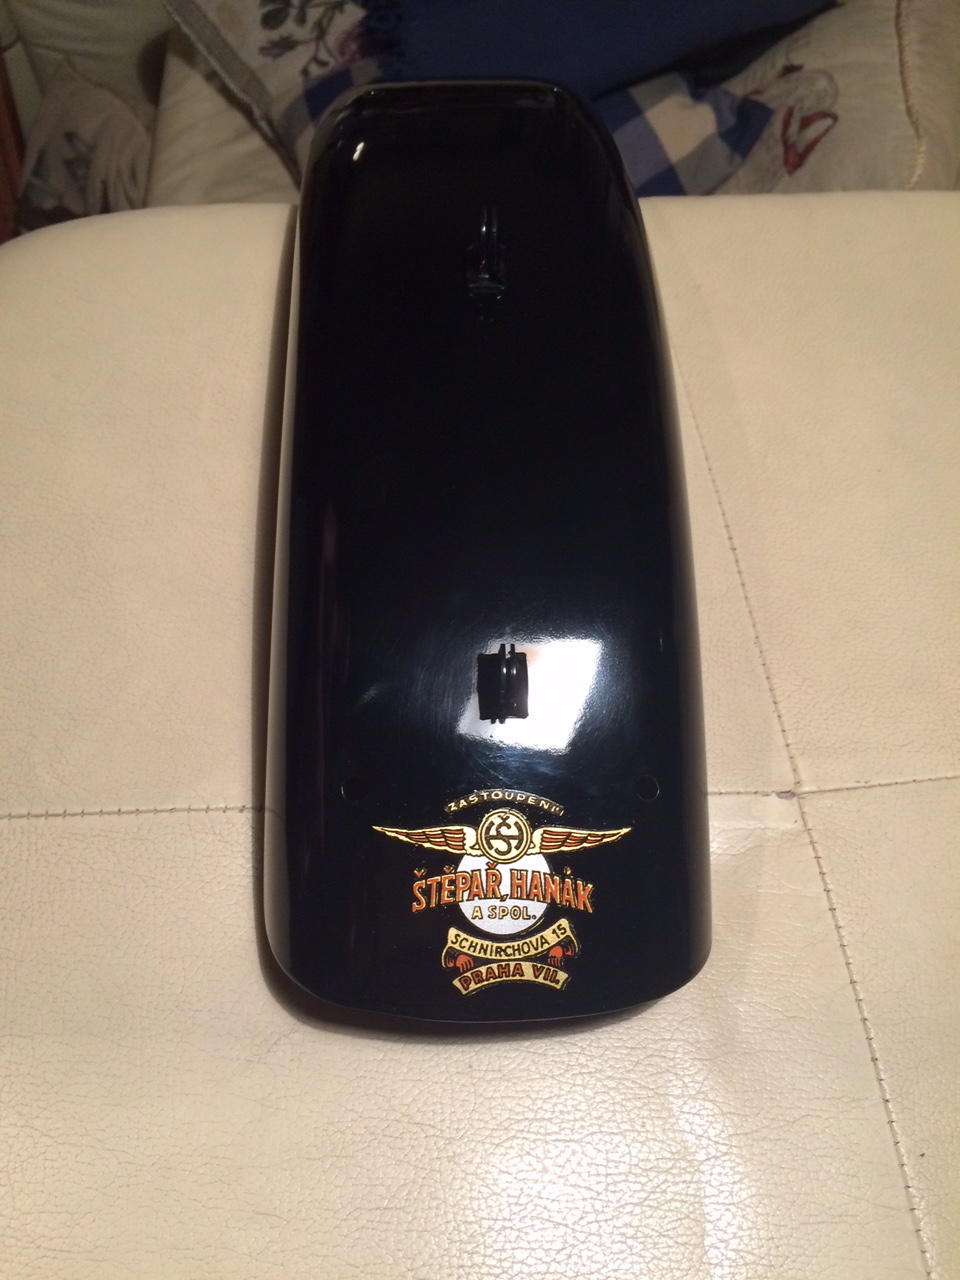
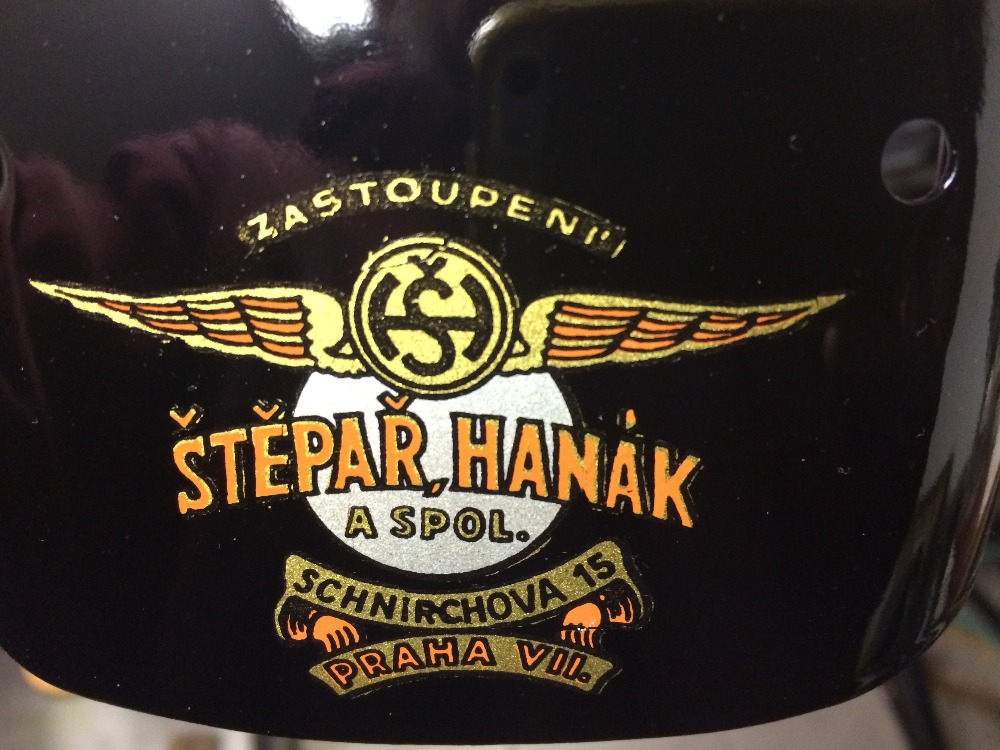
Co říci závěrem ? To dobrodružství za to dle mého soudu stálo. Namísto zežloutlého kusu starého papírku máme nyní historický artefakt v jeho plné slávě a barvě.
Přeji tímto všem ostatním hodně zdaru při Vašem osobním zachraňování historie i jejích byť pouze malých střípků.
What should be said at the end? The adventure was worth it I suppose. Instead of an old yellowish piece of paper here we have a historical artifact in full glory and colour.
I wish you all a good luck with your personal saving of the history even from tiniest pieces.
pre Slovenský Arielklub spracoval
for Slovak Arielklub
Petr Pokorný - Český Ariel klub/Czech Ariel klub
preklad/translator - Rastislav Chmelár
Komentáre
Pridať komentár