oprava spojky Burman
Oprava spojky Burman
Burman clutch repair
Dnes by sme vám chceli priblížiť, ako postupovať a čo nezanedbať pri oprave spojky Burman pre Ariel. Budeme opravovať spojku z trojrýchlostnej prevodovky Burman. Používala sa na Arieloch vyrobených v rokoch 1927-32. Spojka je dôležitá súčasť prenosu sily z primárneho na sekundárny rozvod a musí fungovať dobre, inak poškodí samotnú prevodovku. Aby sme dosiahli správnu funkčnosť spojky, musíme skontrolovať a opraviť jej hlavné časti.
Today we would like to explain how to proceed with and what not to neglect when repairing the Burman clutch on your Ariel. We will repair the clutch from the three speed Burman gearbox. It was used on Ariels made from 1927 to 1932. Clutch is an important part of power transfer from the primary to secondary transmission and must work properly otherwise a damage to the gearbox may occure. To obtain the correct function of the clutch we have to check and repair all it´s main components.
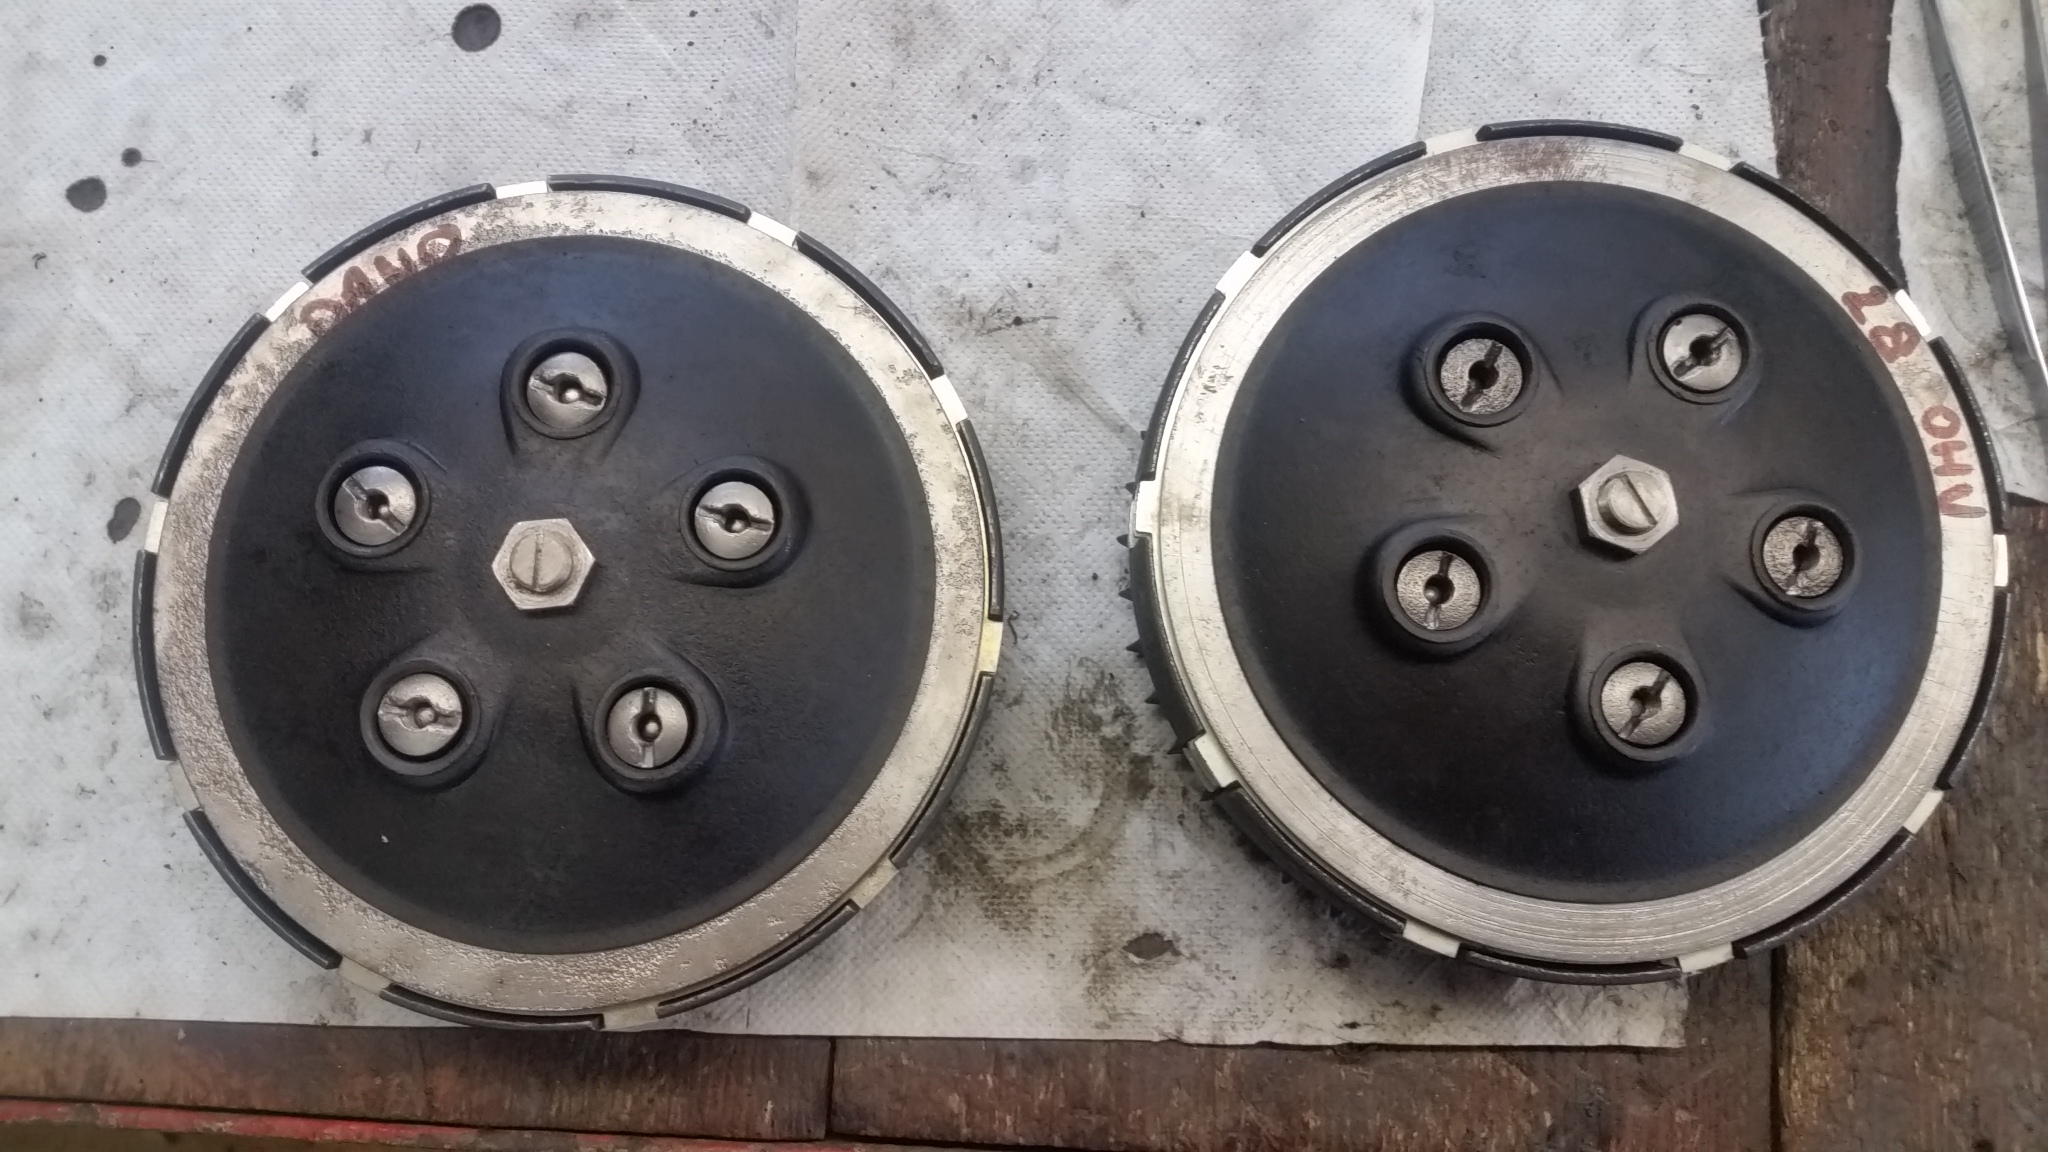
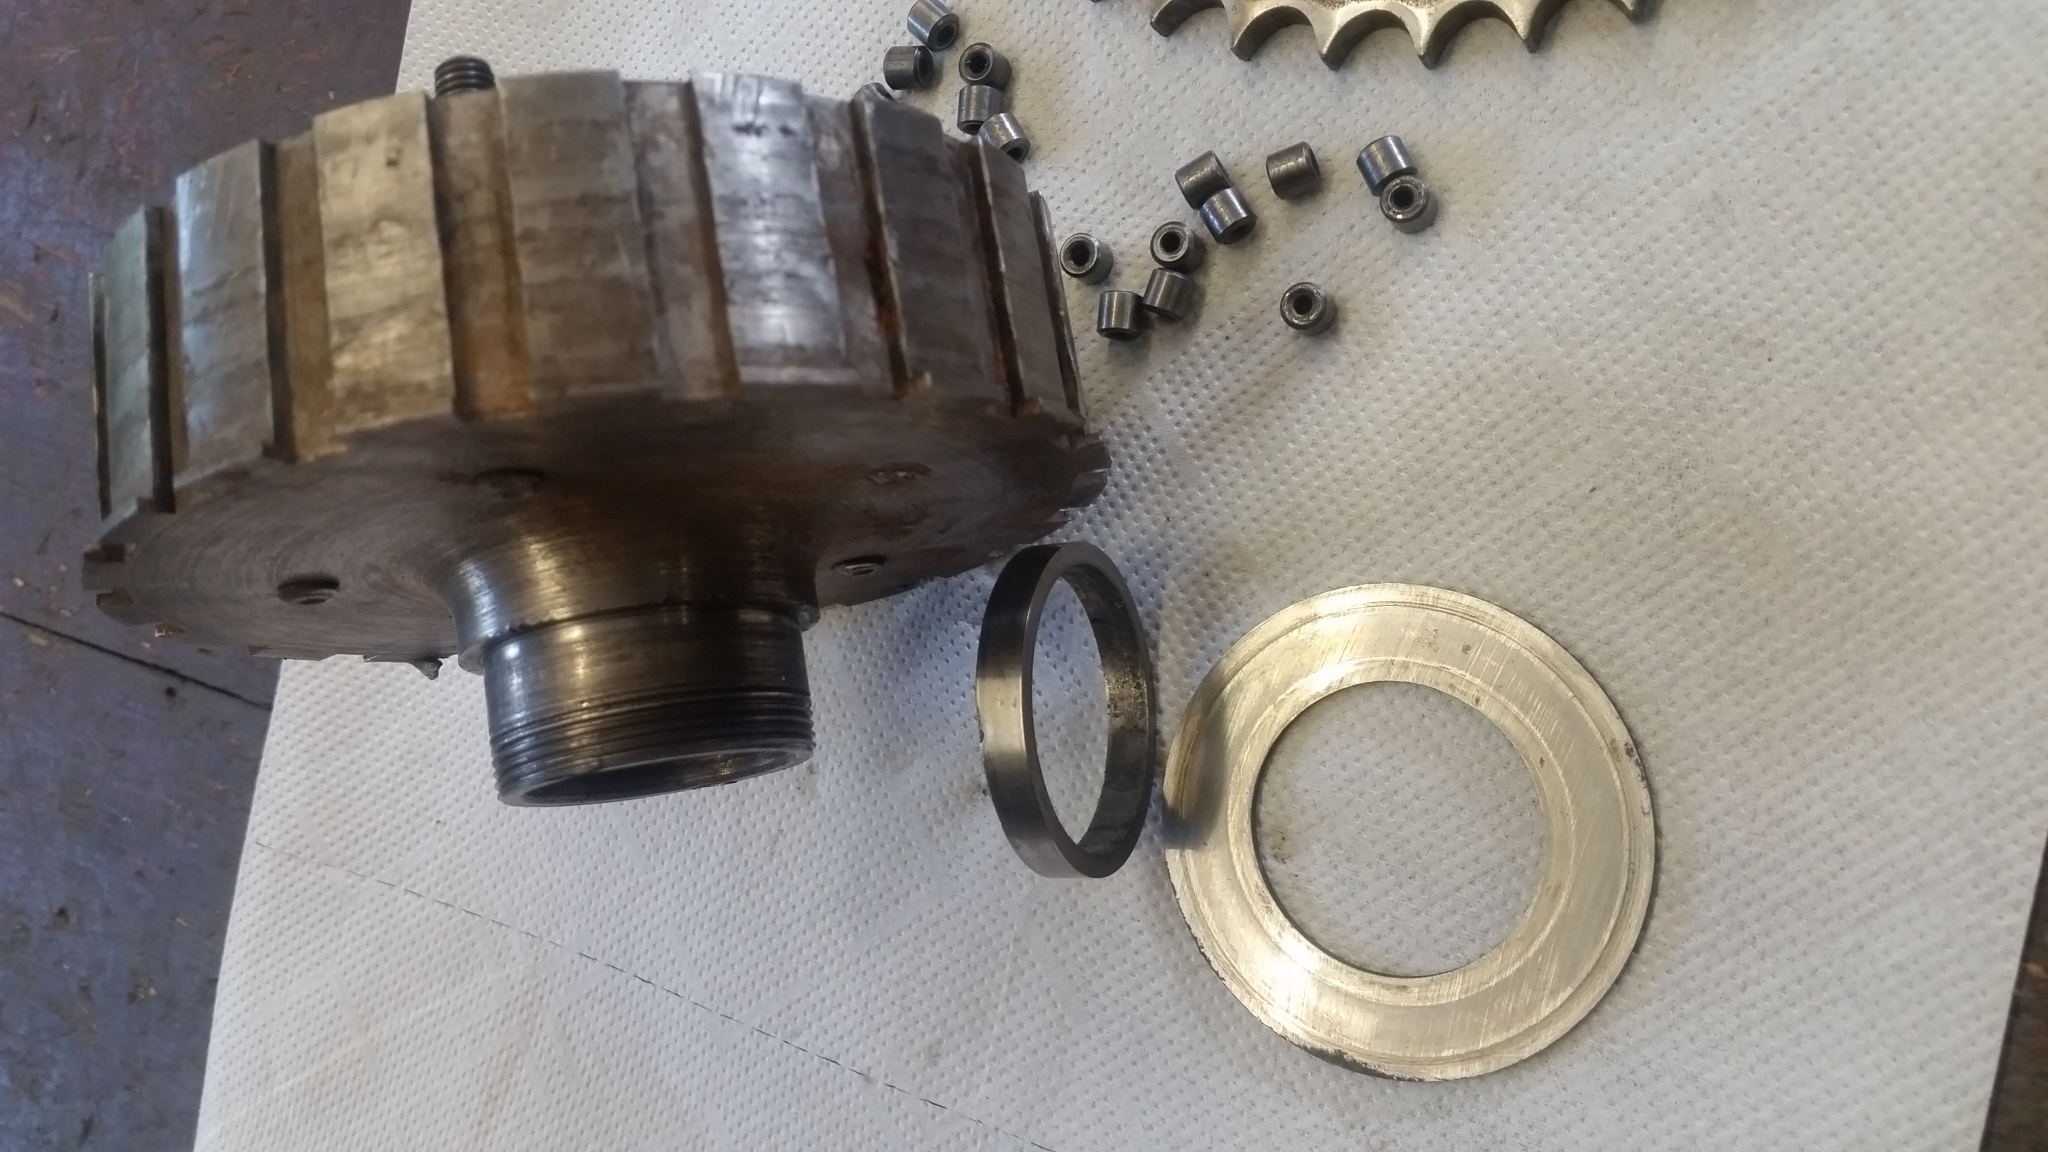
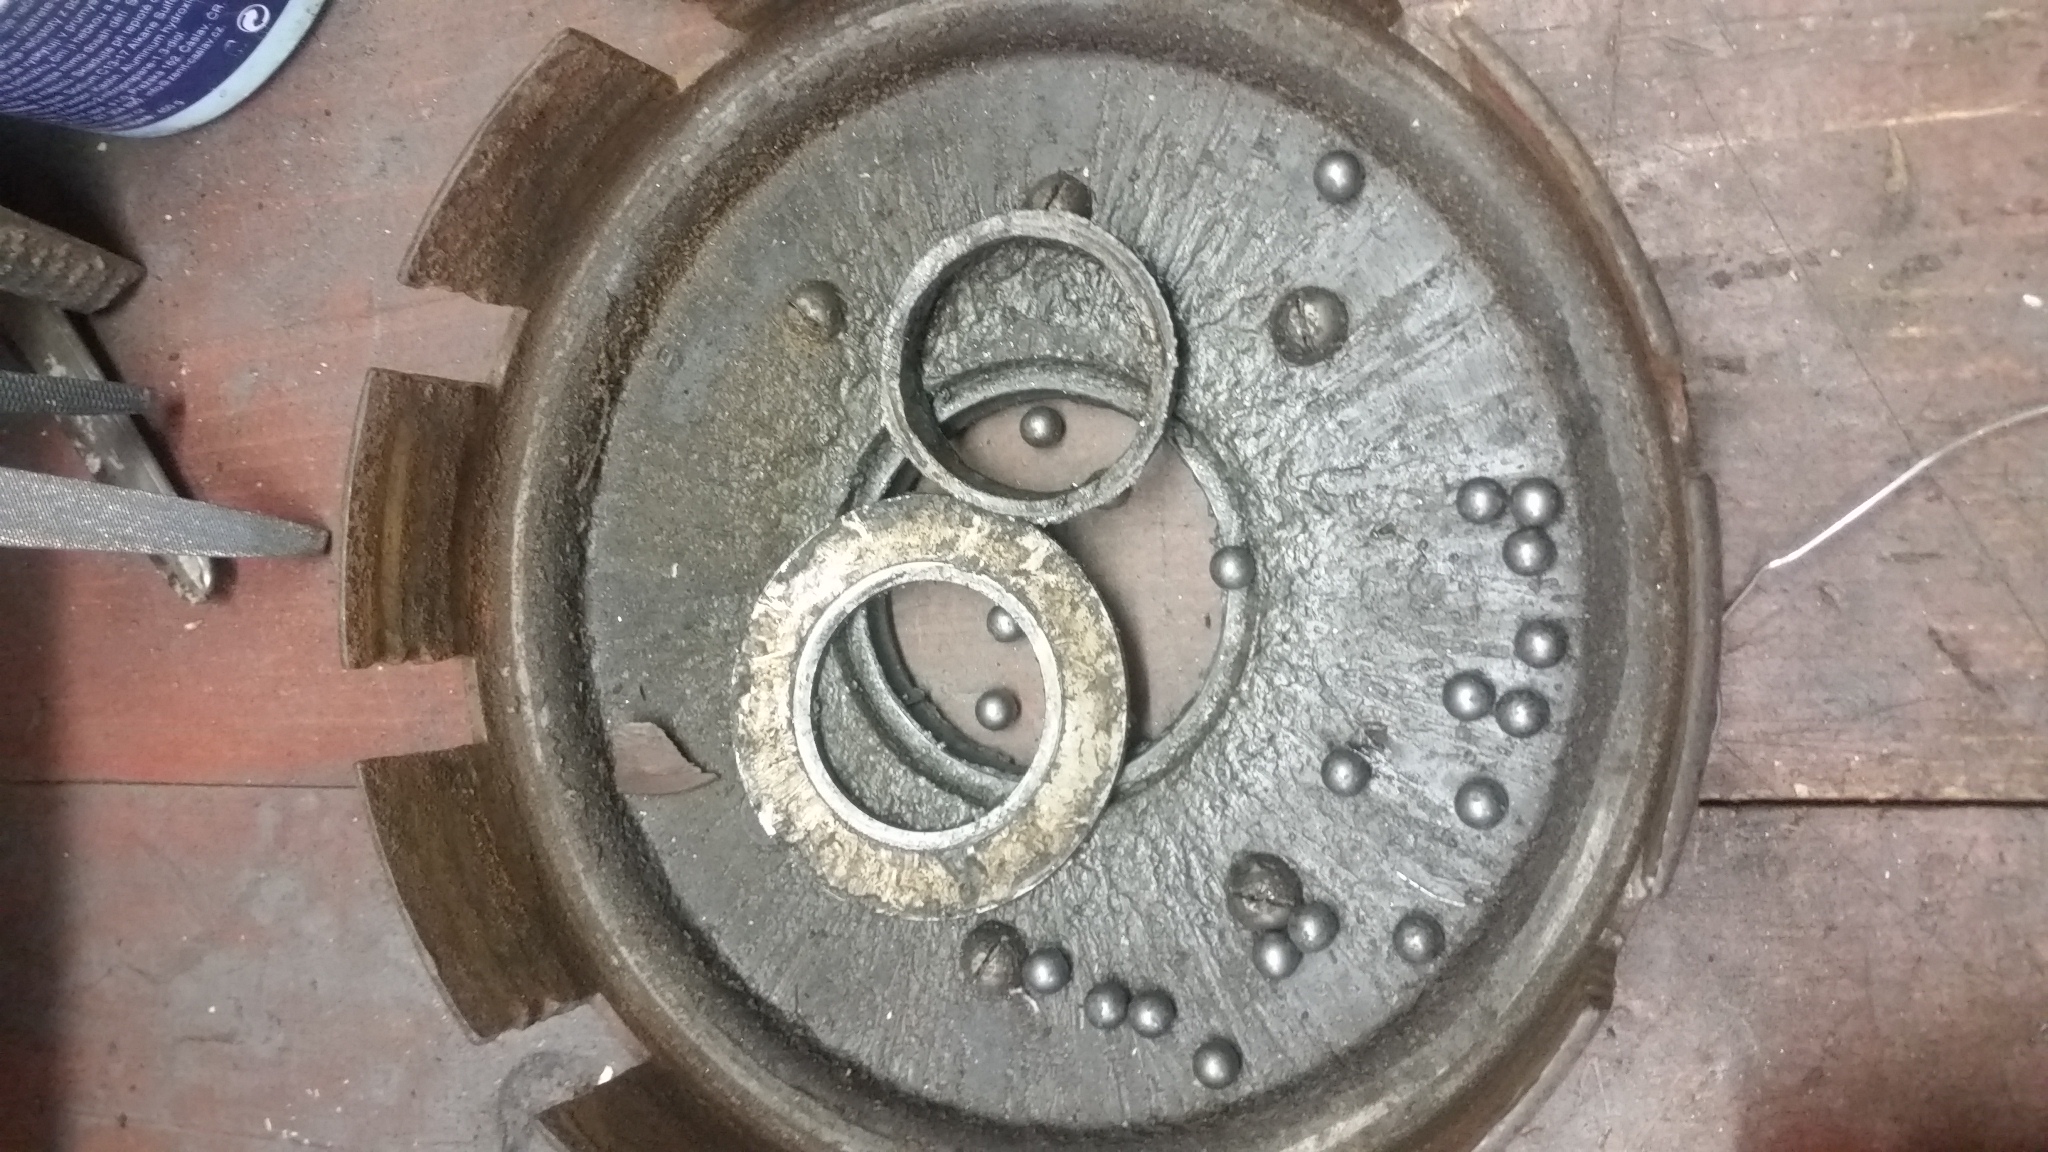
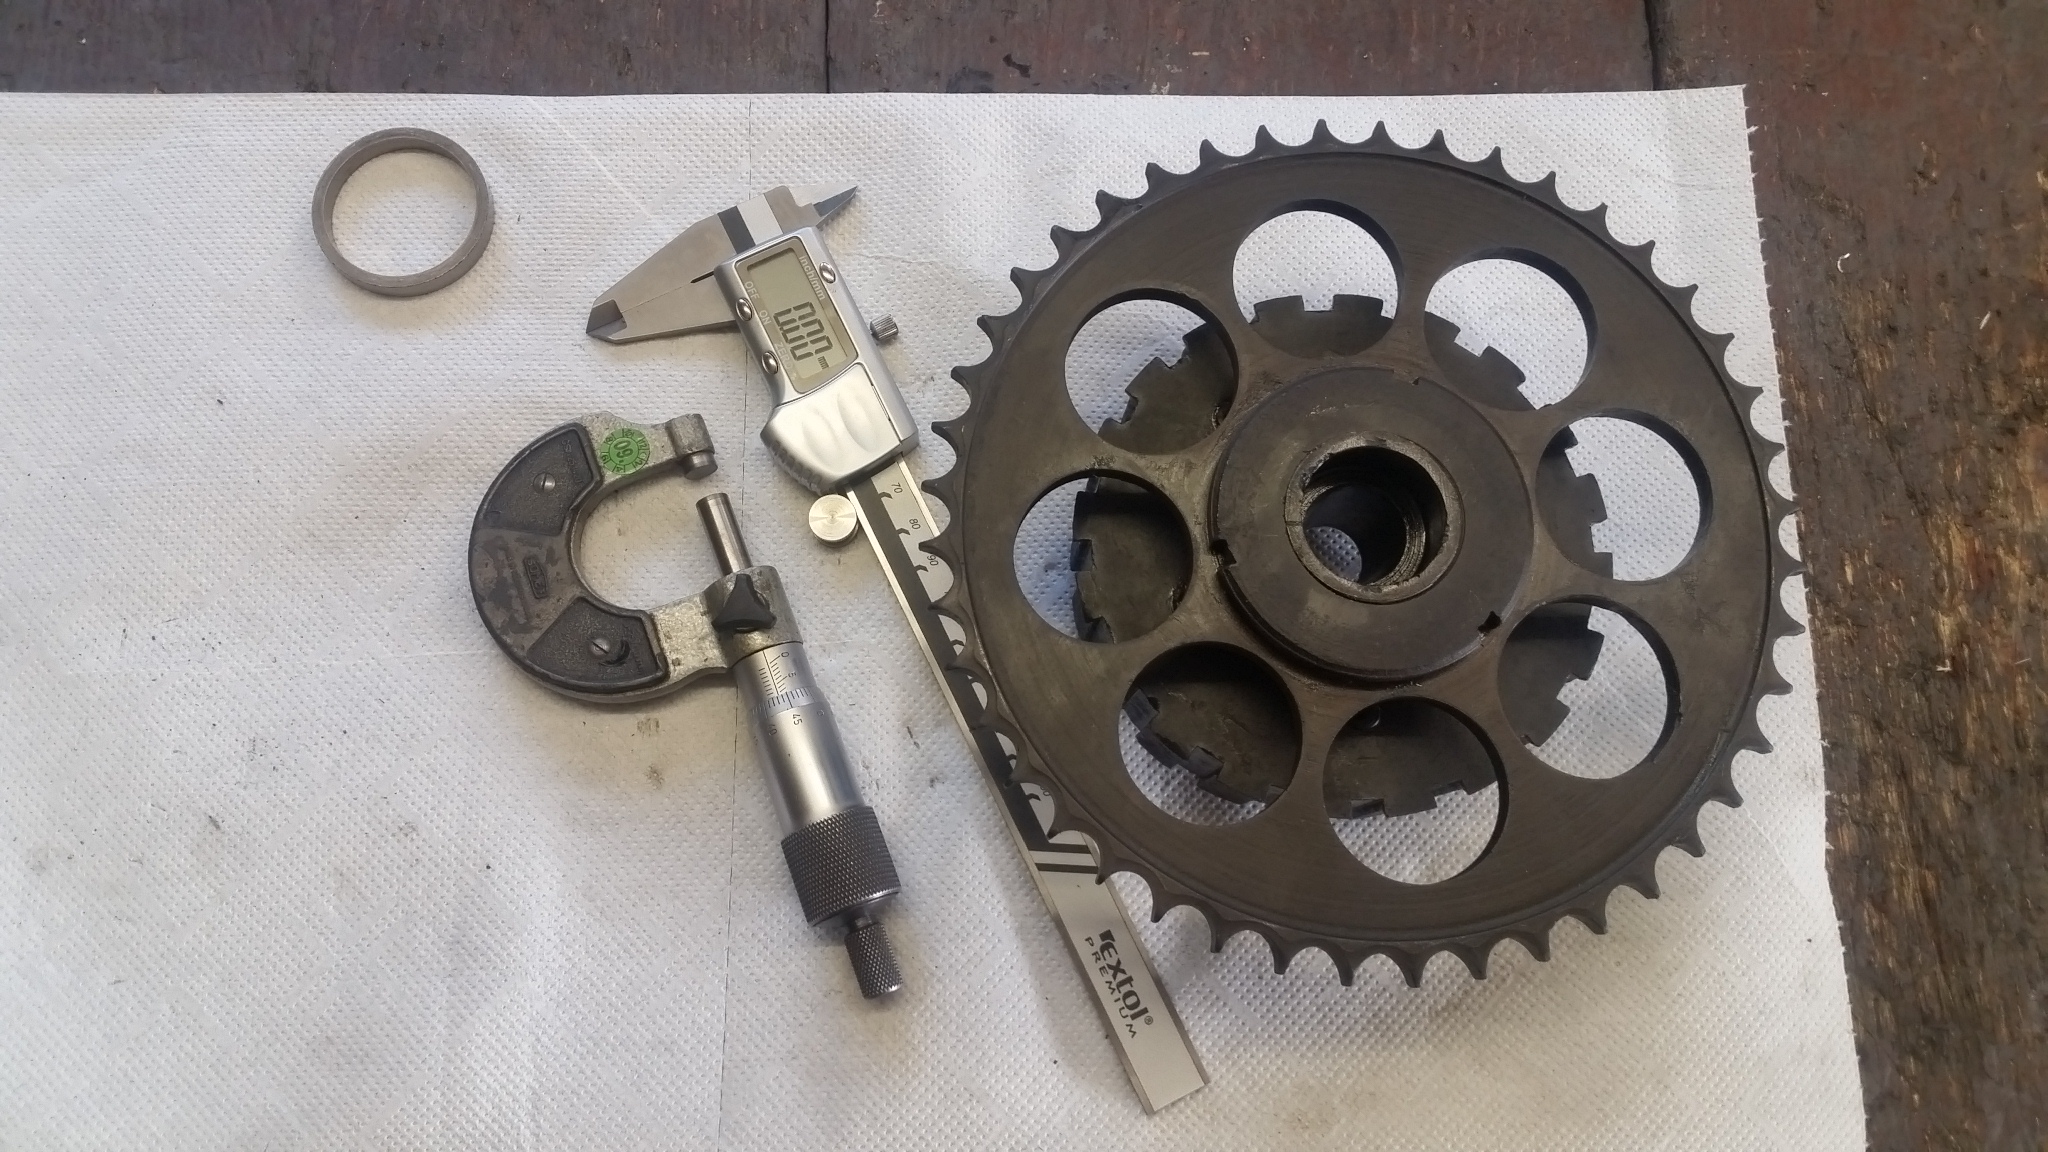
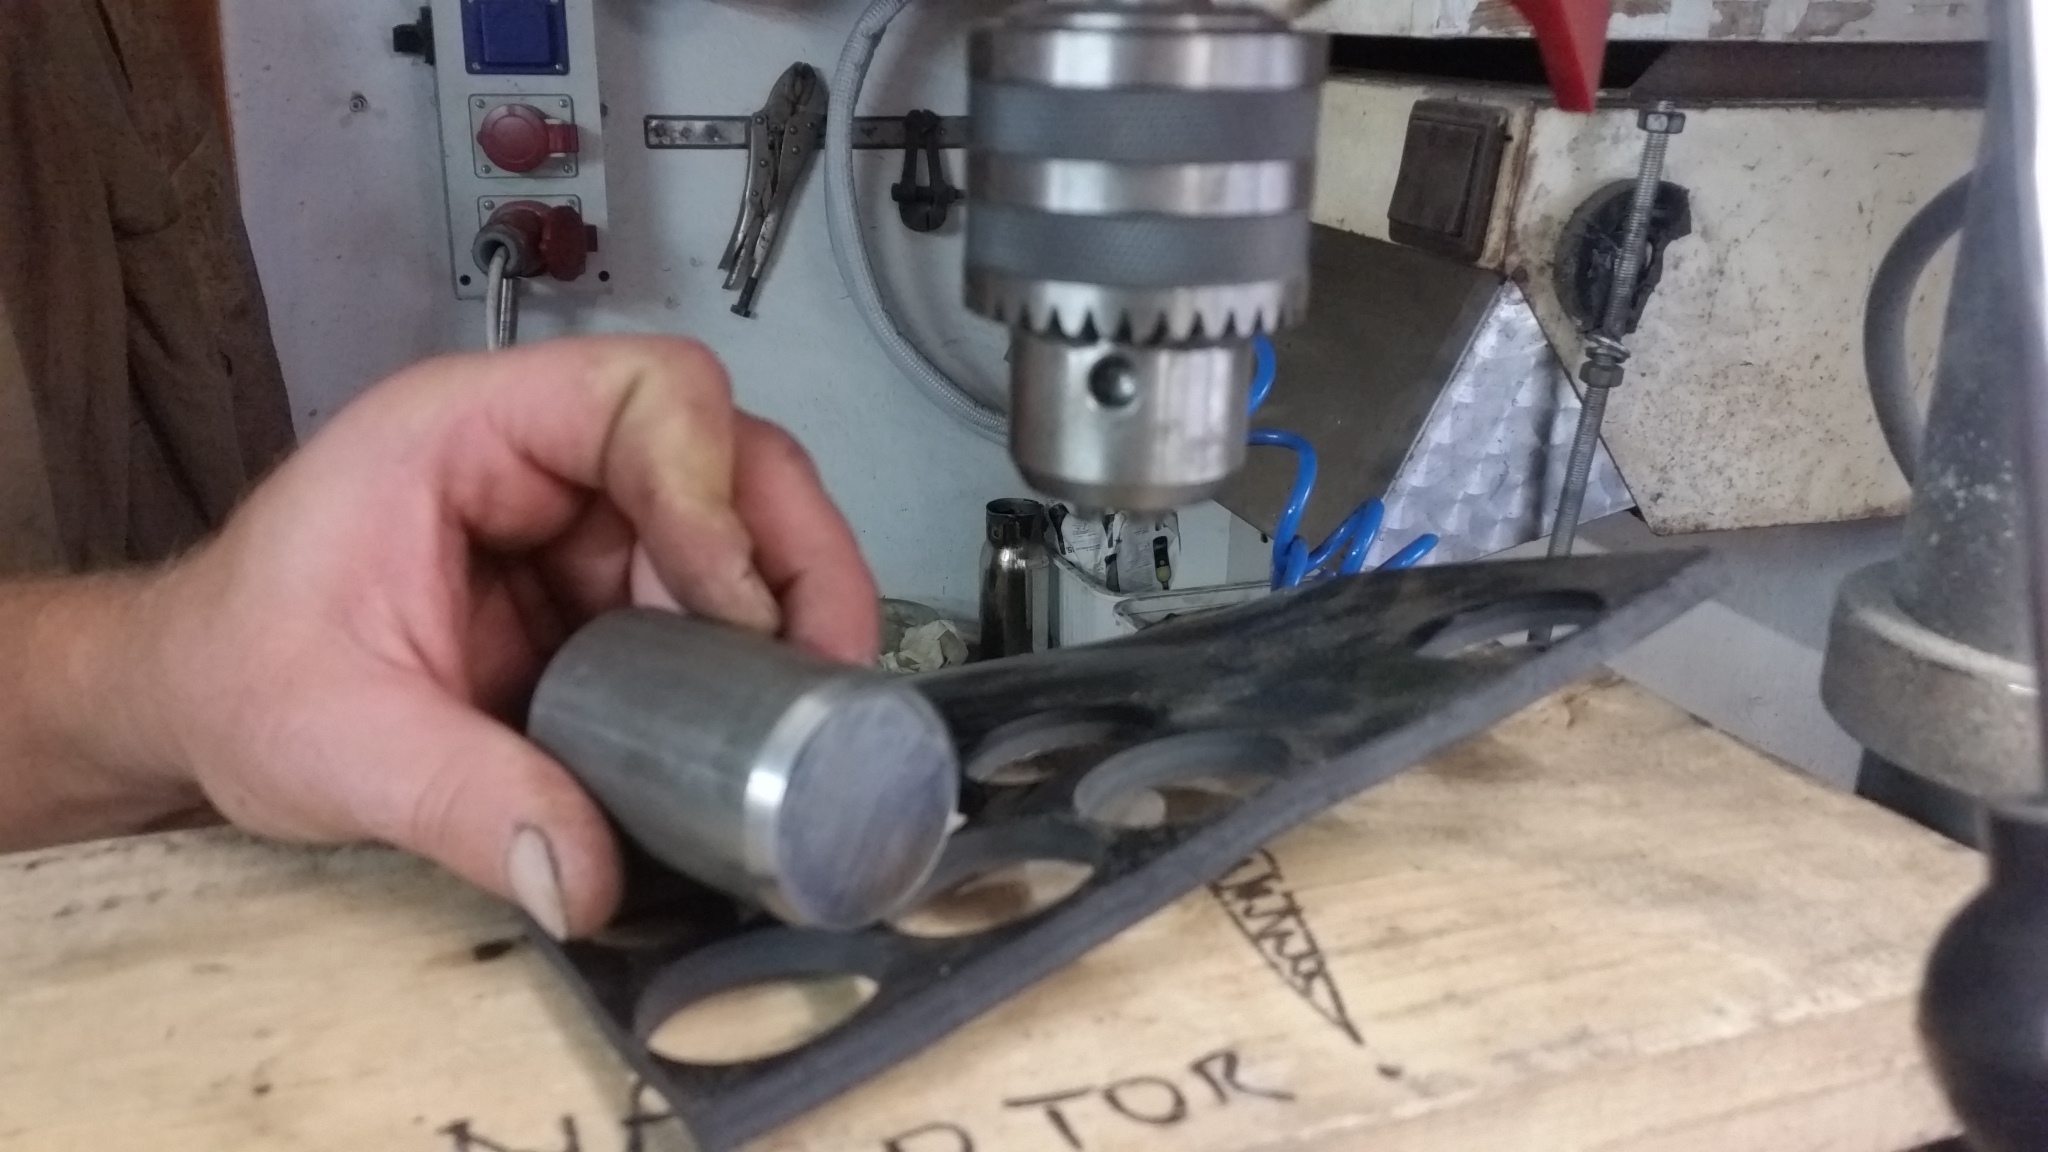
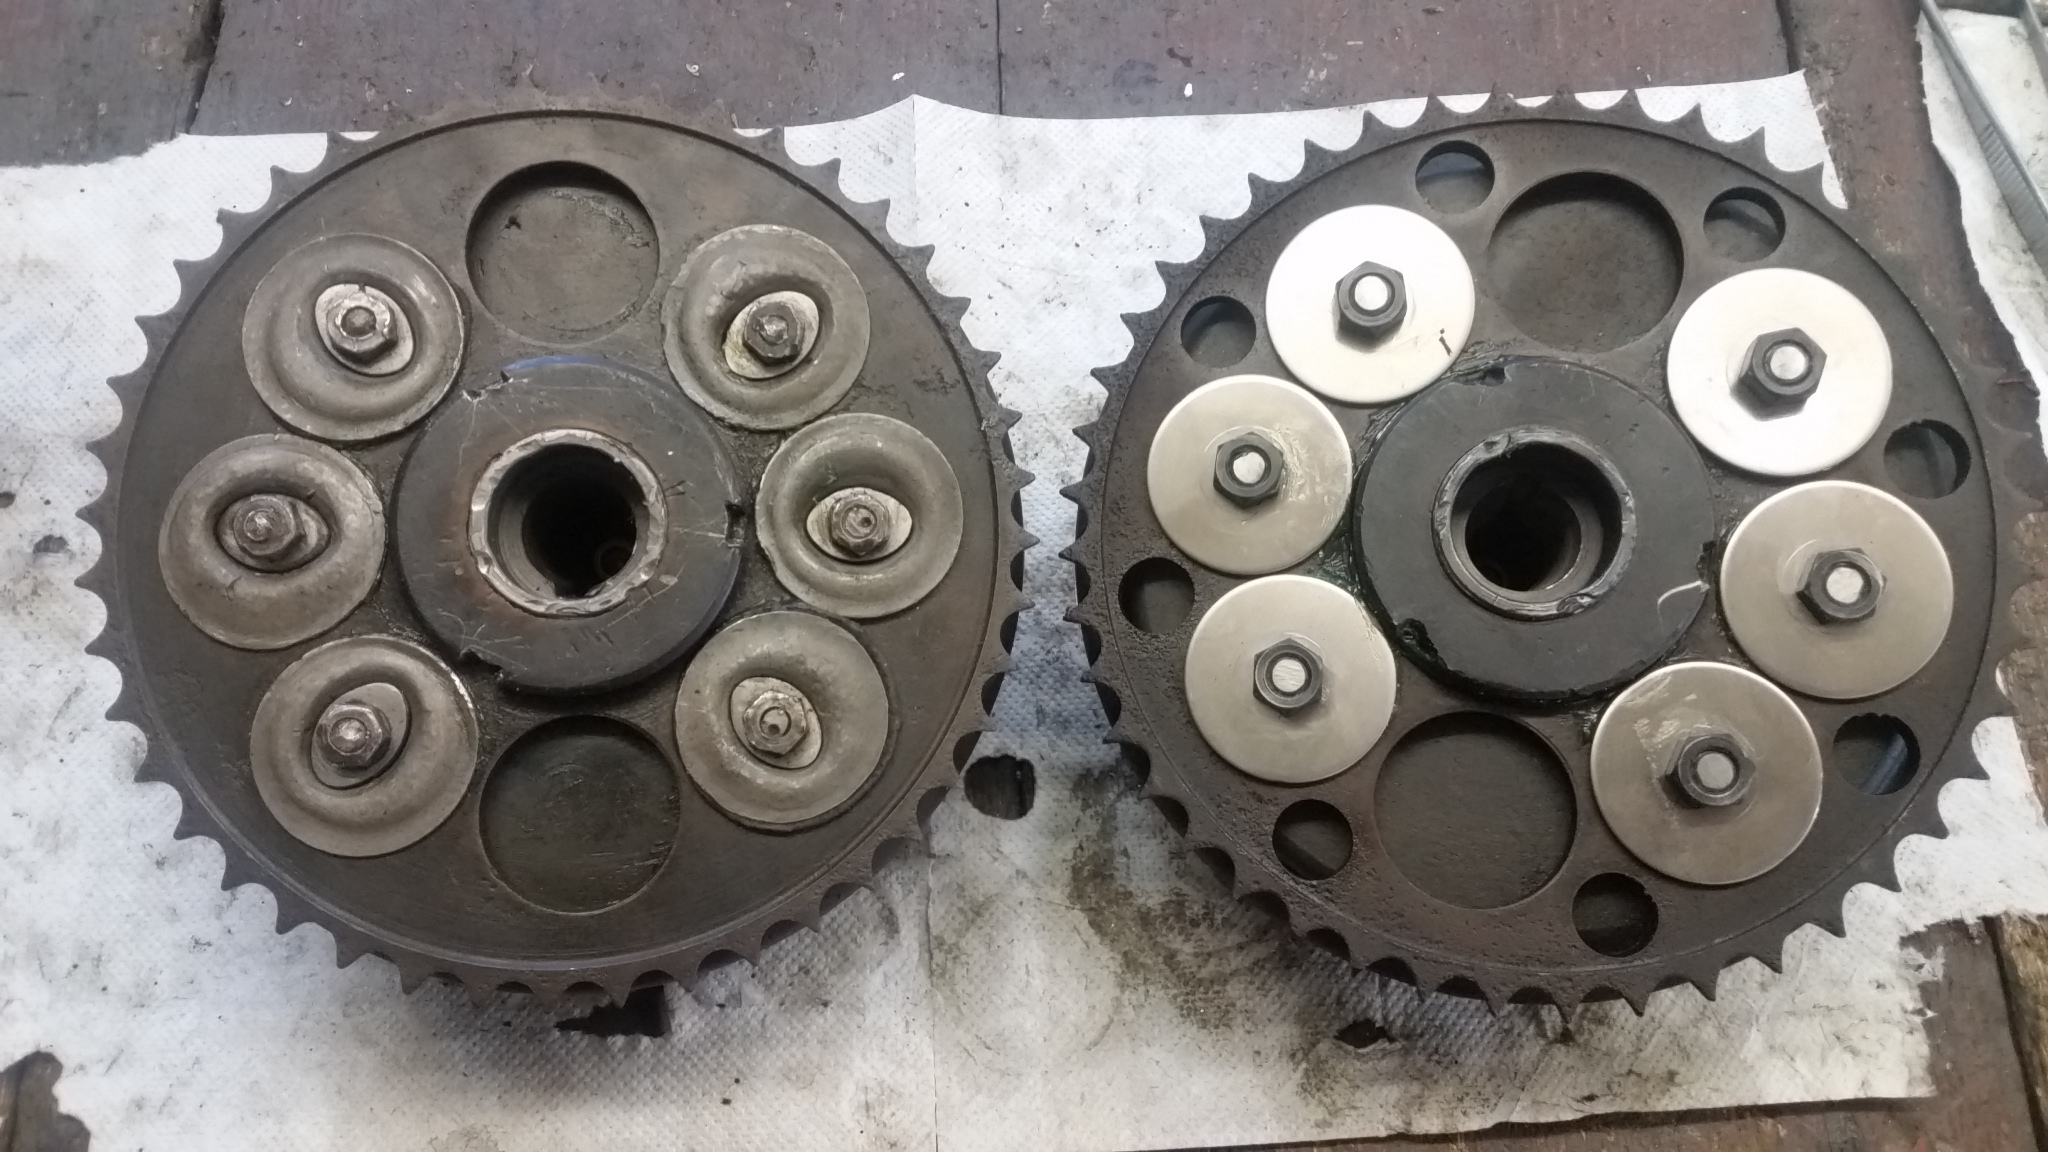
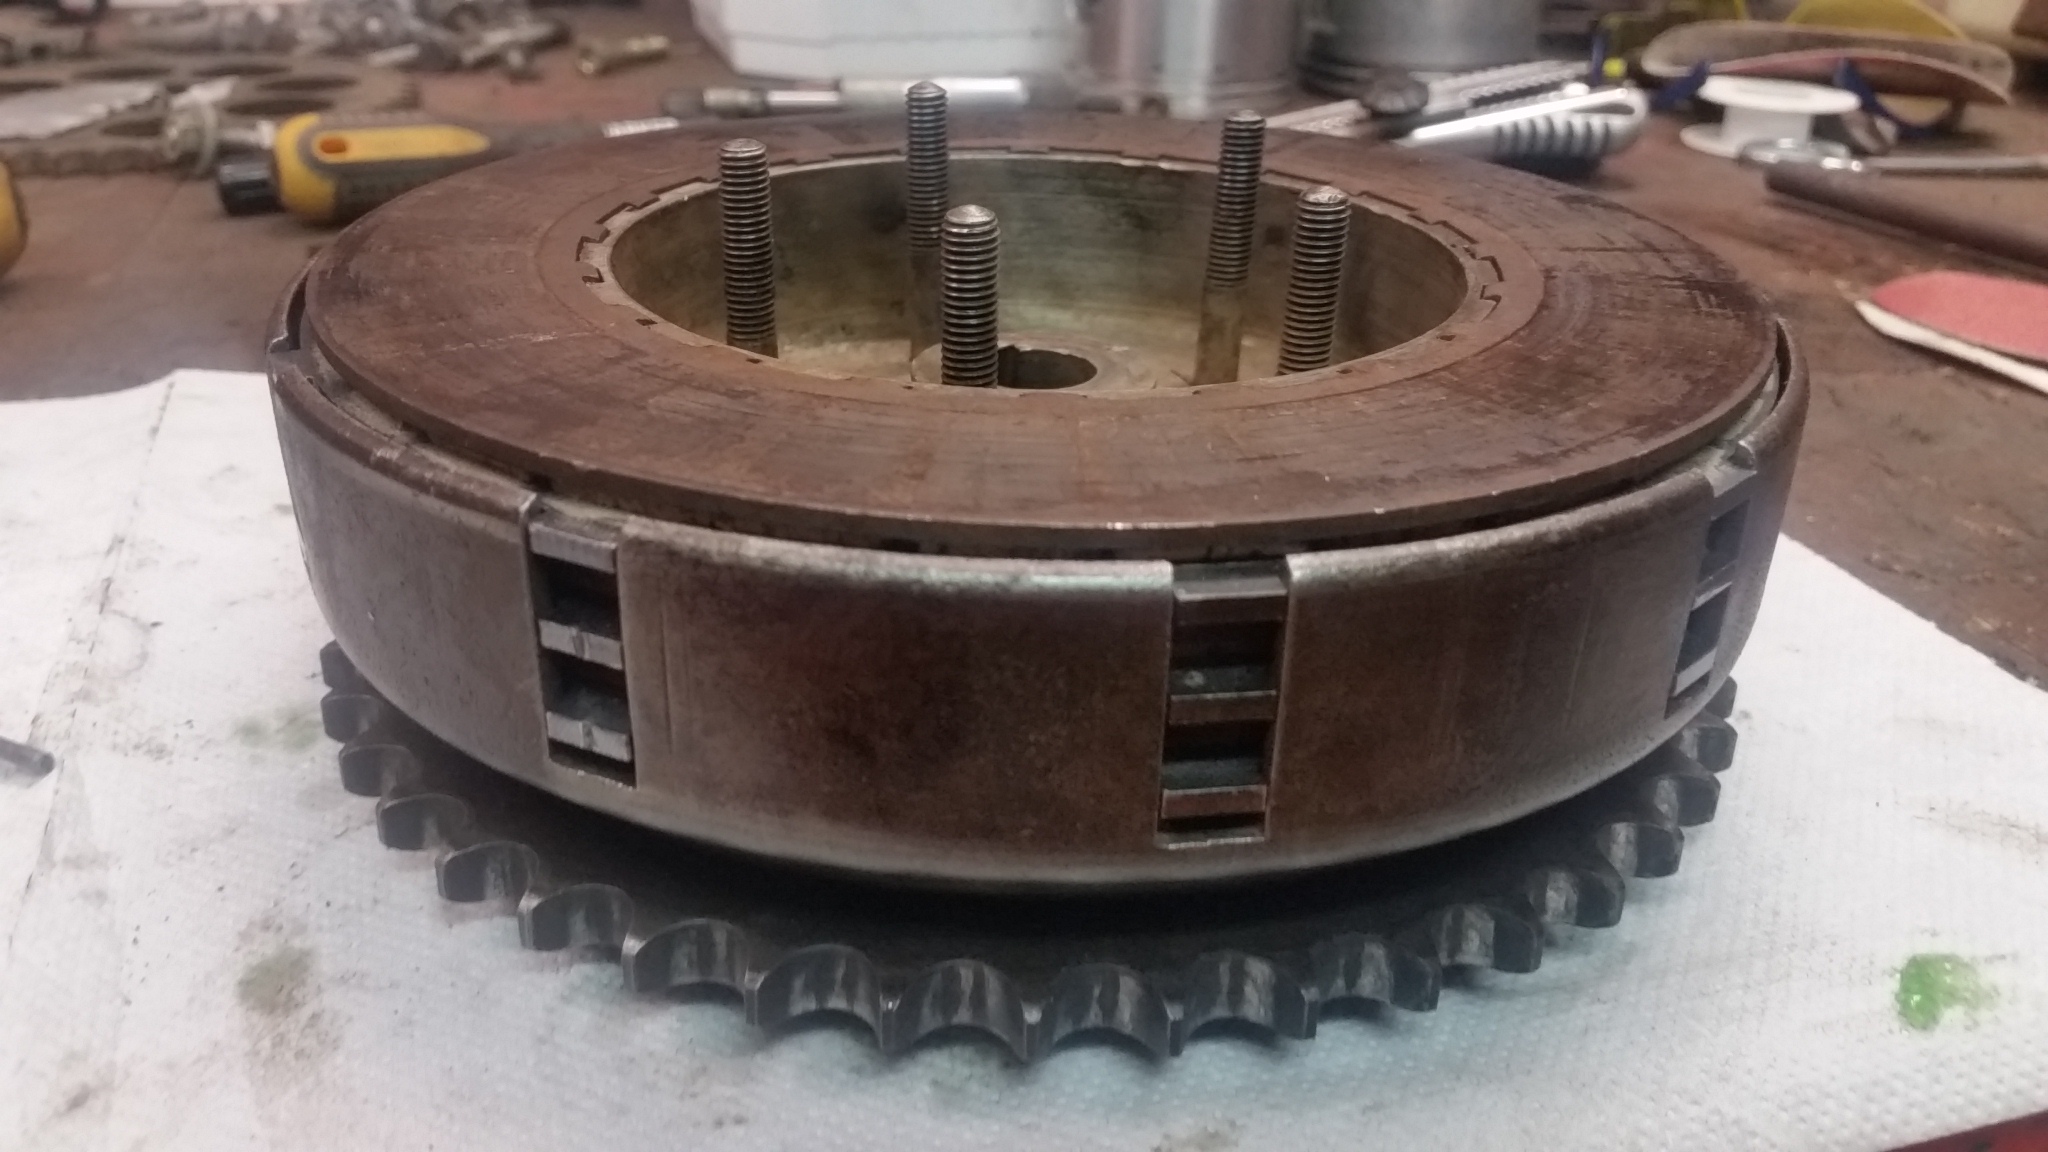
Oprava lamiel nestačí. Základom je spojkové ložisko. Rozoberte teda spojku na samotné súčasti. Začnite povolením piatich skrutiek, ktoré držia prítlačný tanier. Po ich odskrutkovaní bude možné odobrať korkové aj plechové lamely a v strednej časti sa objaví matica, ktorá drží spojku na kuželi hlavného hriadeľa prevodovky. Povoľte ju a stiahnite spojku z prevodovky. Zo zadnej strany je v strednej časti veľká matica spojkového ložiska. Zaistite stredový unášač a povoľte maticu. My sme na zaistenie stredového unášača použili prípravok vyrobený zo starej plechovej lamely. Snažte sa nepoškodiť maticu. Je kalená a v spojke pracuje ako vrchný prítlačný krúžok valčekového ložiska. Po zmontovaní matice sa objaví spojkové ložisko a oddelí spojkový kôš od stredového unášača. Dajte pozor na valčeky spojkového ložiska! Nebude ich už nič držať spolu a mohli by sa Vám rozsypať.
Repairing only the clutch plates is not enough. The basis is the clutch bearing. The clutch needs to be taken apart and you should start by loosening five nuts holding the pressure plate. After that you will be able to remove the cork and metal plates. In the middle a nut will appear which holds the clutch on the main gearbox shaft. Loosen it and pull the clutch of the gearbox. In the middle of the rear side there is a big nut of the clutch bearing. Secure the inner clutch hub and loosen the nut. We used a tool made of the old clutch plate to secure the hub. Try not to damage the nut. It is hardened and in the clutch it functions as a press ring of the roller bearing. After removing the nut a clutch bearing shows up and separates the clutch basket from the hub. Watch out for the rollers of the clutch bearing. Nothing will hold them together now and they may scatter around and get lost.
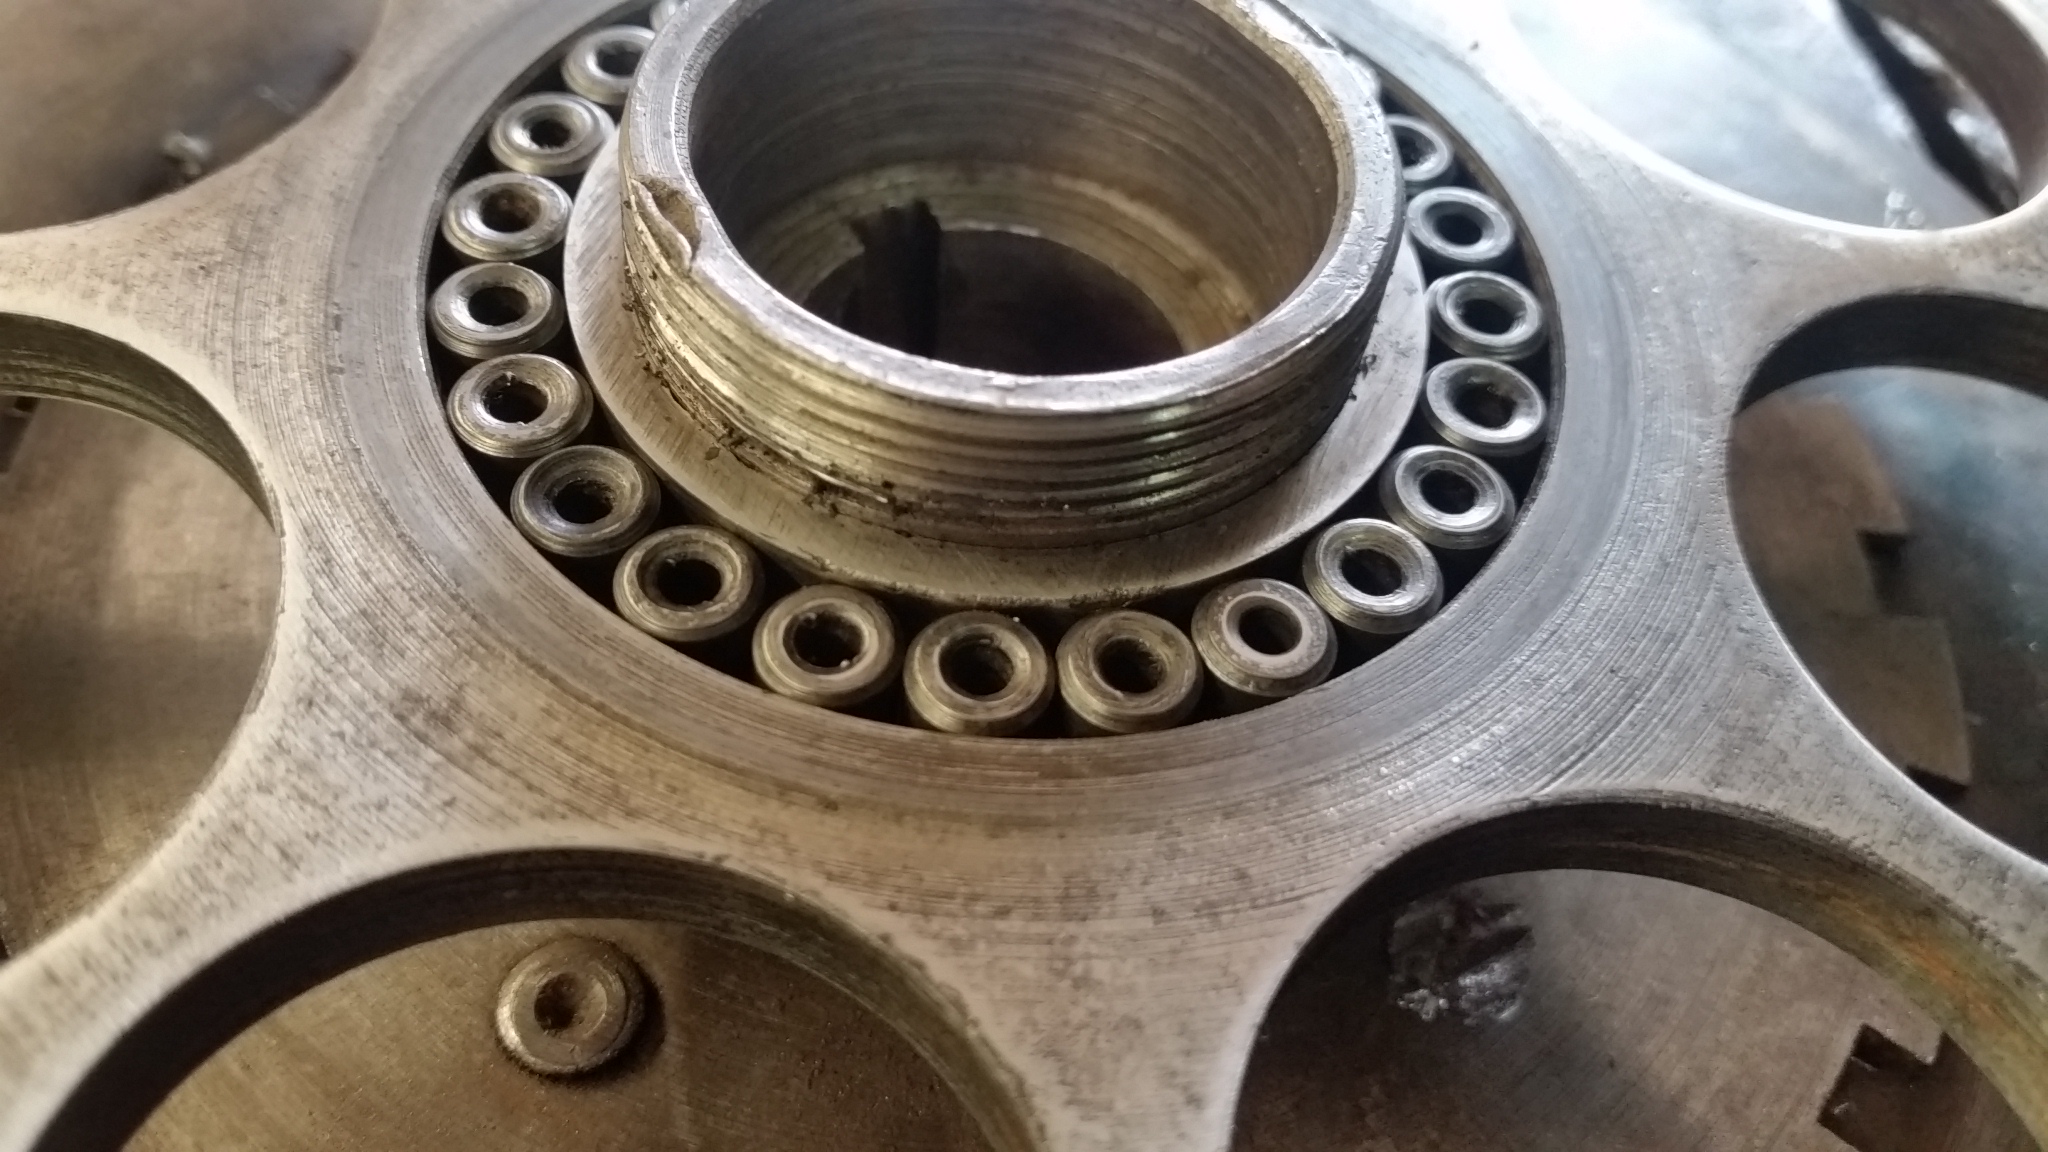
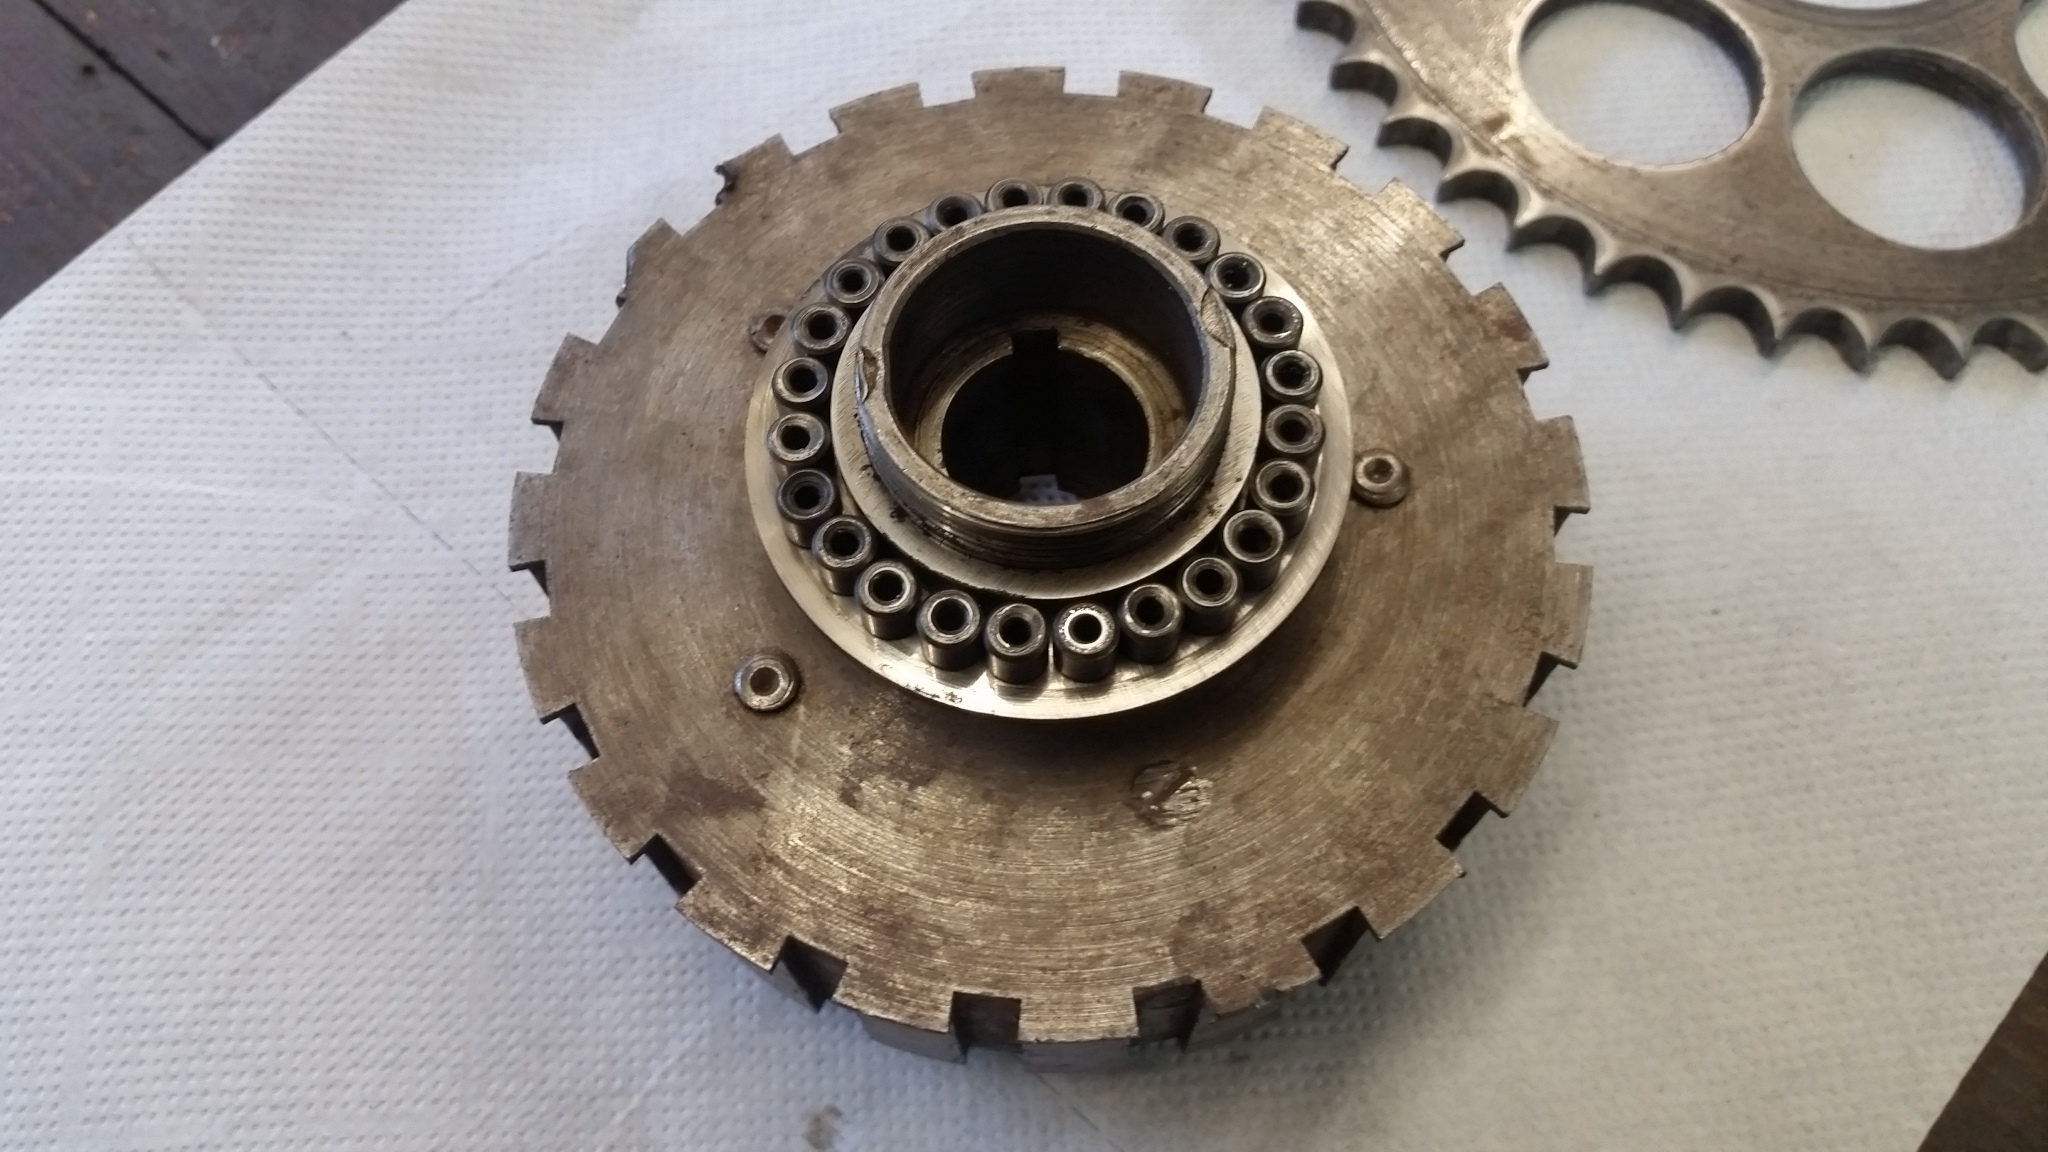
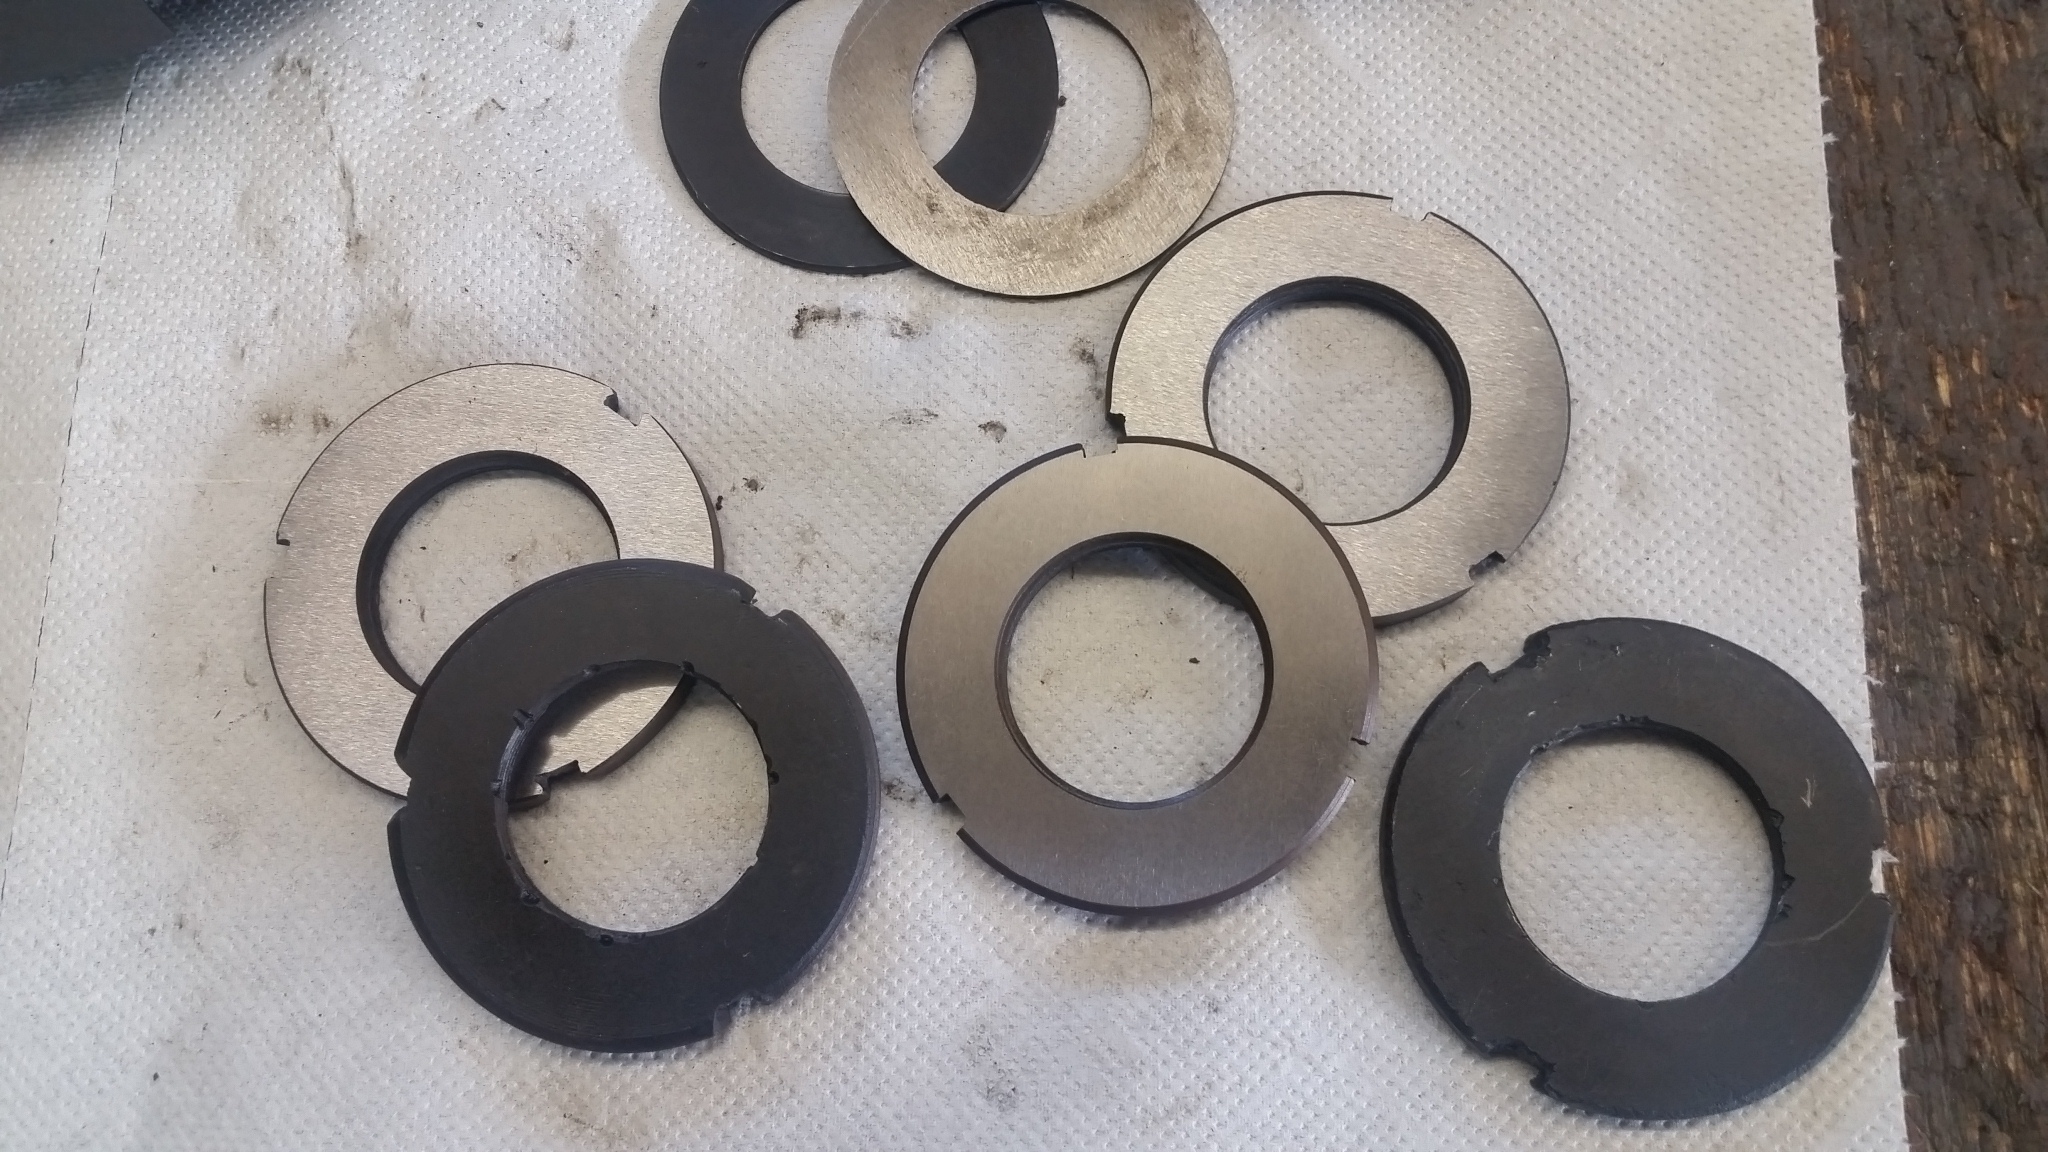
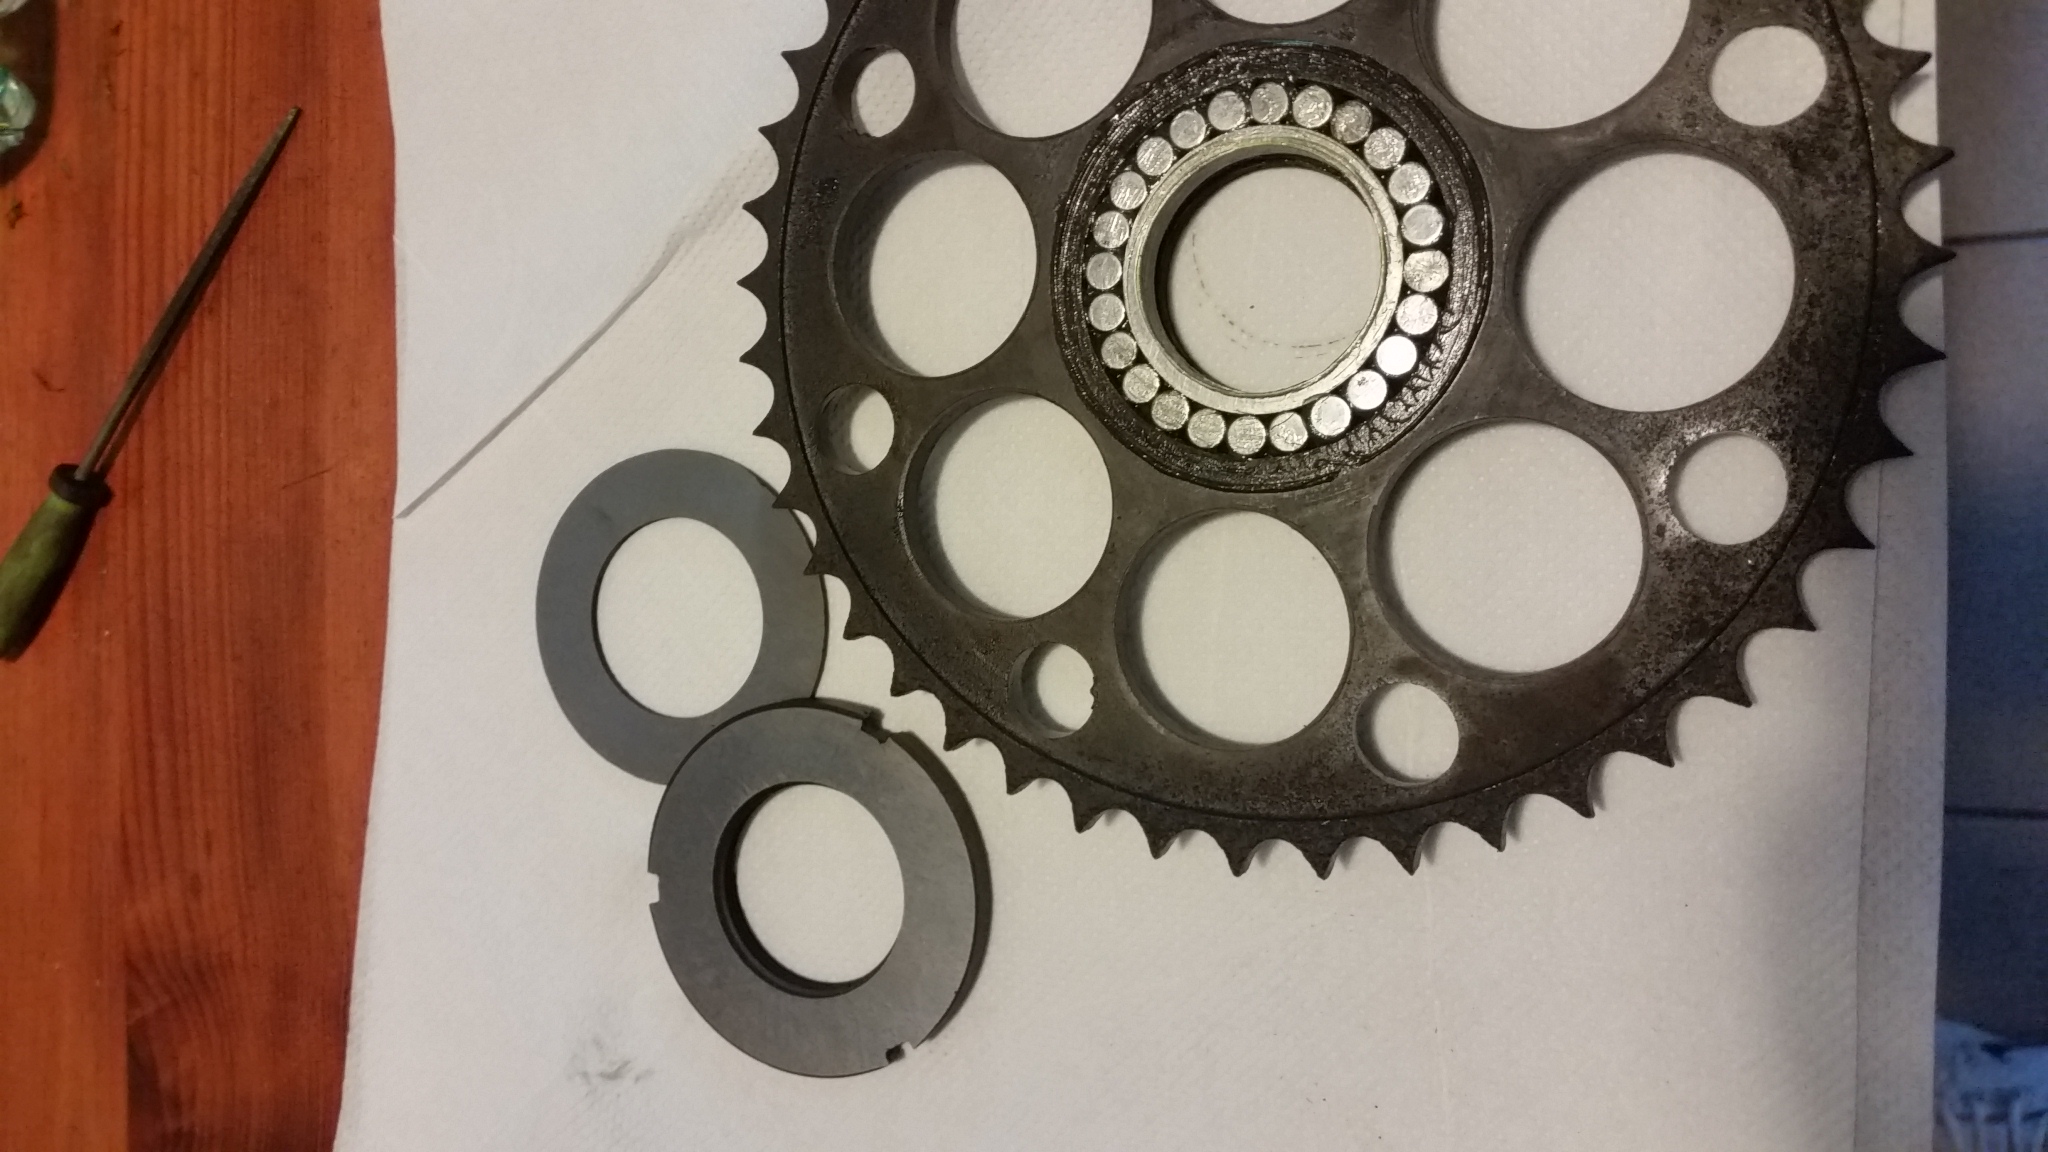
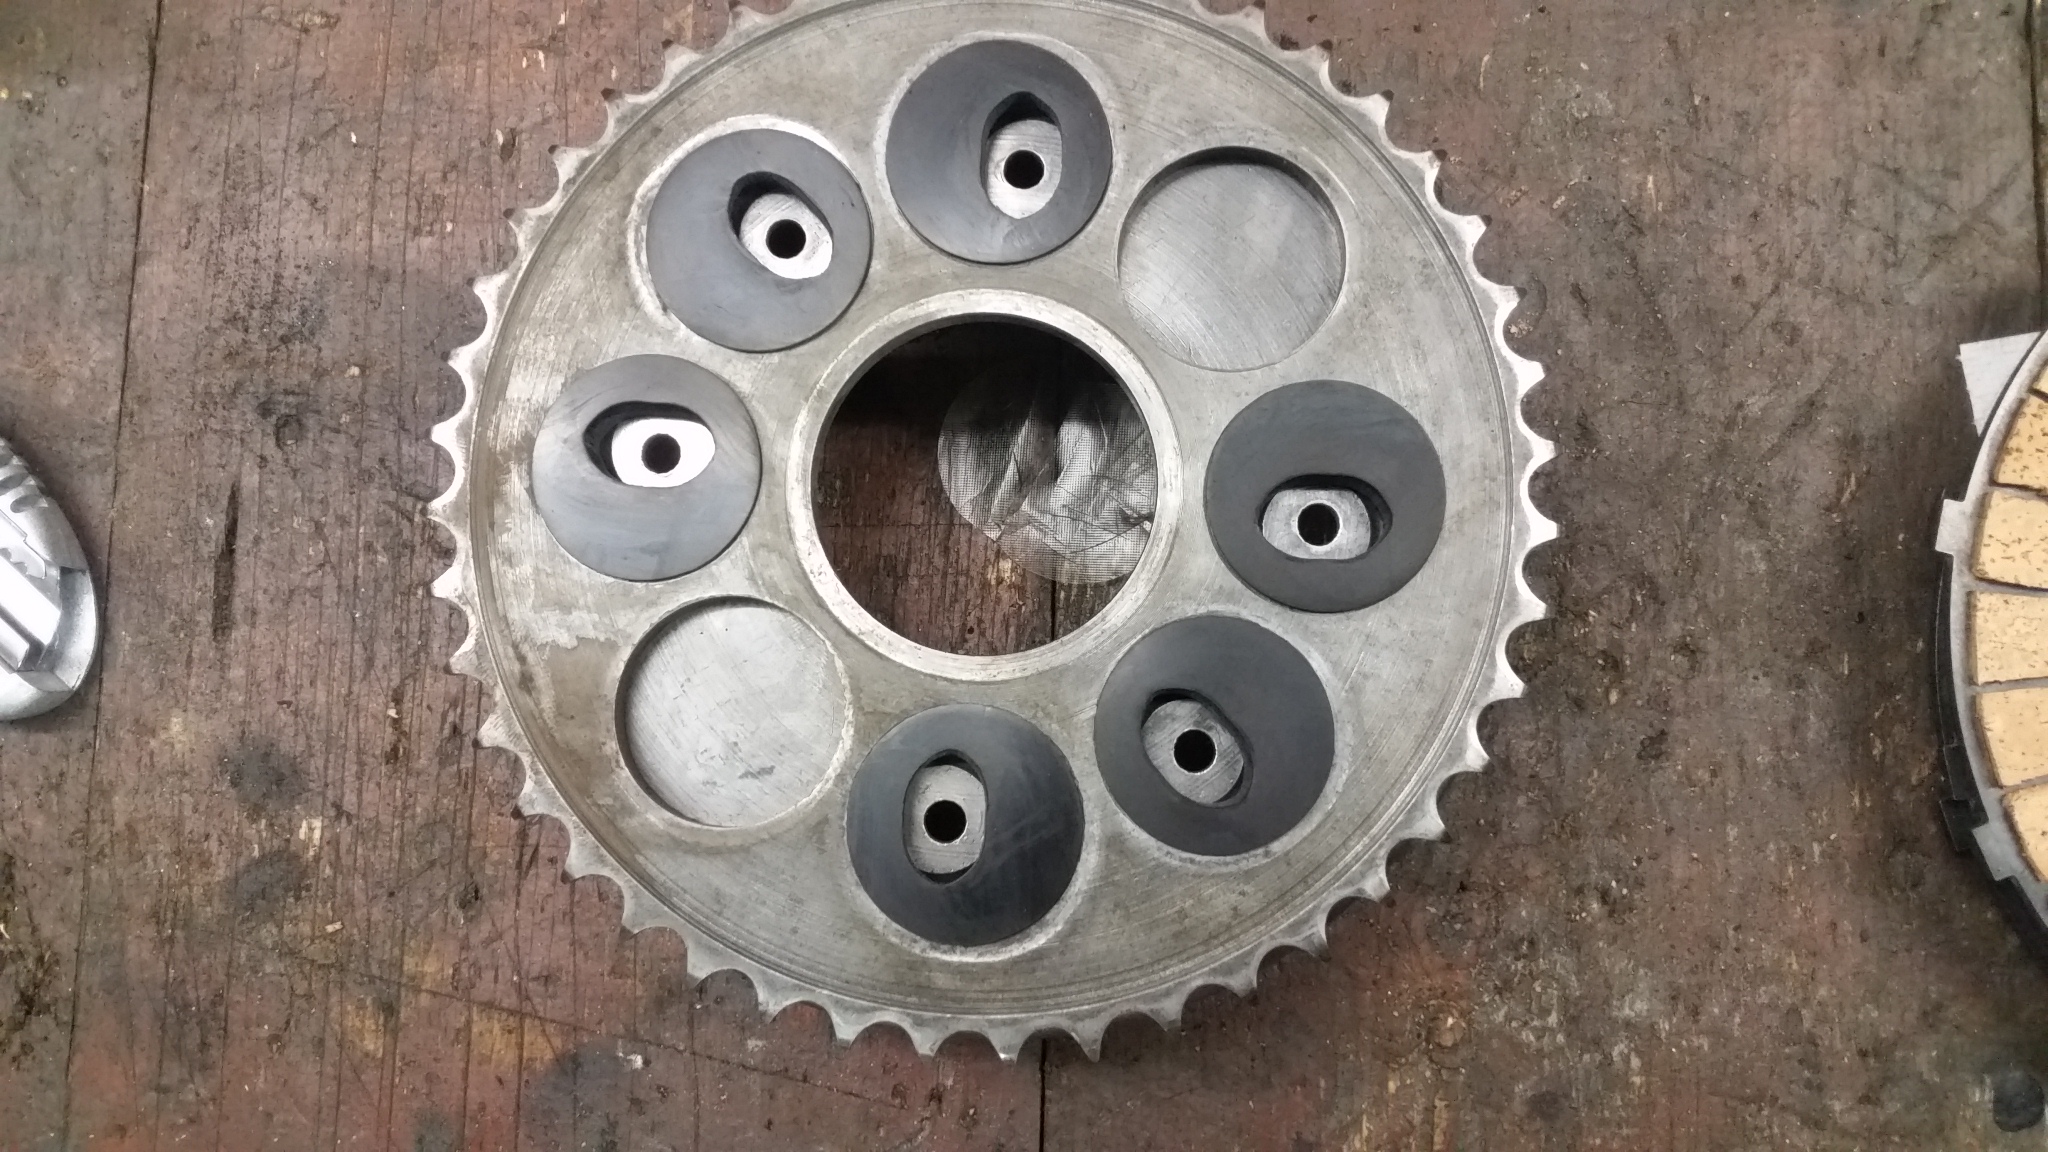
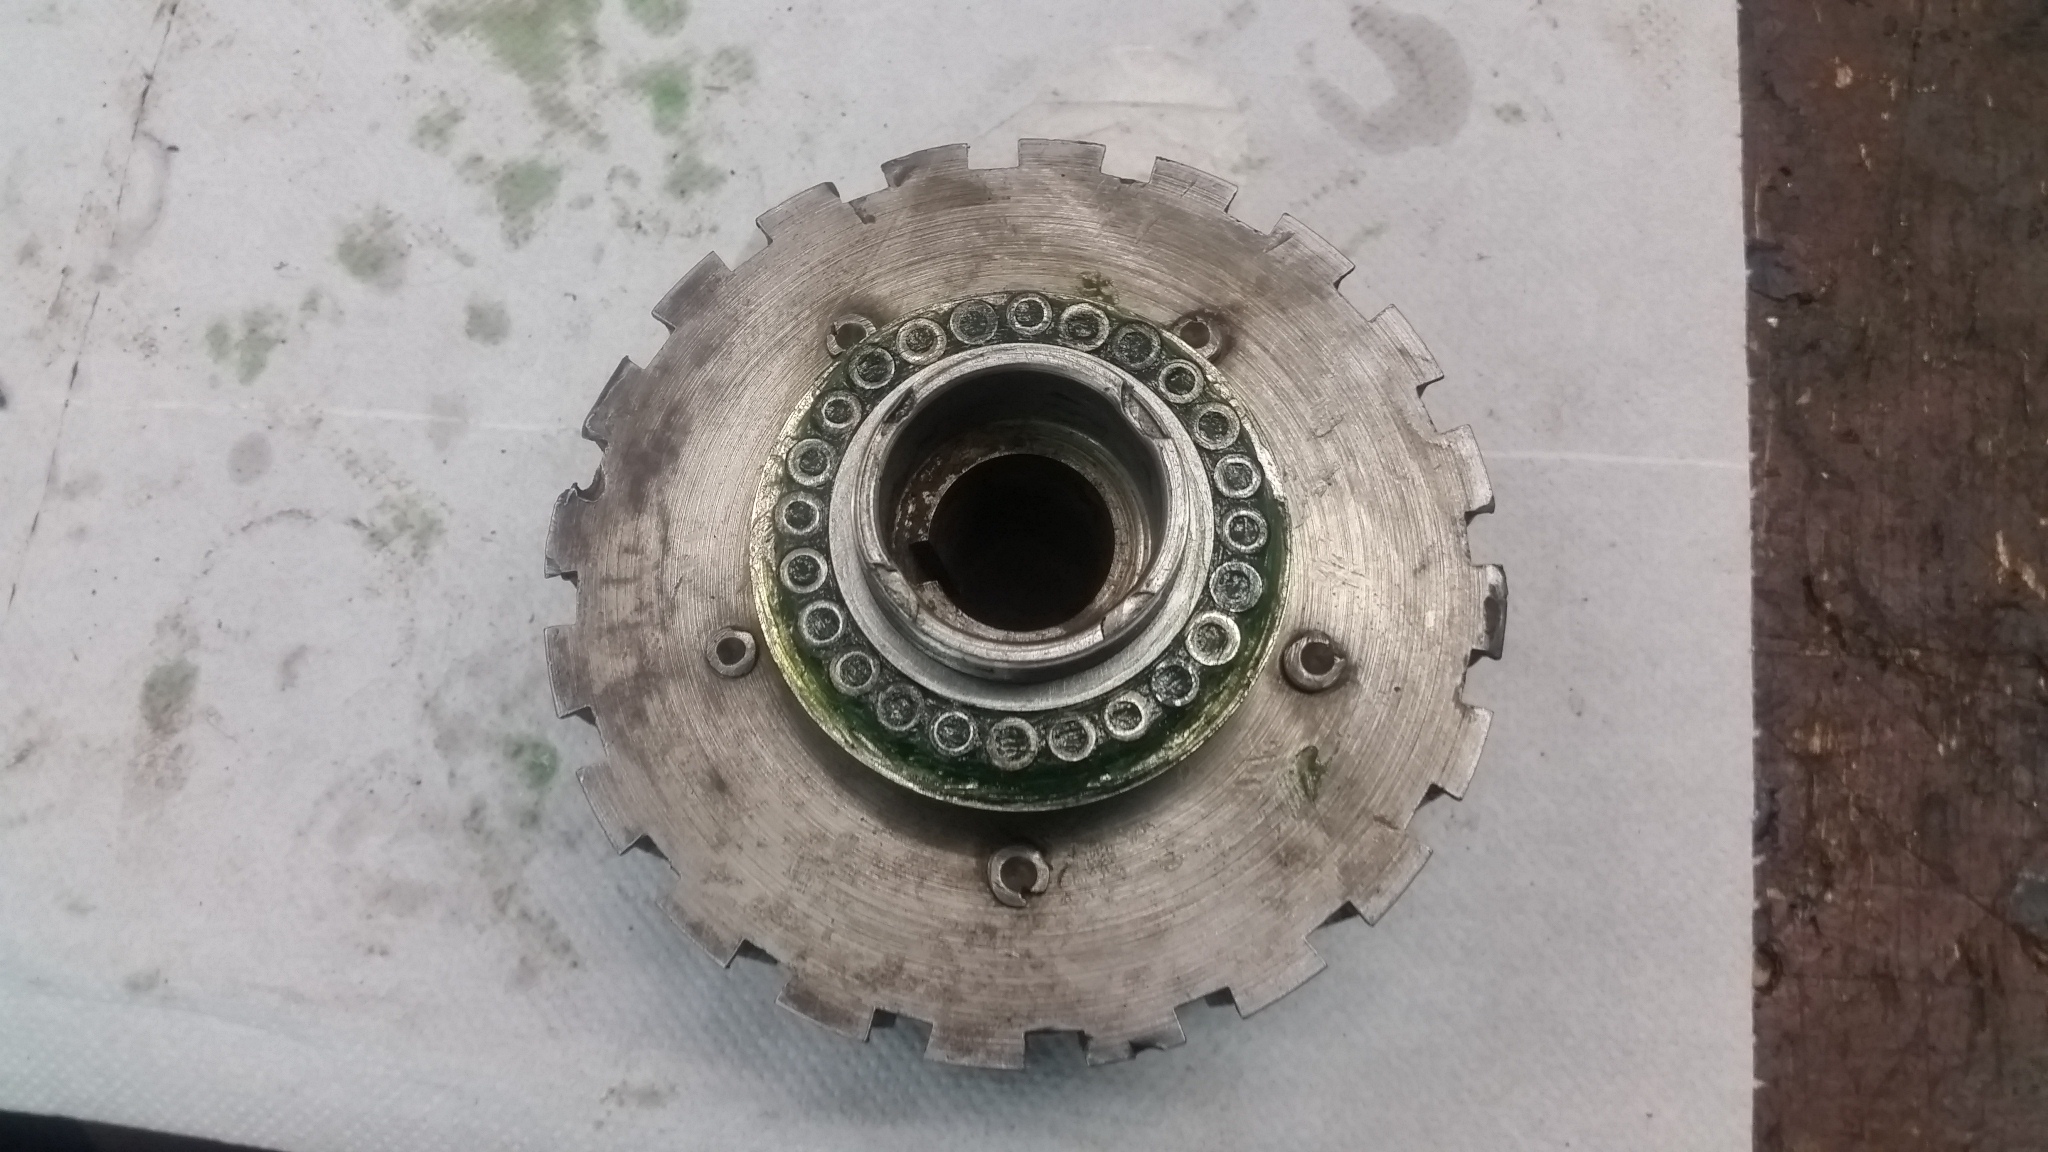
Zo stredového unášača oddeľte vnútorný krúžok ložiska a spodnú podložku ložiska. Zostáva Vám už iba povoliť šesť skrutiek zaisťujúcich ozubené koleso spojky k spojkovému košu. Pod plechovými položkami sa nachádza gumové odpruženie. Oddeľte ho od ozubeného kolesa. Spojku máme rozobratú, môžeme začať s kontrolou súčiastok.
From the center hub the inner bearing ring and a lower spacer needs to be removed. Now you only need to loosen the six nuts securing the clutch gear wheel to the clutch basket. Under the metal plate spacers a rubber cushioning is placed. Separate it from the gear wheel. The clutch is now dismantled and we can go on with the inspection of its parts.

Po odstránení mastnoty a zbytkov nečistôt sa pokúste zložiť spojkové ložisko (bez spojkového koša). Spodnú podložku a vrchnú maticu ložiska je potrebné nechať prebrúsiť na plocho. Skontrolujte obežnú dráhu na ozubenom kolese. Ak ste našli poškodenie, je potrebné nechať prebrúsiť aj otvor. Je to obežná dráha a ak by ste tento krok vynechali, poškodia sa Vám časom valčeky a proces opravy spojky budete musieť zopakovať.
After cleaning of the grease and dirt try to assemble the clutch bearing (without the clutch basket). The lower spacer and top bearing nut needs to be grinded flat. Check the roller track on gear wheel. If damaged you need to have the opening to be grinded smooth. If you would skip this step the rollers would damage with time and the whole procedure of the clutch repair will have to be repeated.
.
Originálne valčeky majú priemer 1/4 palca a majú stredovú dierku, v ktorej sa zachytávalo mazivo. Na našom trhu sa dajú zohnať valčeky iba bez otvoru. 1/4 x 1/4 sú teda o trochu vyššie ako originál a budeme ich musieť upraviť. Ak je vonkajšia obežná dráha veľmi poškodená a budete musieť trochu viac brúsiť, použite plusové valčeky. Sú v ponuke 6,5 mm x 6,5 mm. Zmerajte prebrúsený otvor ozubeného kolesa, pripočítajte 2 krát rozmer valčekov a vypočítajte veľkosť vnútorného krúžku. Jeho výška musí byť o 0,05-0,1 mm väčšia ako je hrúbka ozubeného kolesa pri obežnej dráhe (stretli sme sa z viacerými rozmermi).
The original rollers are 1/4 inch in diameter and have a center holes in which the lubricant was retained. We are only able to get the rollers without the holes. Their dimensions are ¼ x ¼ so they are little taller than the original rollers and we will have to adjust them. If the outer runways on the gear wheel have major defects it then has to be grinded till smooth and plus sized rolers must be used. There are 6.5 x 6.5 mm available. Measure the grinded hole of the gear wheel, add twice the size of the rollers and add the size of the inner ring. His hight must be bigger by 0.05 – 0.1 mm than the thickness of the gear wheel on the roller runway (we have found different dimensions).

Vnútorný krúžok budete musieť nechať vyrobiť v odbornej dielni. Je to vlastne iba kalený krúžok s obrúseným povrchom na mieru. Valčeky nechajte tiež prebrúsiť z výšky na tento rozmer. Po zložení a dotiahnutí spojkového ložiska Vám vnútorný krúžok určí vôľu a stredový unášač sa musí ľahko krútiť. V prípade, že má spojkové ložisko veľkú vôľu, znížte vnútorný krúžok. Stretli sme sa z rôznymi dobovými úpravami spojkového ložiska. Dokonca sme v niektorých spojkách našli úpravu na guličky, no skoro vždy to viedlo k poškodeniu stredového unášača spojky.
The inner ring must be manufactured by a professional. It is a custom made hardened circle with the grinded surface. Also let the rollers to be grinded to be adequately tall. After the assembly and tightening clutch bearing the inner ring will set the free play and the inner hub must turn freely. In case that the free play will be excessive lower the inner ring. We also had an experience with modifications of the clutch bearing done in a past when these bikes were relatively new. Actually some clutches were modified in a way that bearing balls were used what of course lead to a damage of the centre clutch hub.

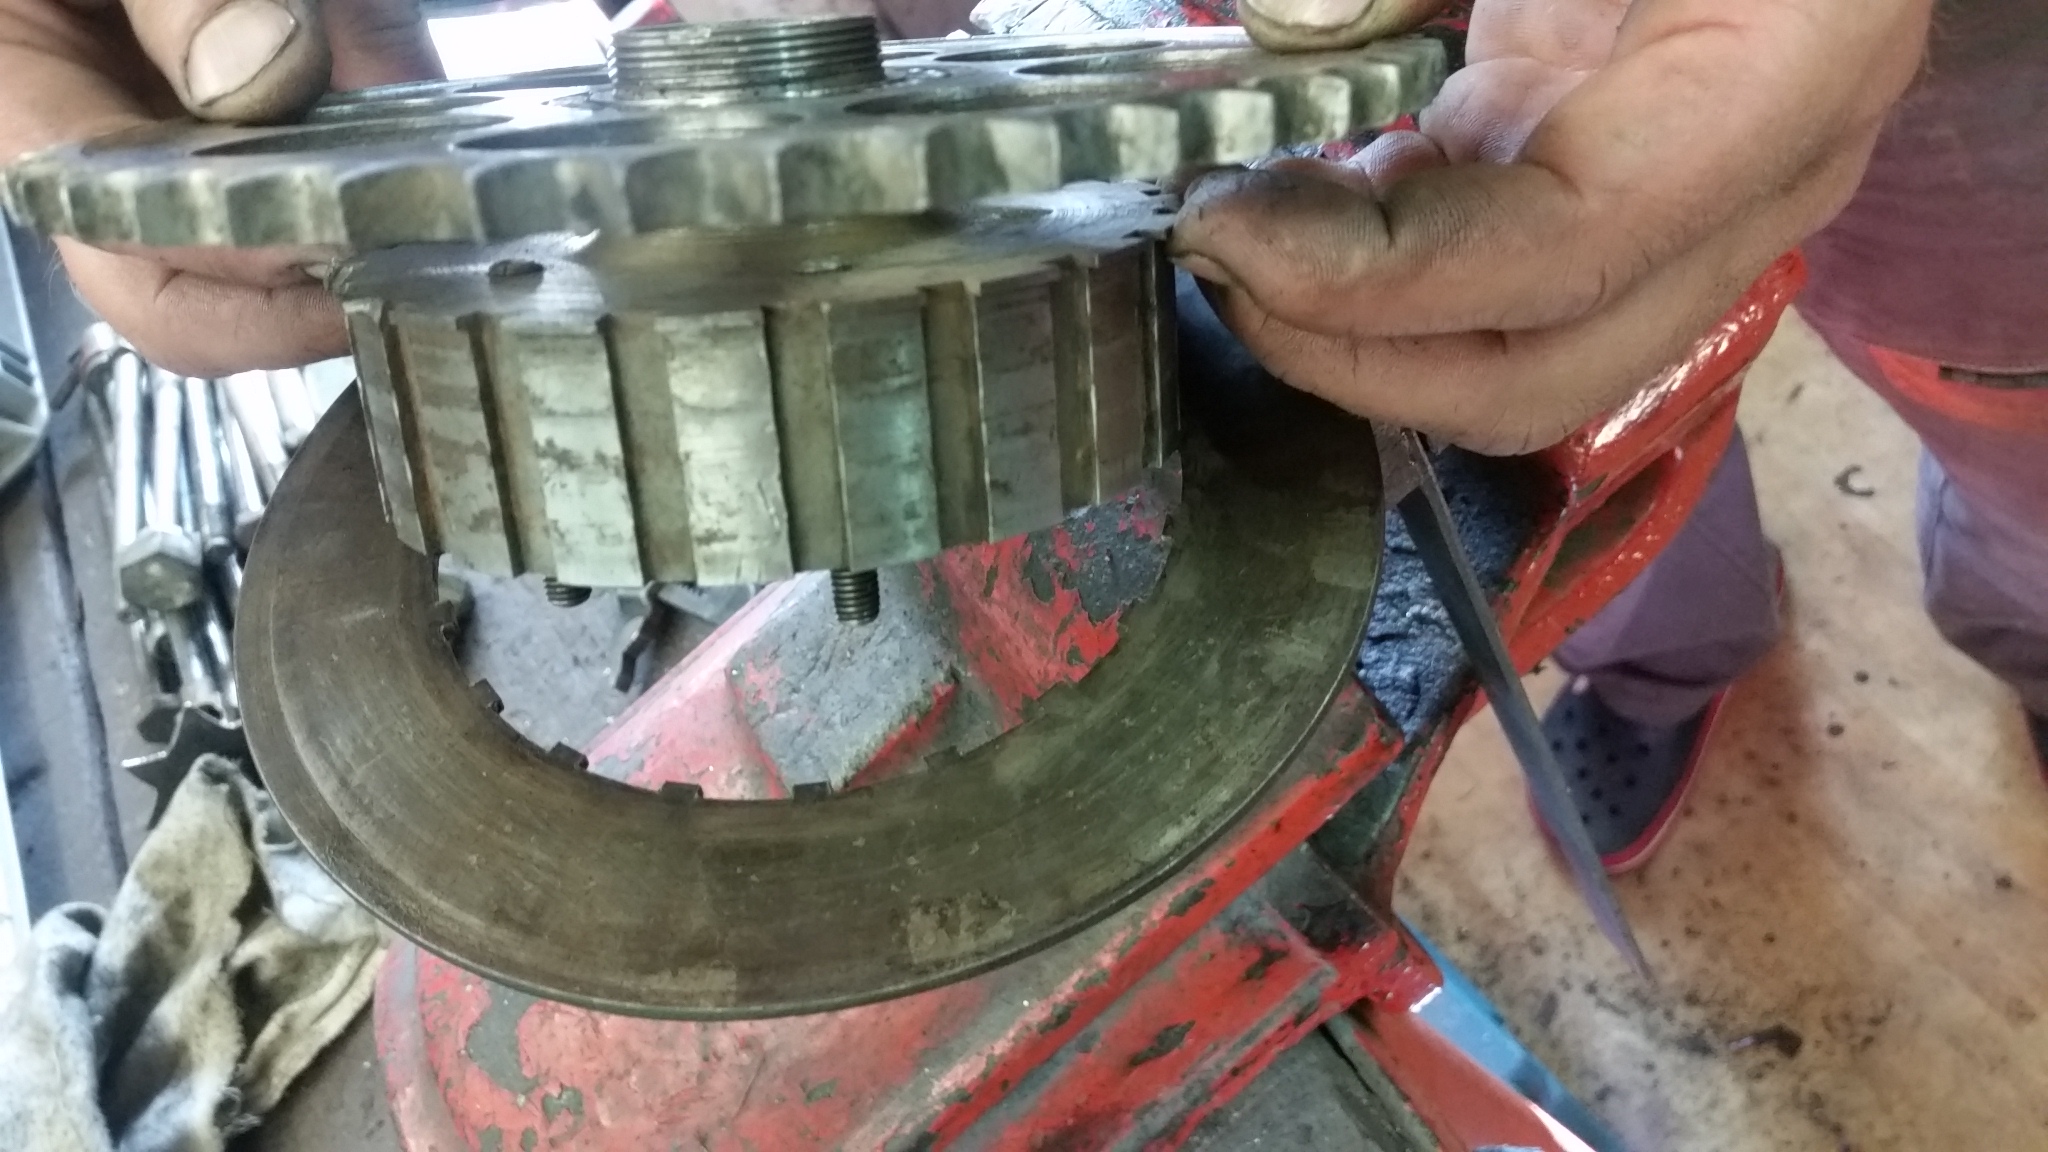
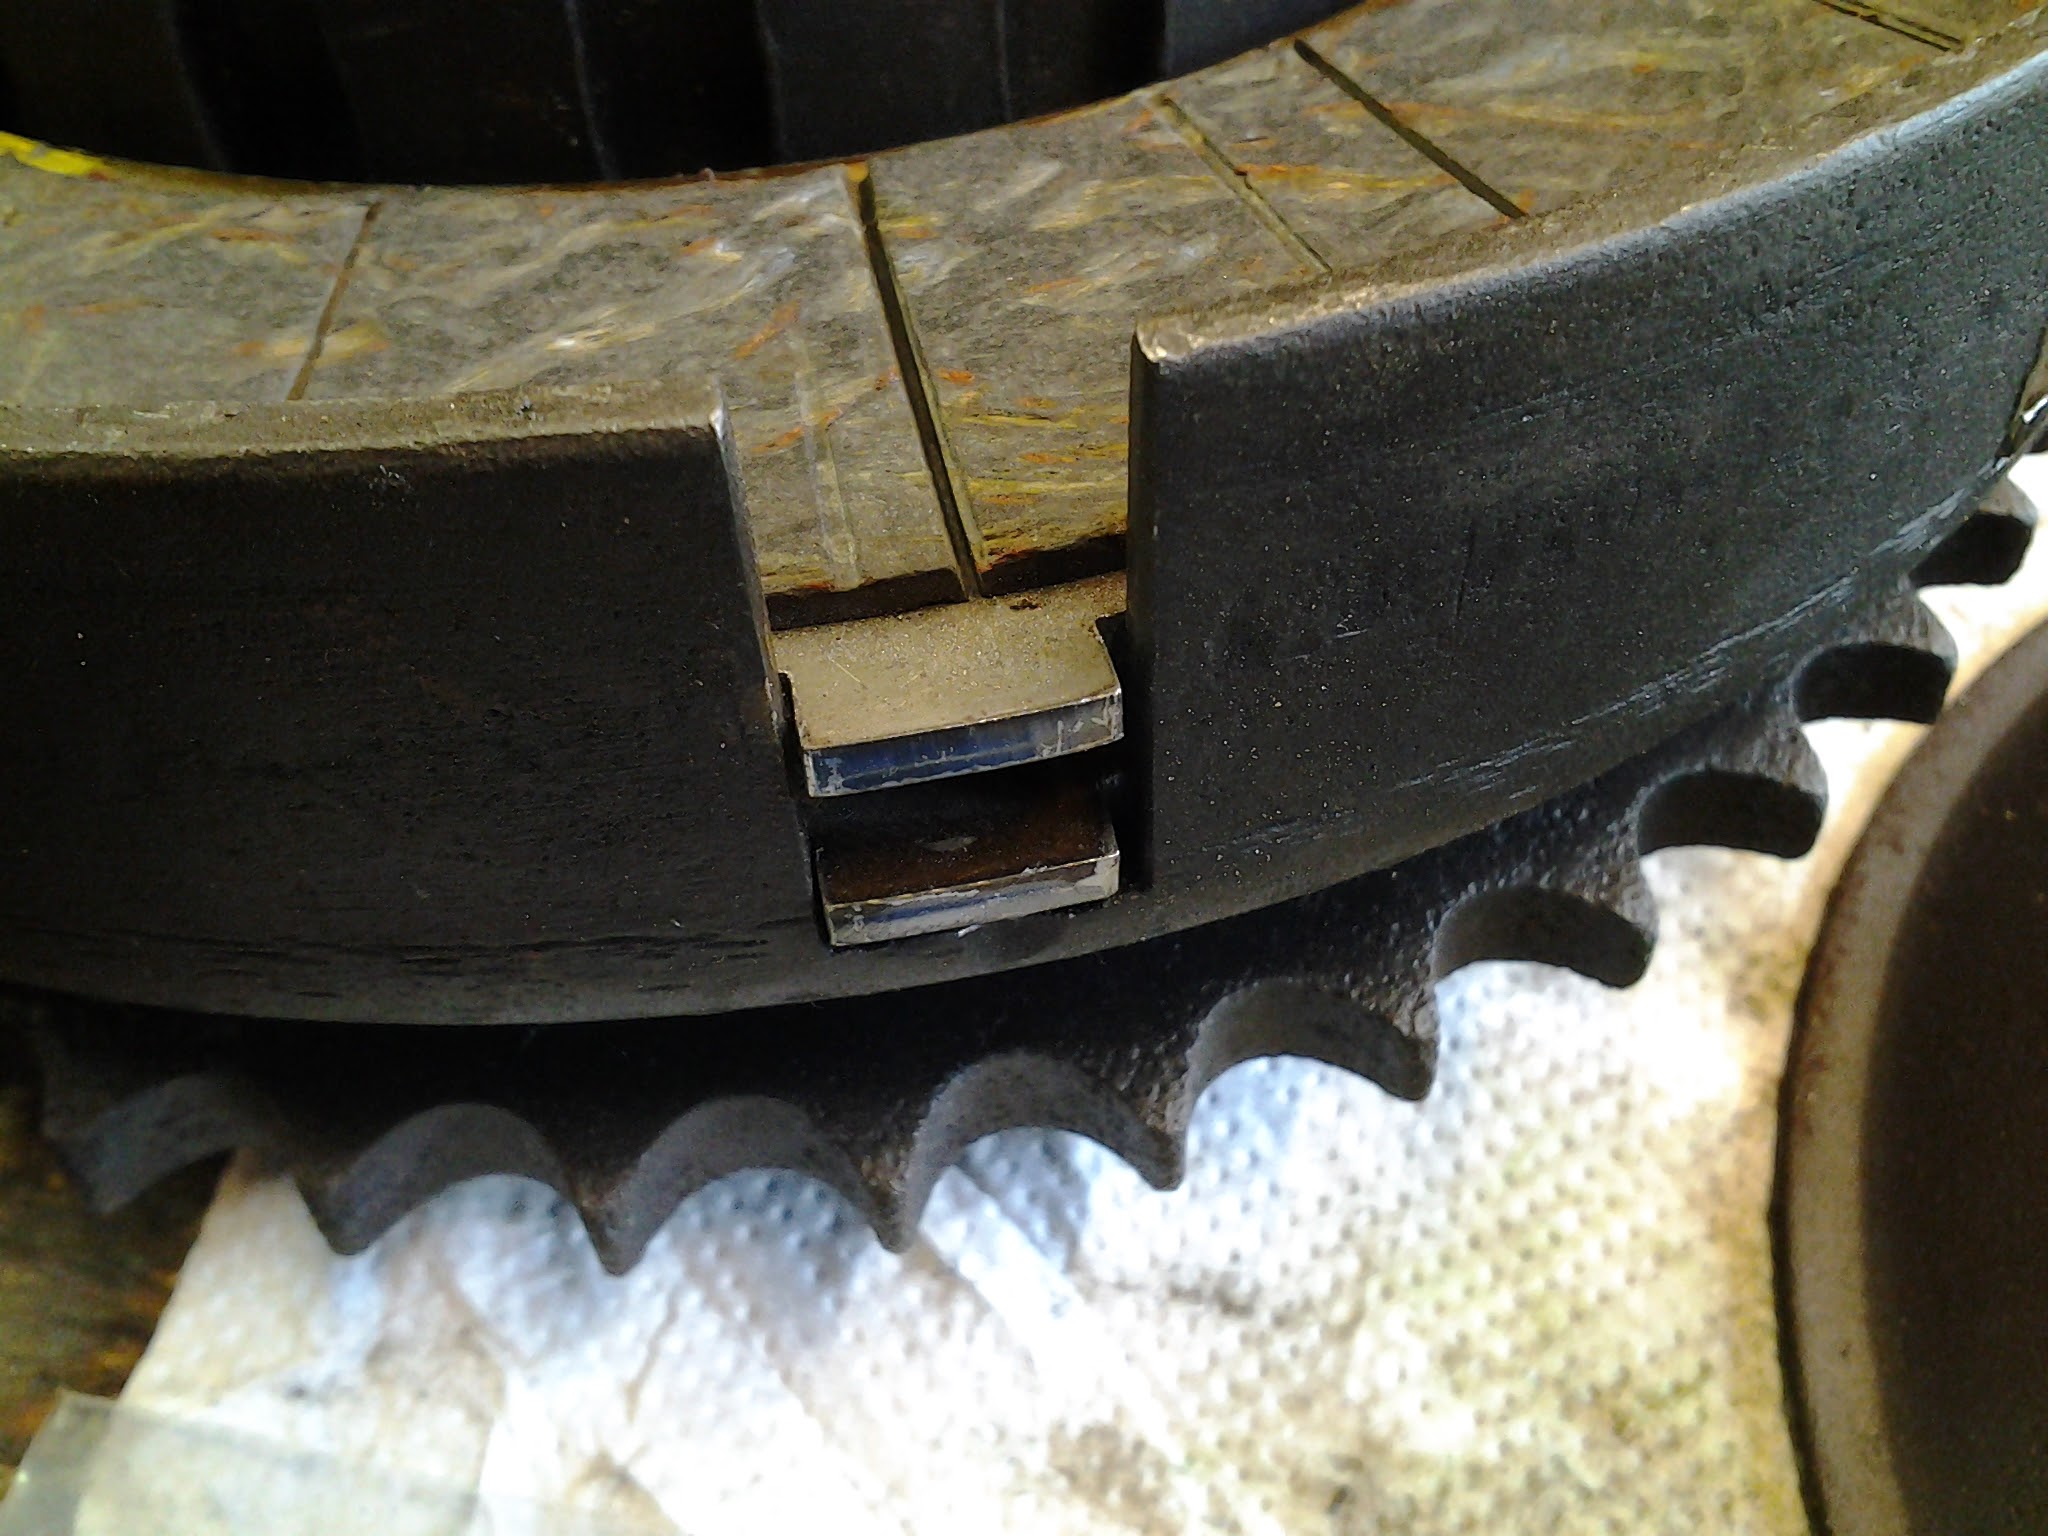
Voľné spojkové ložisko umožňuje stredovému unášaču pohyb do strany, čo spôsobuje opotrebenie drážok, v ktorých sa pohybujú lamely spojky. Ak je Váš stredový unášač opotrebený, je nutné drážky frézovať na najbližší možný priemer a zakúpiť lamely s väčším priemerom vodiacich jazýčkov. Ten istý spôsob sme použili aj v prípade opotrebenia spojkového koša. Tu nieje nutné posielať kôš k frézarovi, ale dá sa to doladiť aj doma. Základom je určiť si najbližší možný priemer otvoru a brúsením docieliť, aby sa všetky vodiace jazýčky dotýkali spojkového koša zároveň. Rozloží sa tak sila merného tlaku súčastne na viac bodov. Lamely aj kôš budú mať potom dlhšiu životnosť.
When the free play of the clutch bearing is excessive it lets the centre hub move from side to side, what causes the wear of the grooves in which the clutch plates move. If the clutch hub is worn the grooves need to be milled to the closest possible diameter and new clutch plates with bigger teeth have to be installed. We proceeded the same way when the clutch basket was badly worn. No need to send the basket to the professional, it is possible to do it at home. The basic thing is to choose the closest possible diameter of the opening and grinde the grooves to make the clutch plate teeth touch the basket at the same time. It makes the power to spread on more spots. The lifespan of the clutch plates and the basket will be much longer.
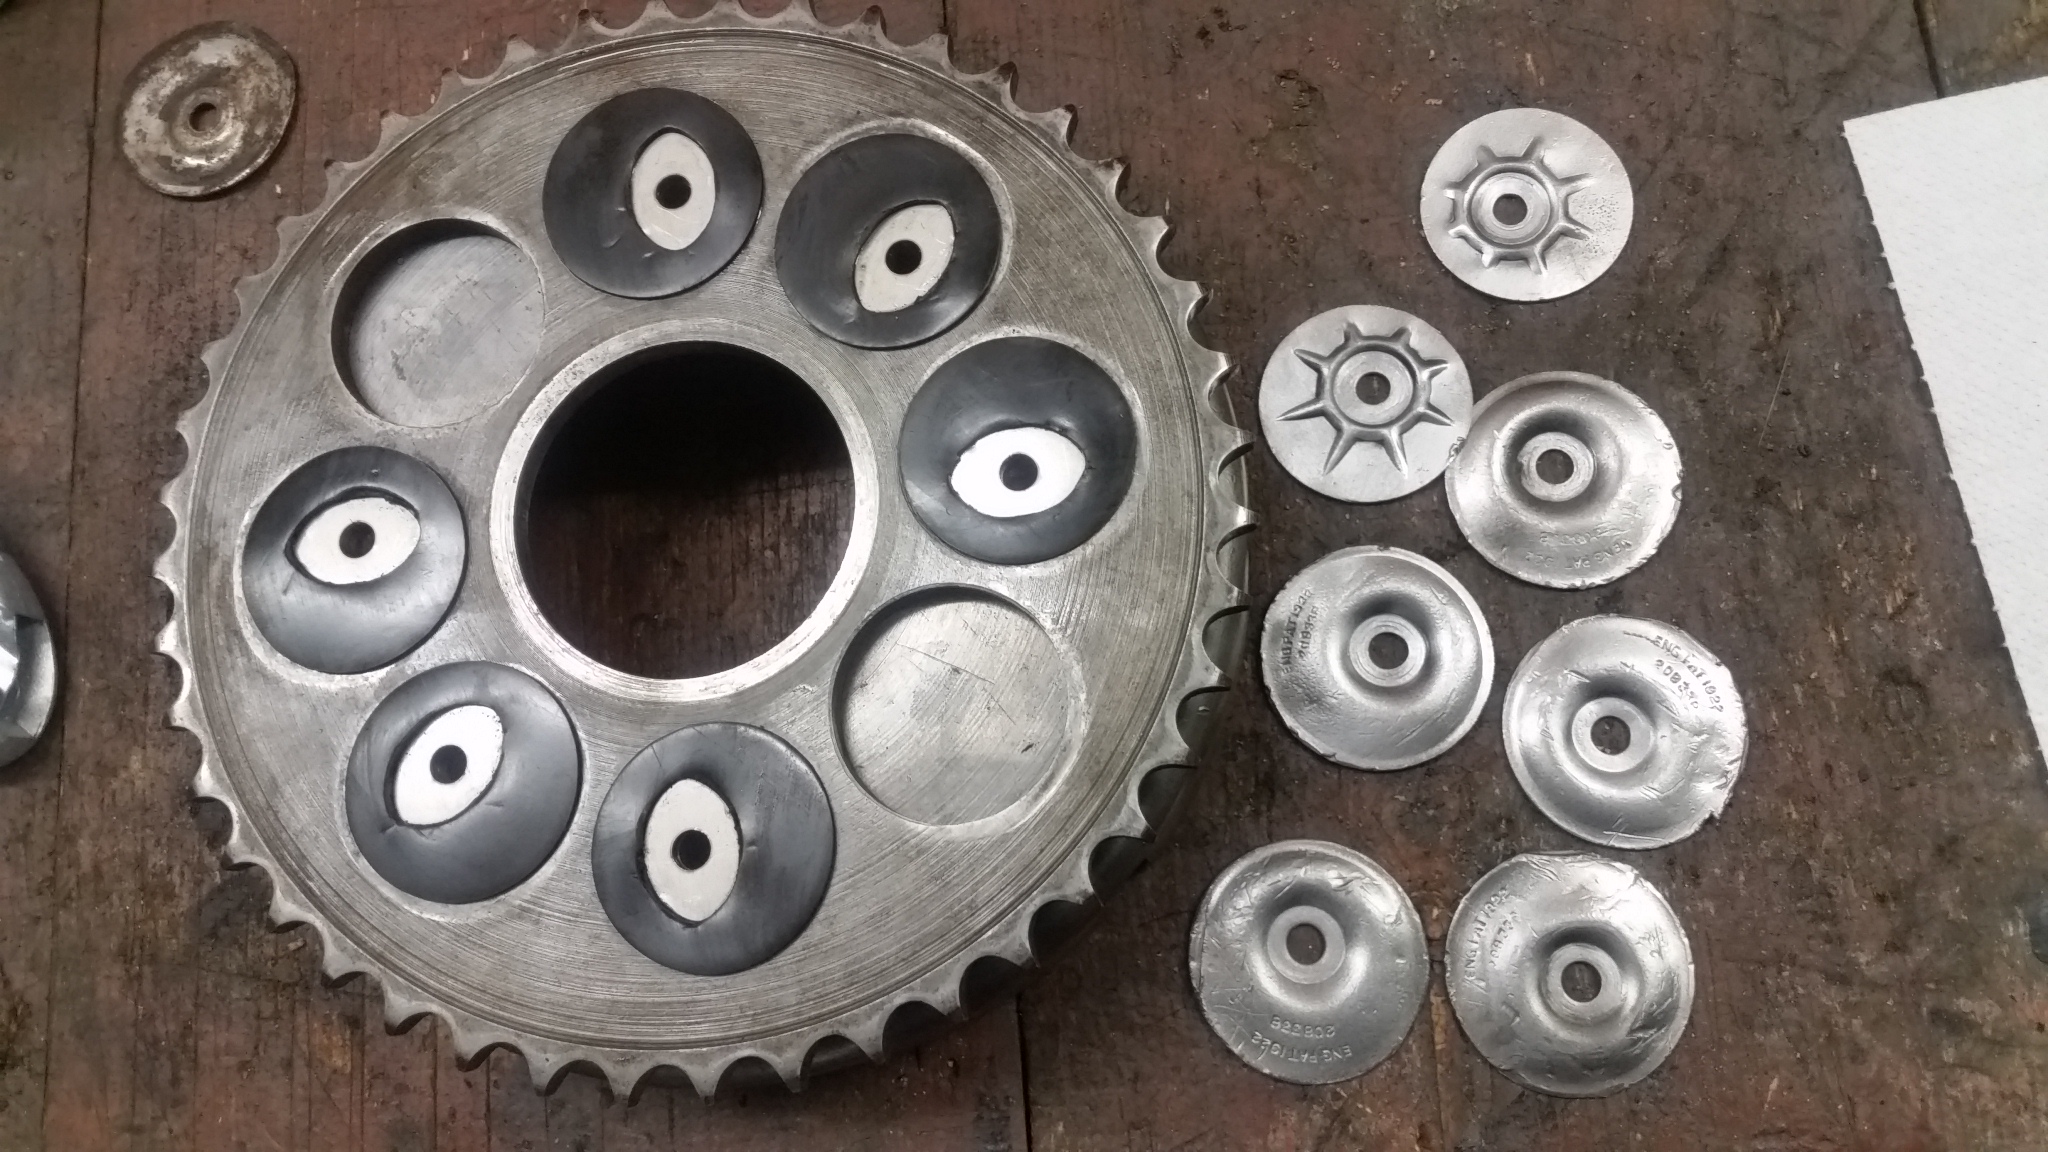
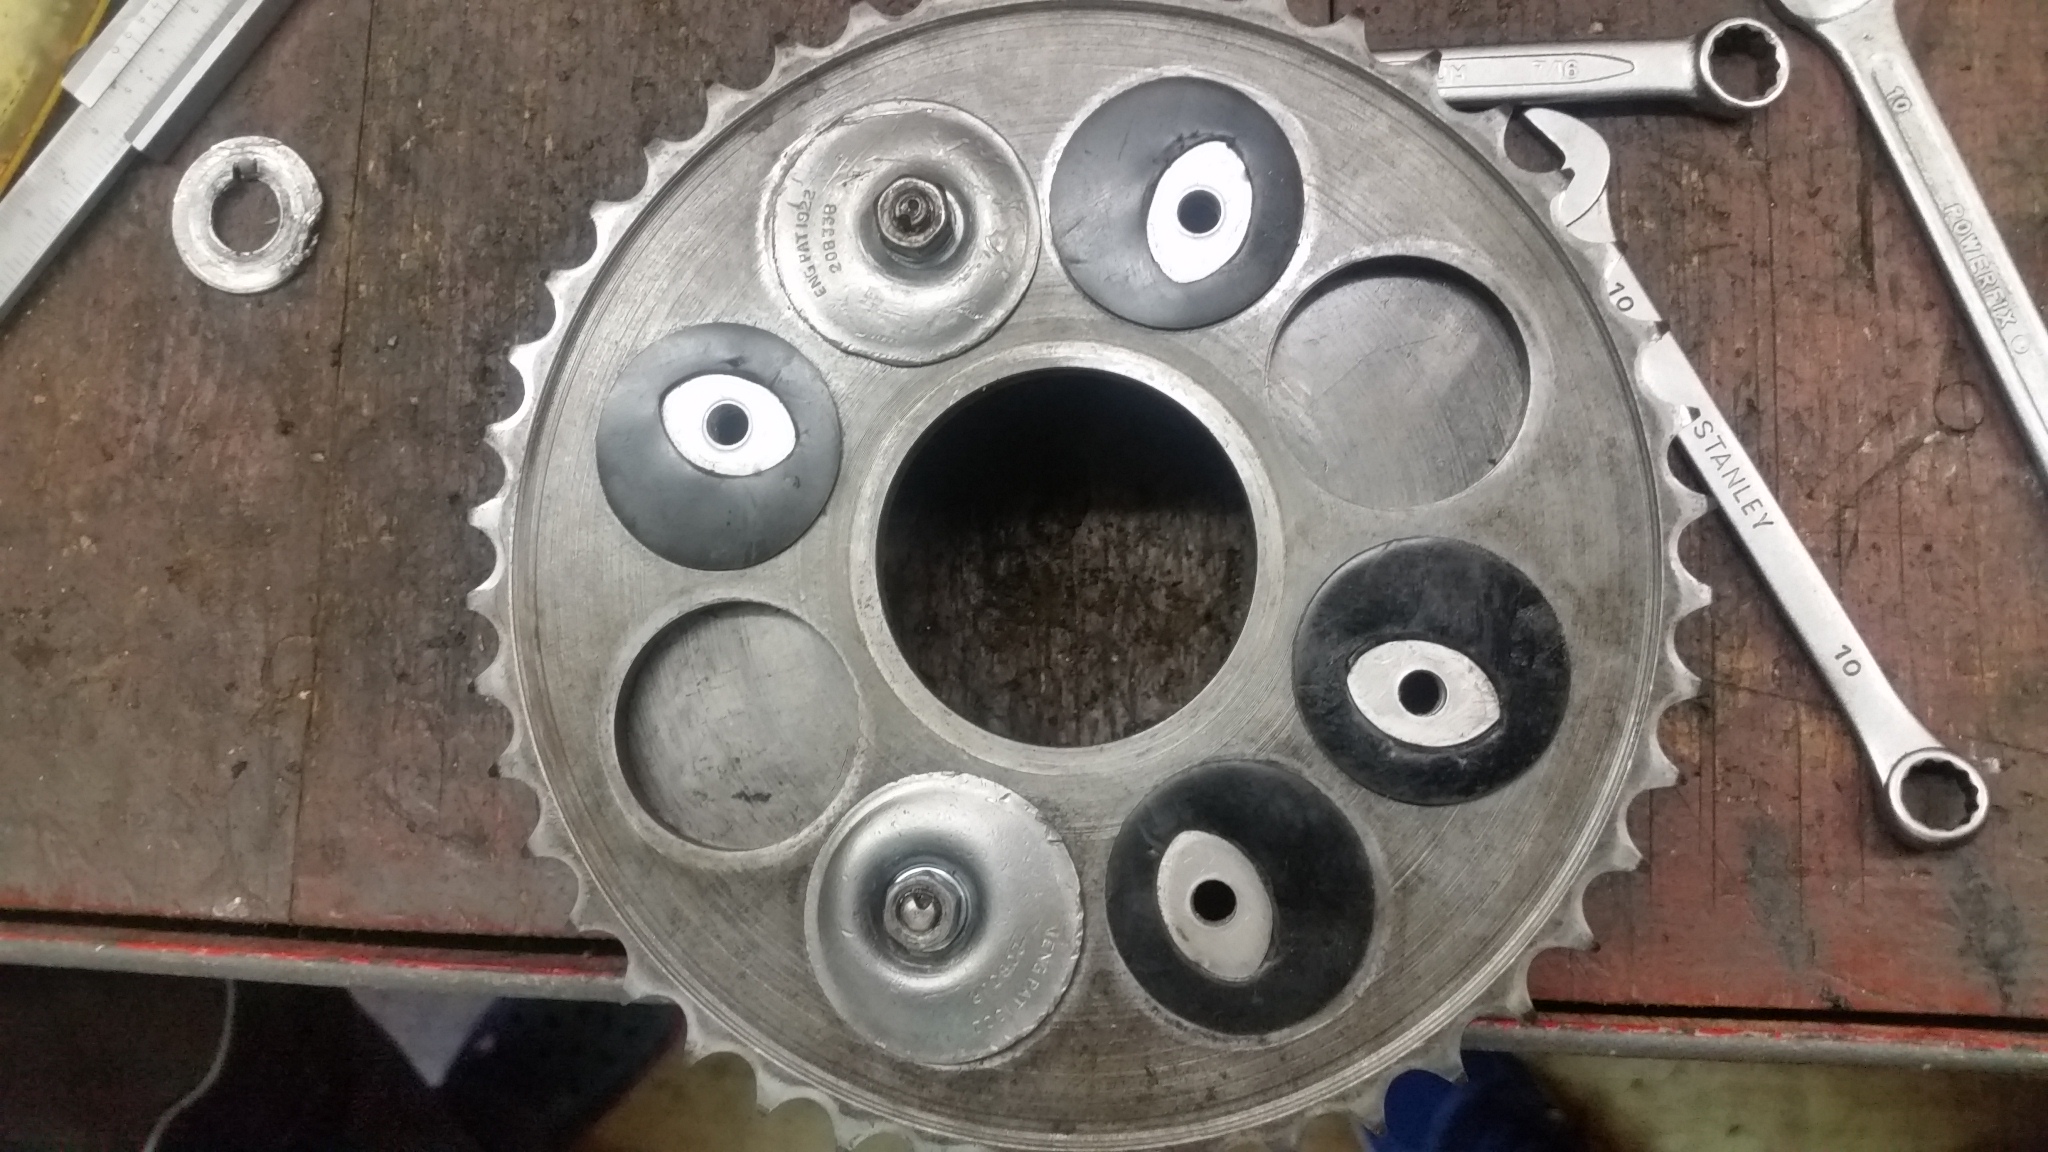
Gumové odpruženie býva často spuchrené a rozpadnuté. Ak budete musieť meniť tieto bloky gumy, použite typ NBR, alebo Viton. Odolné voči olejom. Primárny rozvod je mazaný výdychom z motora a olej sa dostáva až k odpruženiu spojky. Stretli sme sa s viacerými modifikáciami tohto odpruženia. Niektoré typy používajú šošovkové jadro zvnútra a niektoré majú podobné jadro ako výplň prelisu krycej podložky. Stretli sme sa aj s valcovým jadrom umiestneným presne v strede. Z hľadiska umiestnenia dier na spojkovom koši a otvorov na ozubenom kolese , tiež z hľadiska prenosu sily by som dal prednosť šošovkovým jadrám.
Many times the rubber cushions are swollen and falling to pieces. In case you will have to replace these rubber blocks use NBR or Viton type resistant to oil. The primary drivetrain is lubricated by the breather hose and the oil gets to the clutch cushioning. We also saw various modifications of these cushions. Some types use a lens shaped core and the other were shaped to fit the covering spacer. We also saw a cylinder shaped block placed in the centre. According to where the holes are situated on the clutch basket and also because of the power transfer I would prefer the lens shaped rubber cores.
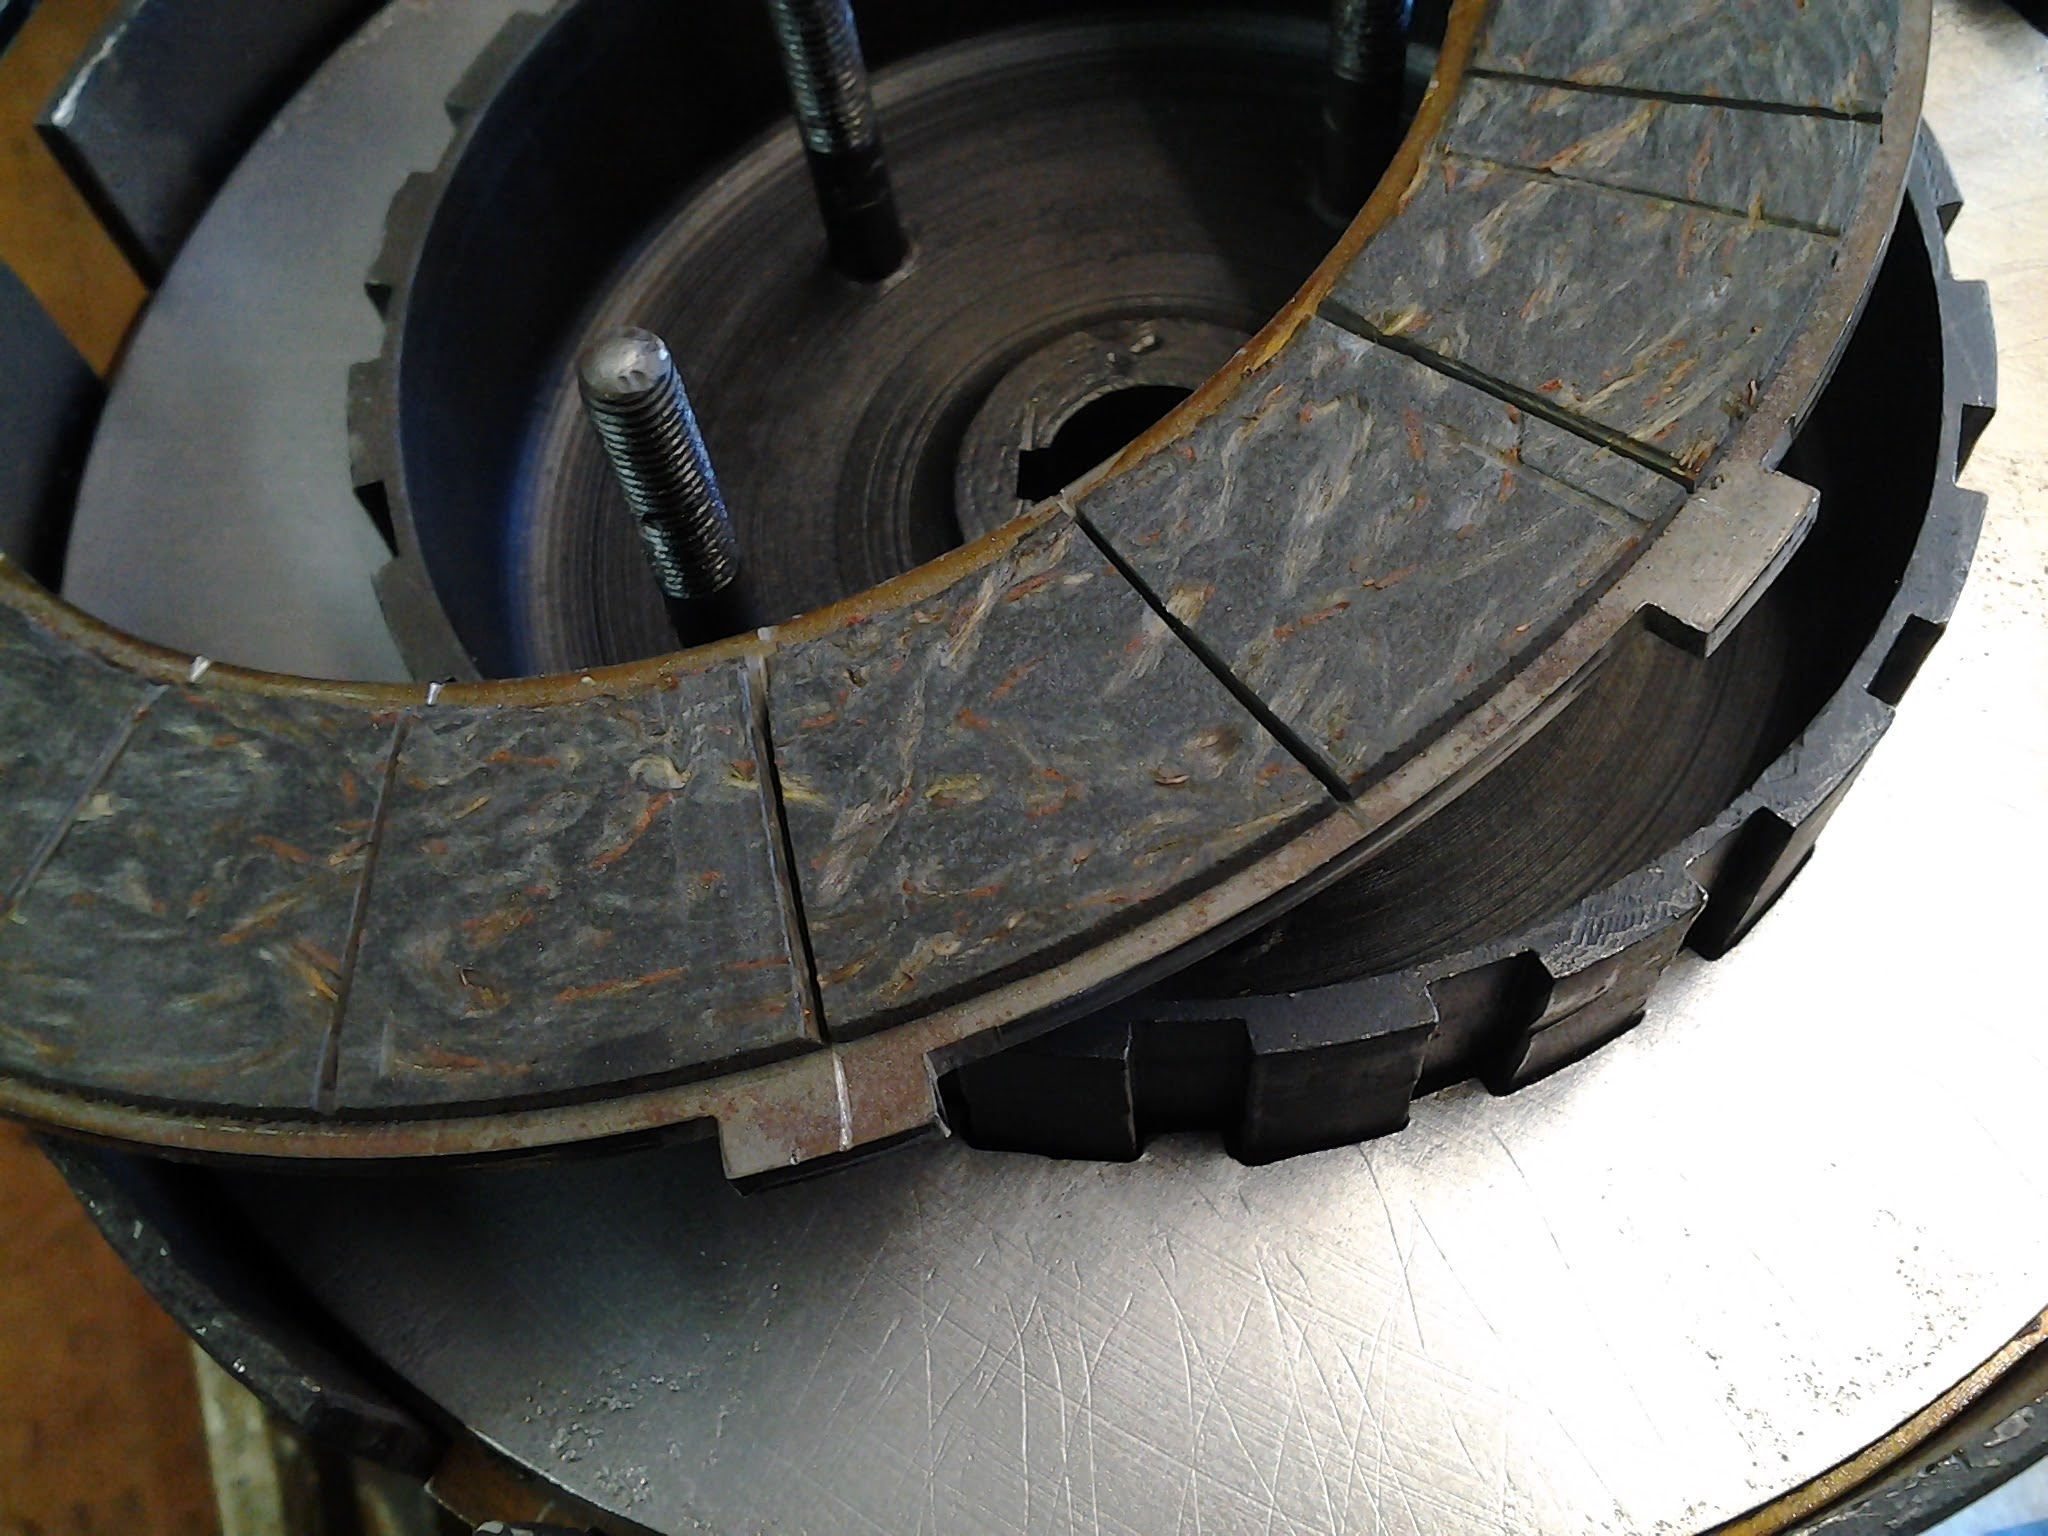
Netreba však zabudnúť na to, že spojka pracuje aj s vibráciami a mohlo by dôjsť k povoleniu skrutiek. V minulosti sa tento problém riešil zaklepnutím jamkovačom. V dnešnej dobe sú na trhu dostupné lepidlá na závity, ktoré zabránia povoleniu skrutiek. Ak si chcete opraviť pôvodné korkové lamely, použite radšej korok v celku. Niektoré druhy lepidiel použité pri výrobe korkových plátov sa správajú nevhodne pri styku s olejom.
An important thing to remember is that the clutch vibrates when in use and there is a chance that the screws can loosen with time. In the past this issue was solved by a hole punch. Today we are able to use the thread lock glues which will prevent the screws from loosening. If you want to repair the old cork clutch plates use the cork bark and not the pressed prefabricated cork. Some of the glues used in the cork plate production may not be resistant to oil.
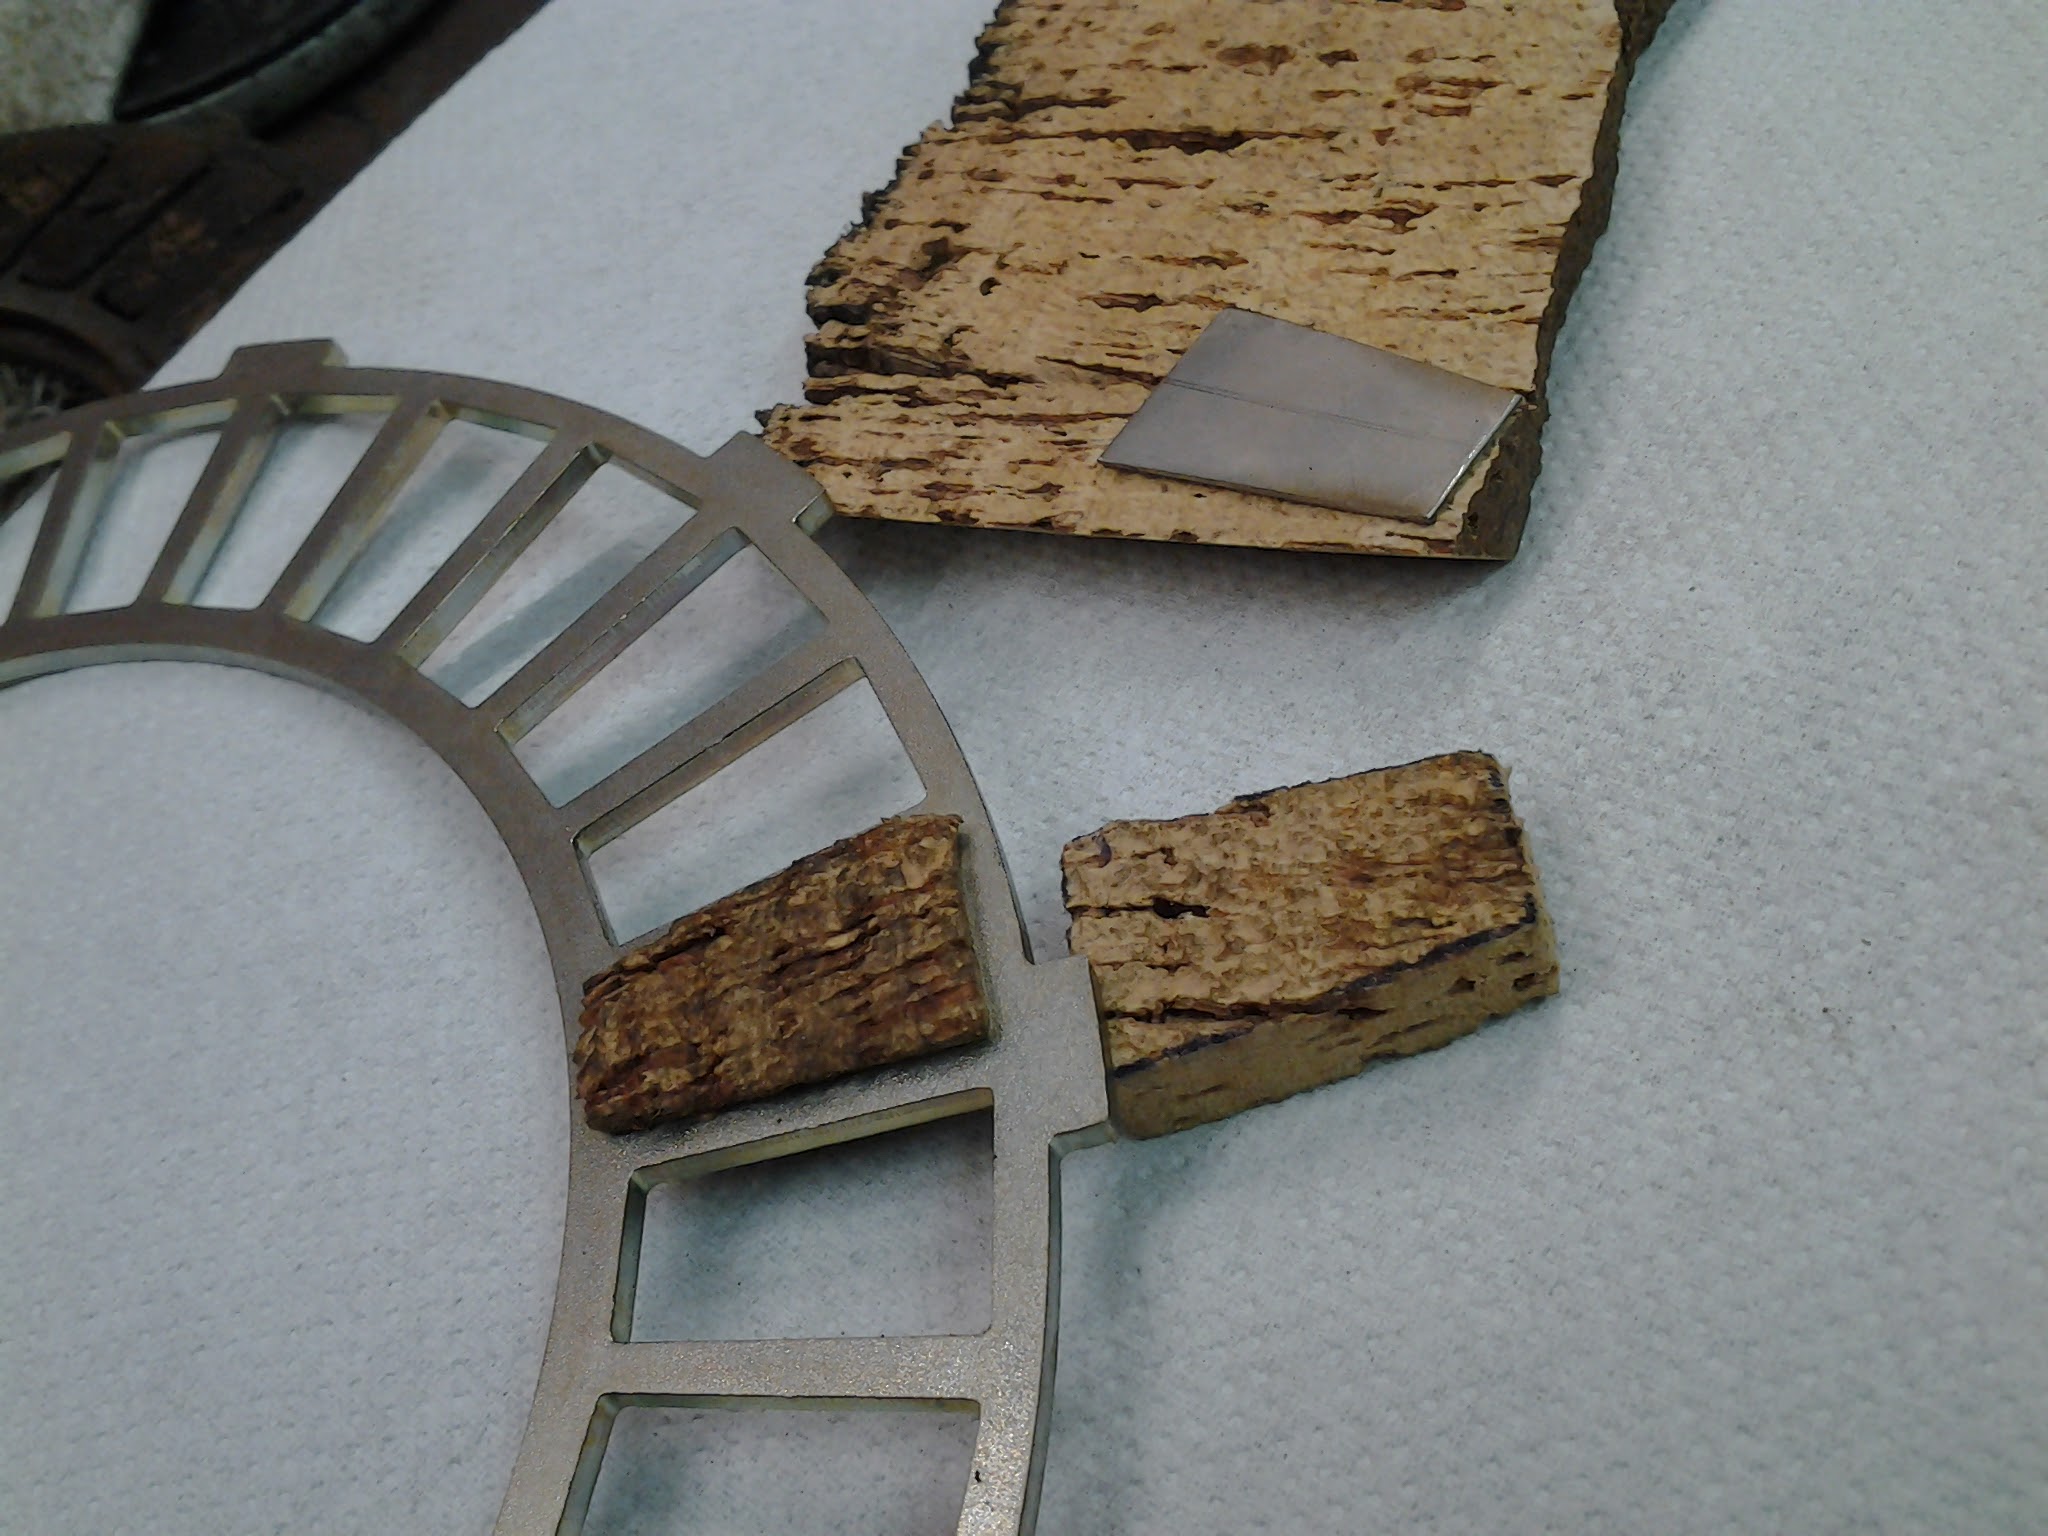
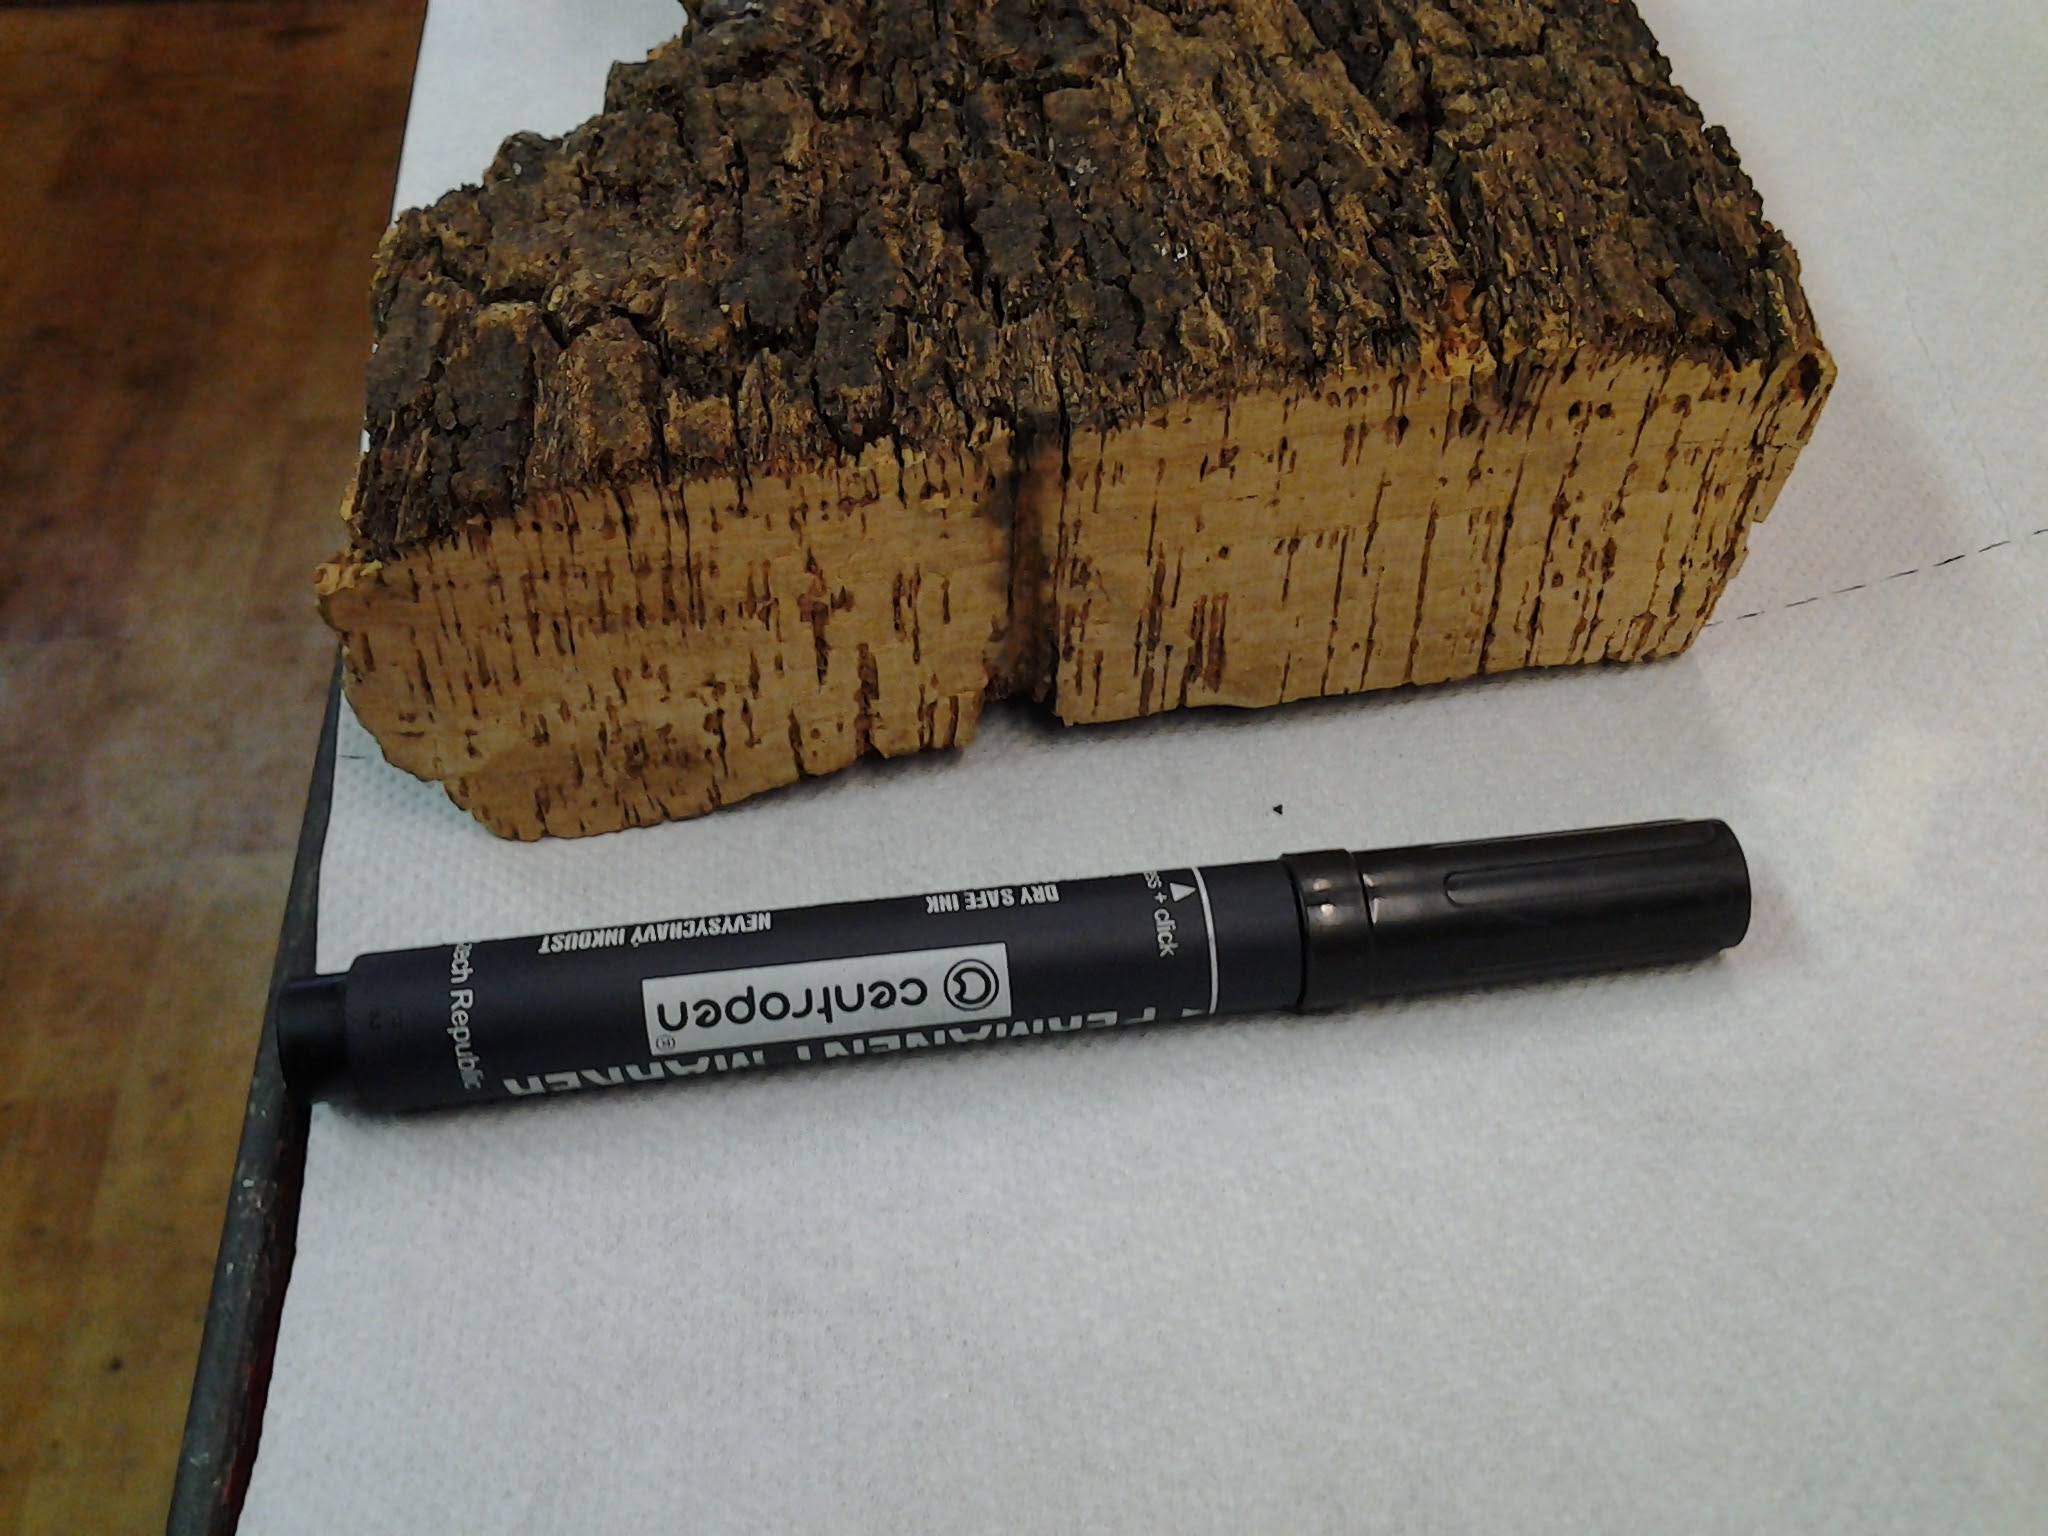
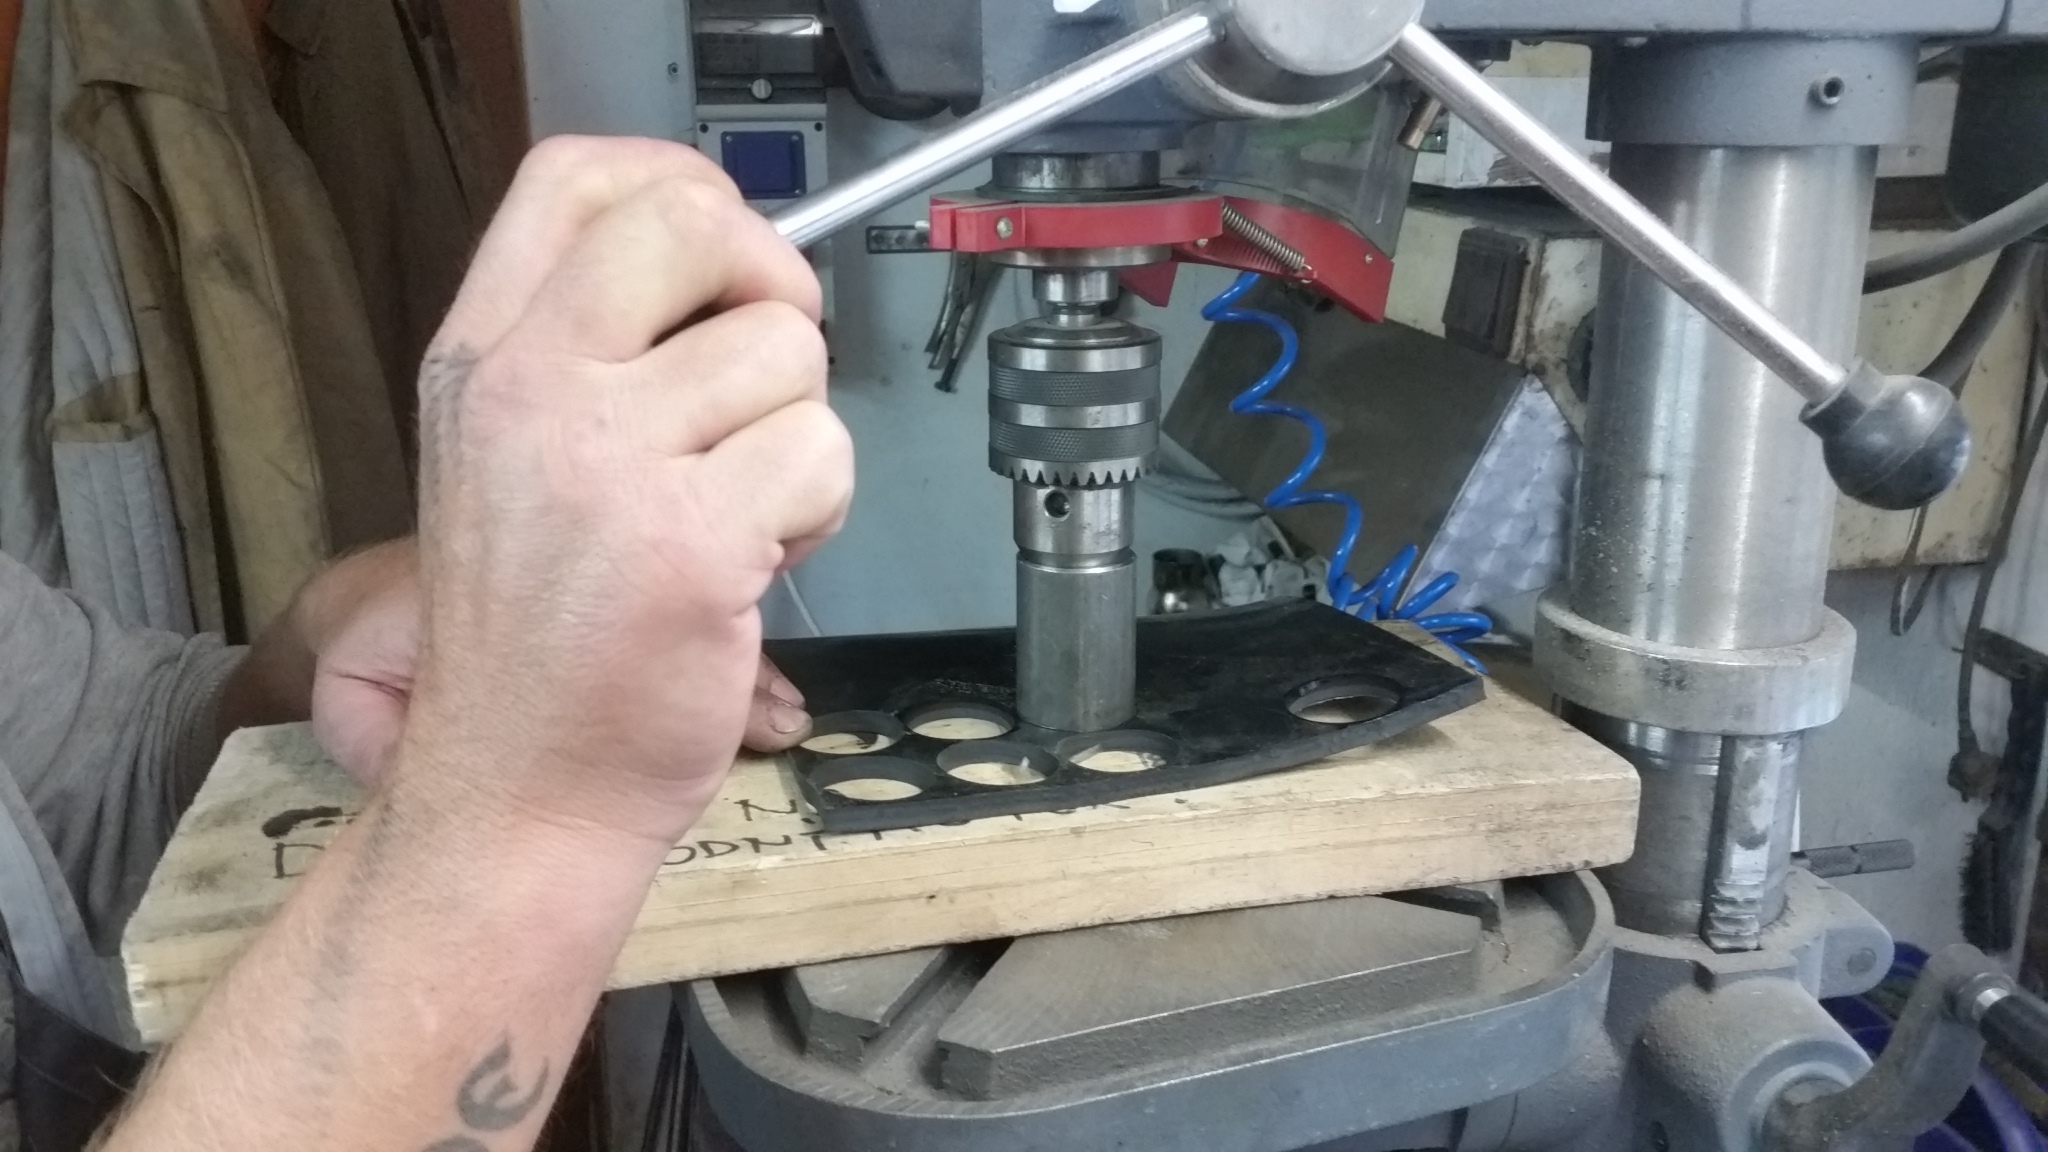
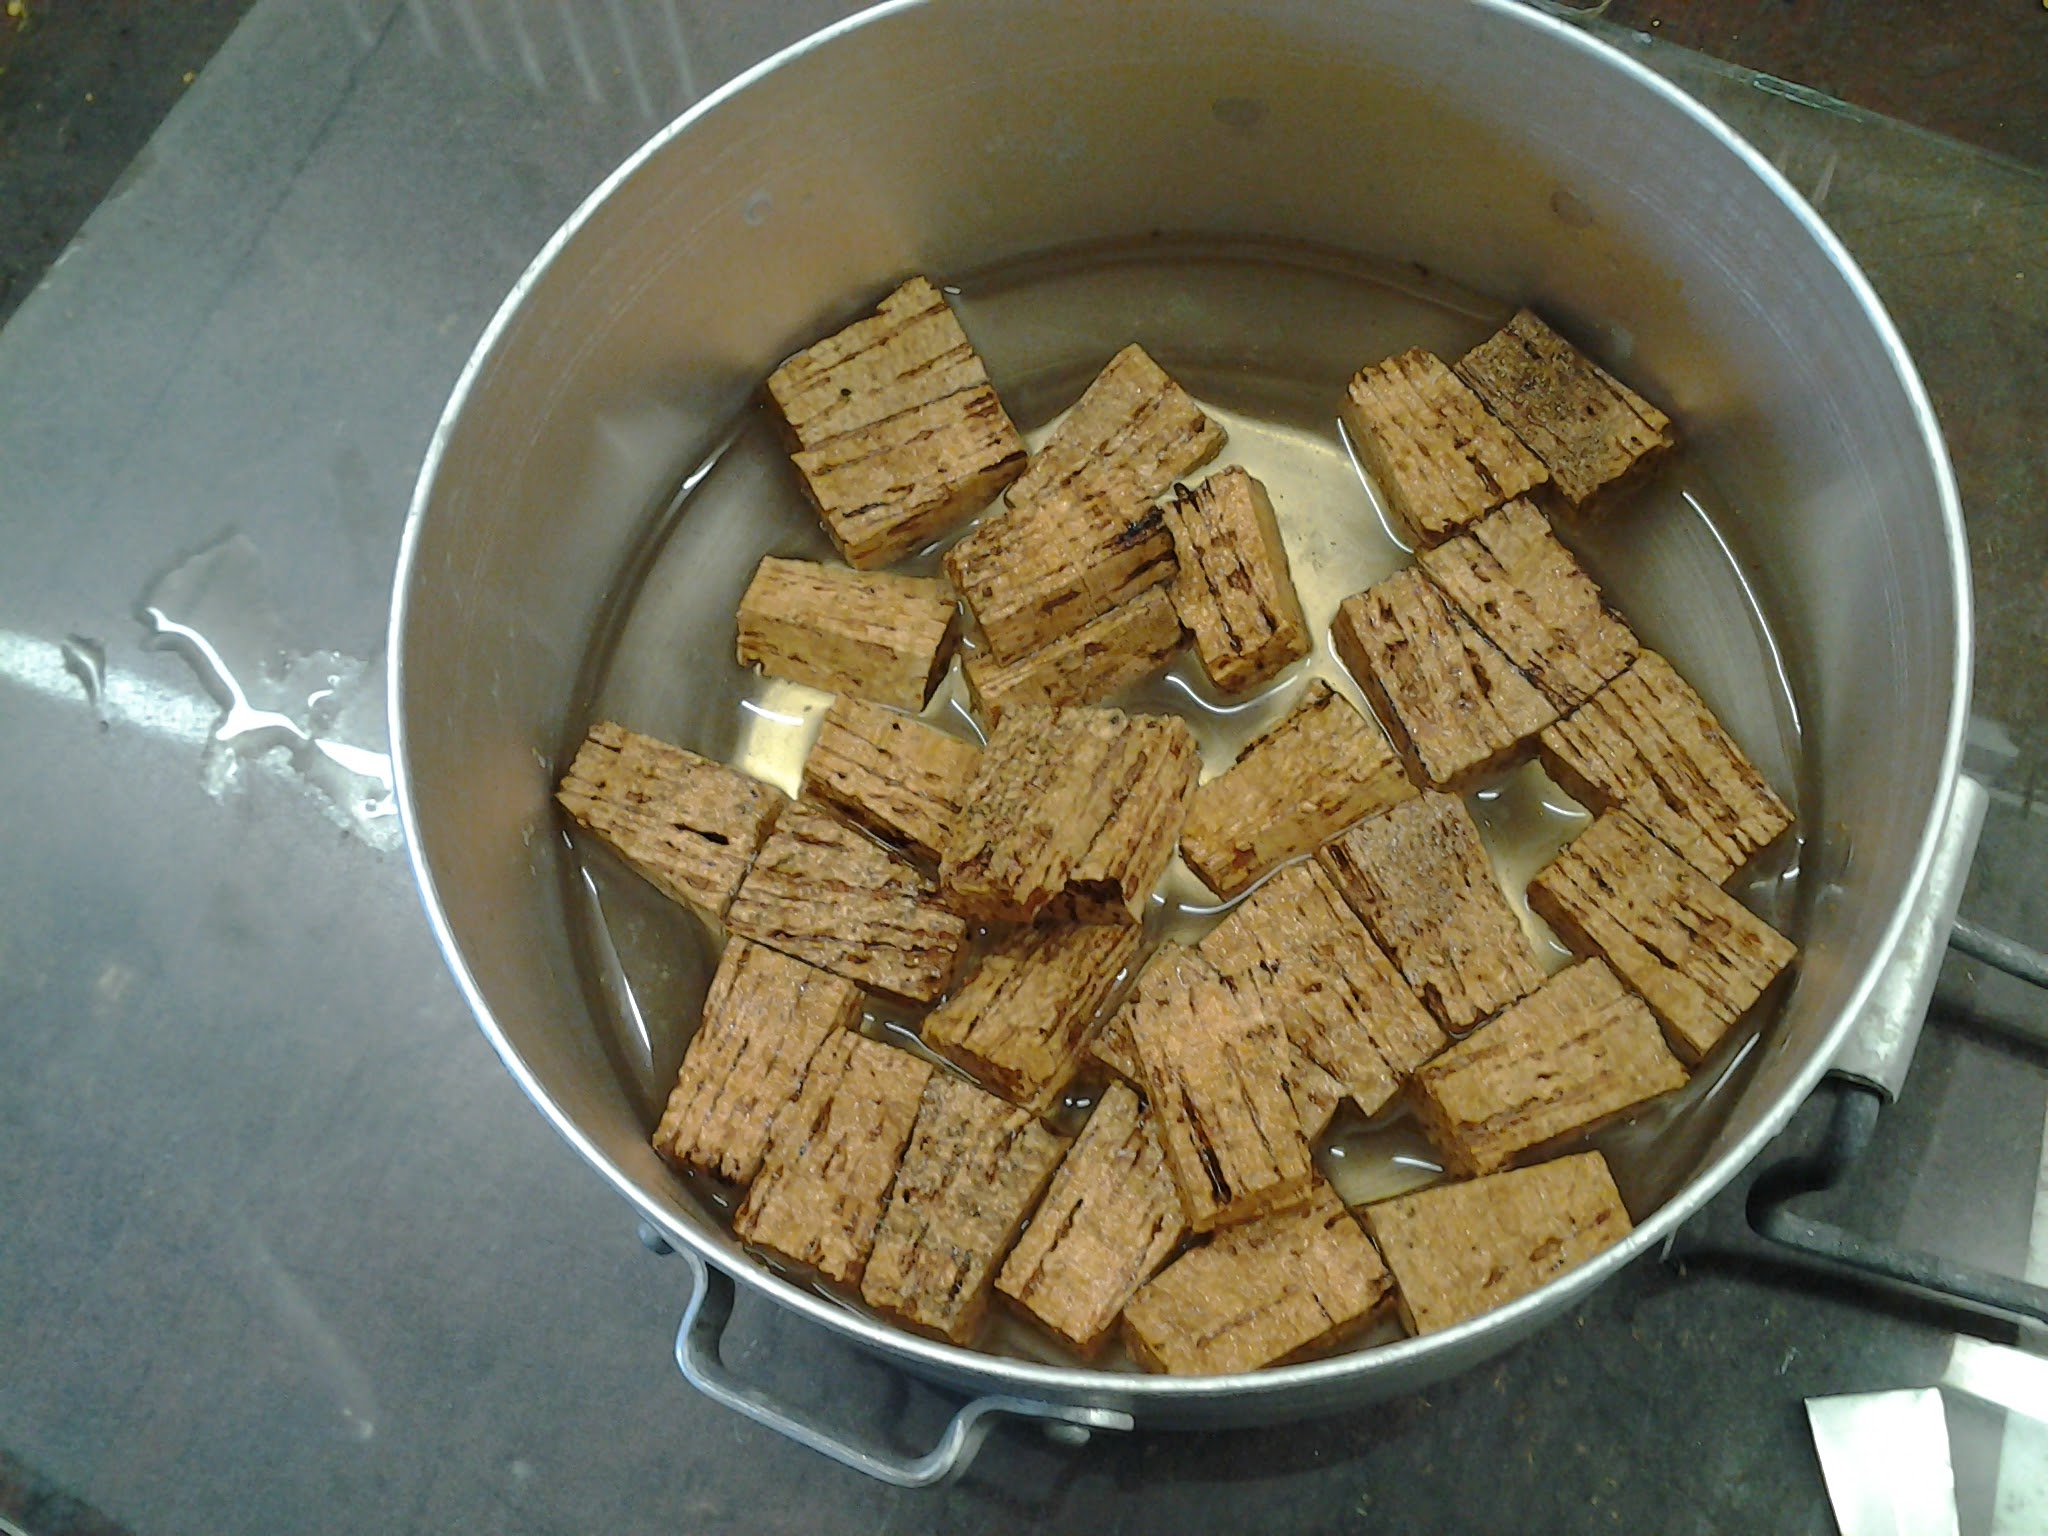
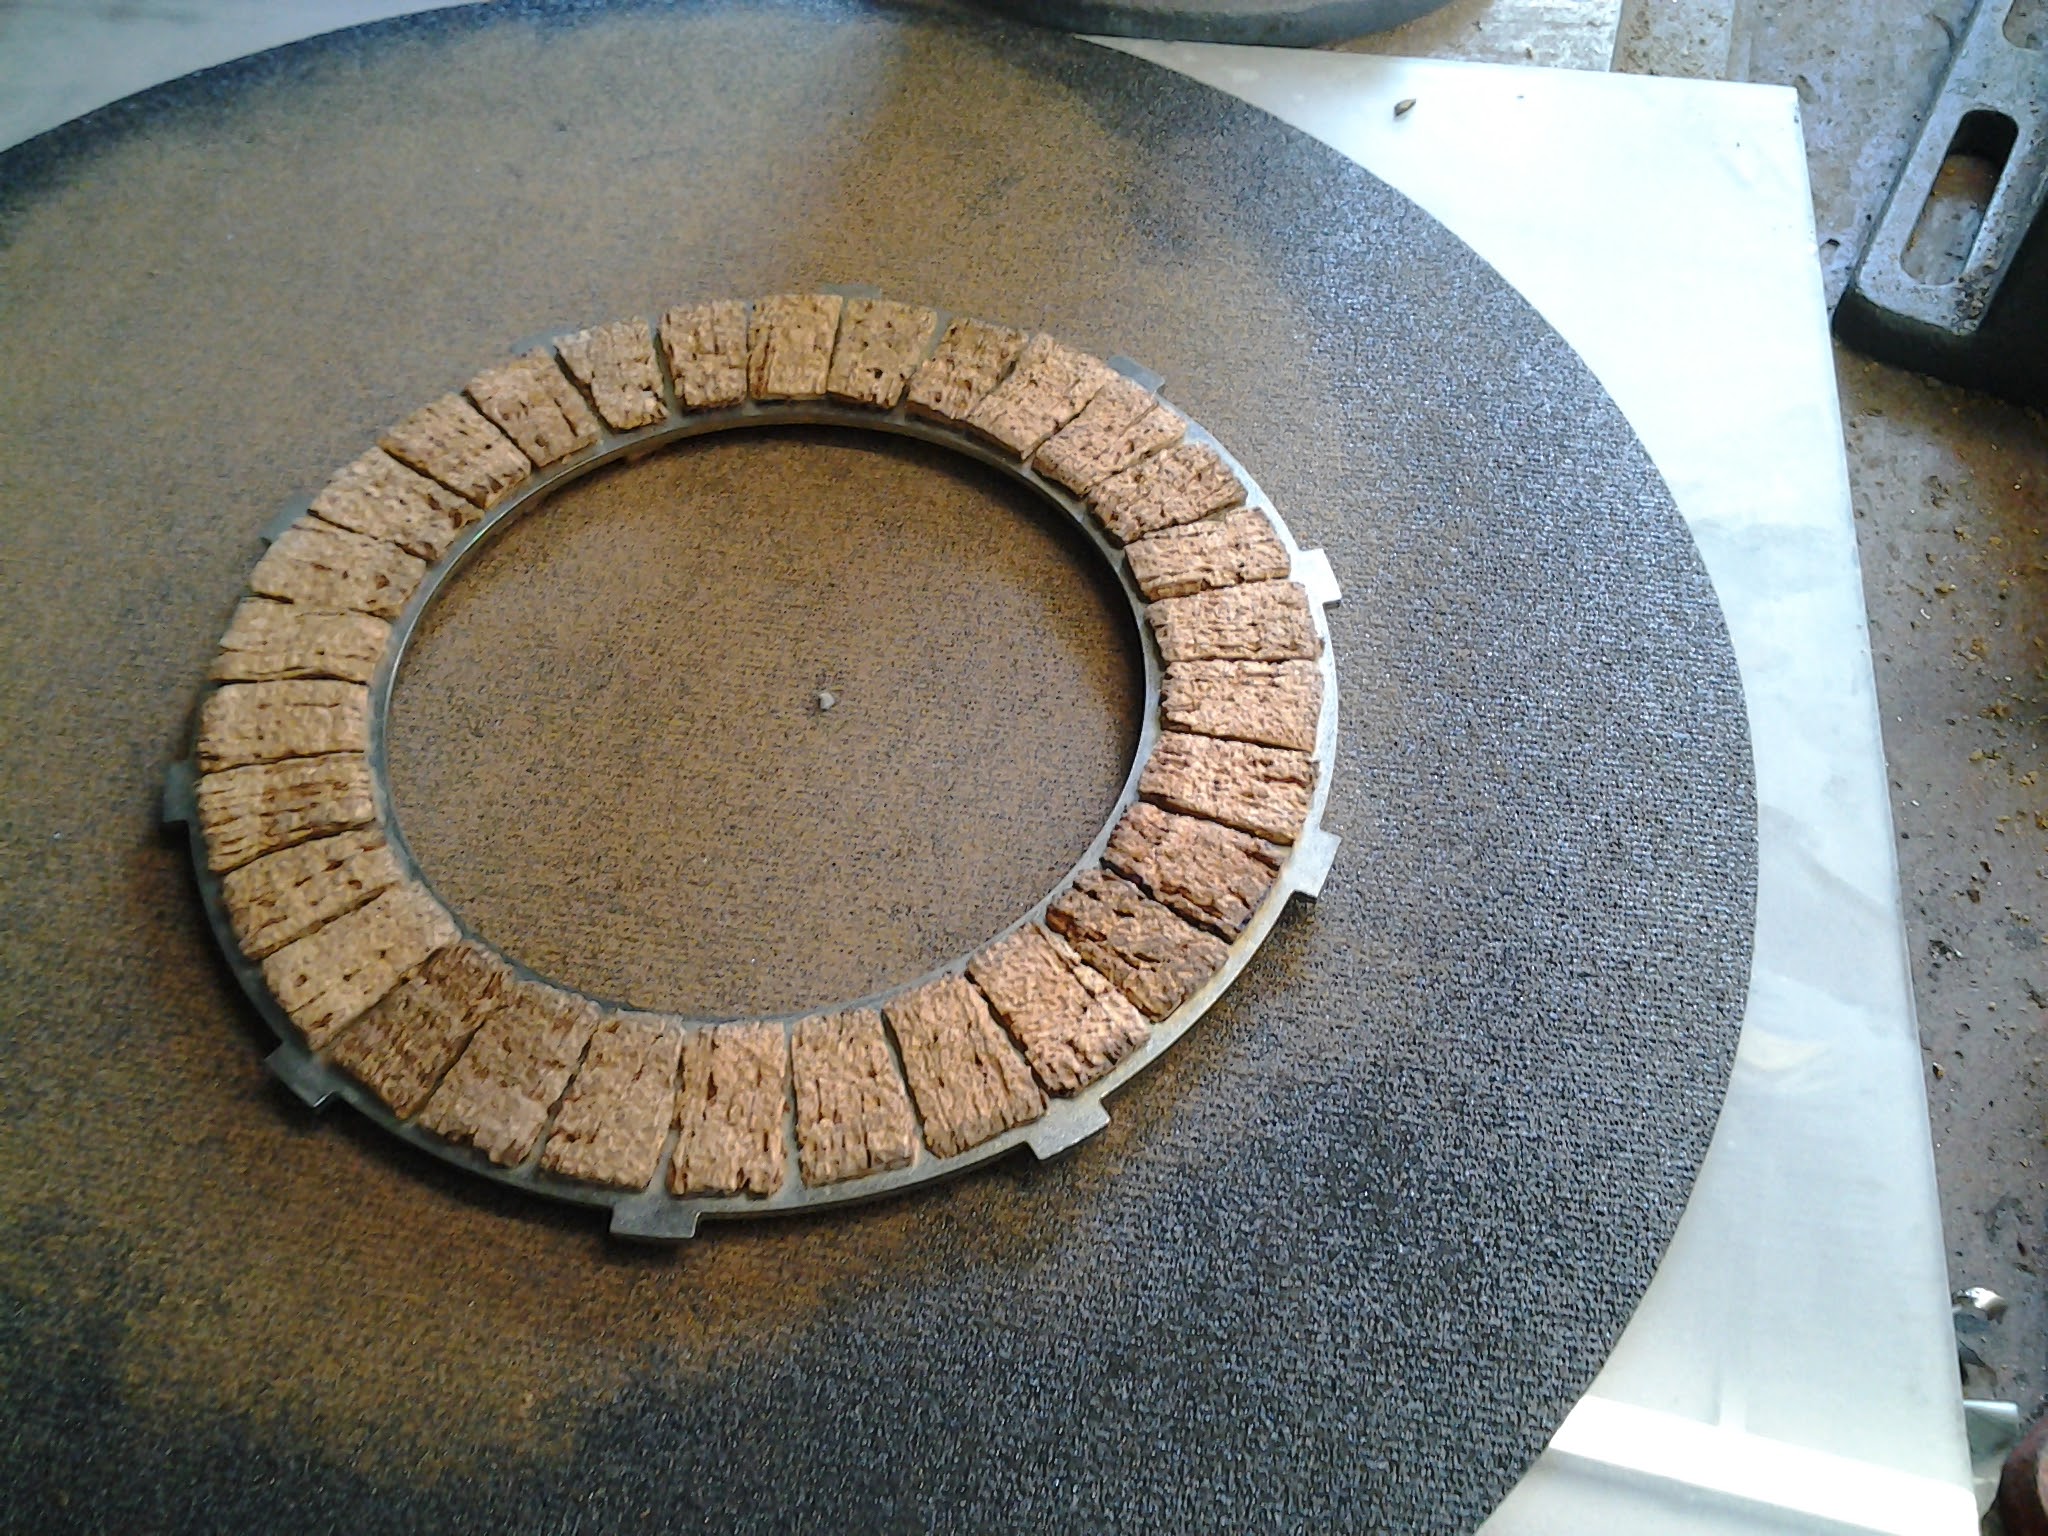
Plát kôry sme narezali na zhruba 7 mm pásy a potom na malé kúsky podľa tvaru okienok v lamele. Korkové predlohy musia byť zhruba o 2 mm širšie než otvor . Keď budete mať narezaný dostatok korkových kúskov, zalejte ich horúcou vodou a nechajte chvíľu postáť. Korok zmäkne ako špongia a budete ho môcť vkladať do okienok lamely. Spojkovým lamelám sa budeme venovať v ďalšom článku podrobnejšie.
We cut the cork bark plate to strips cca 7 mm thick and then to small pieces according to the clutch plate holes. The cork pieces need to be around 2 mm wider than the holes. When you prepare enough of the cork pieces put them to a hot water and let them sit for a while. The cork will become soft like a spunge and you will be able to instert them to the clutch plate holes. We will discuss the topic about the clutch plates in the next article more thoroughly.
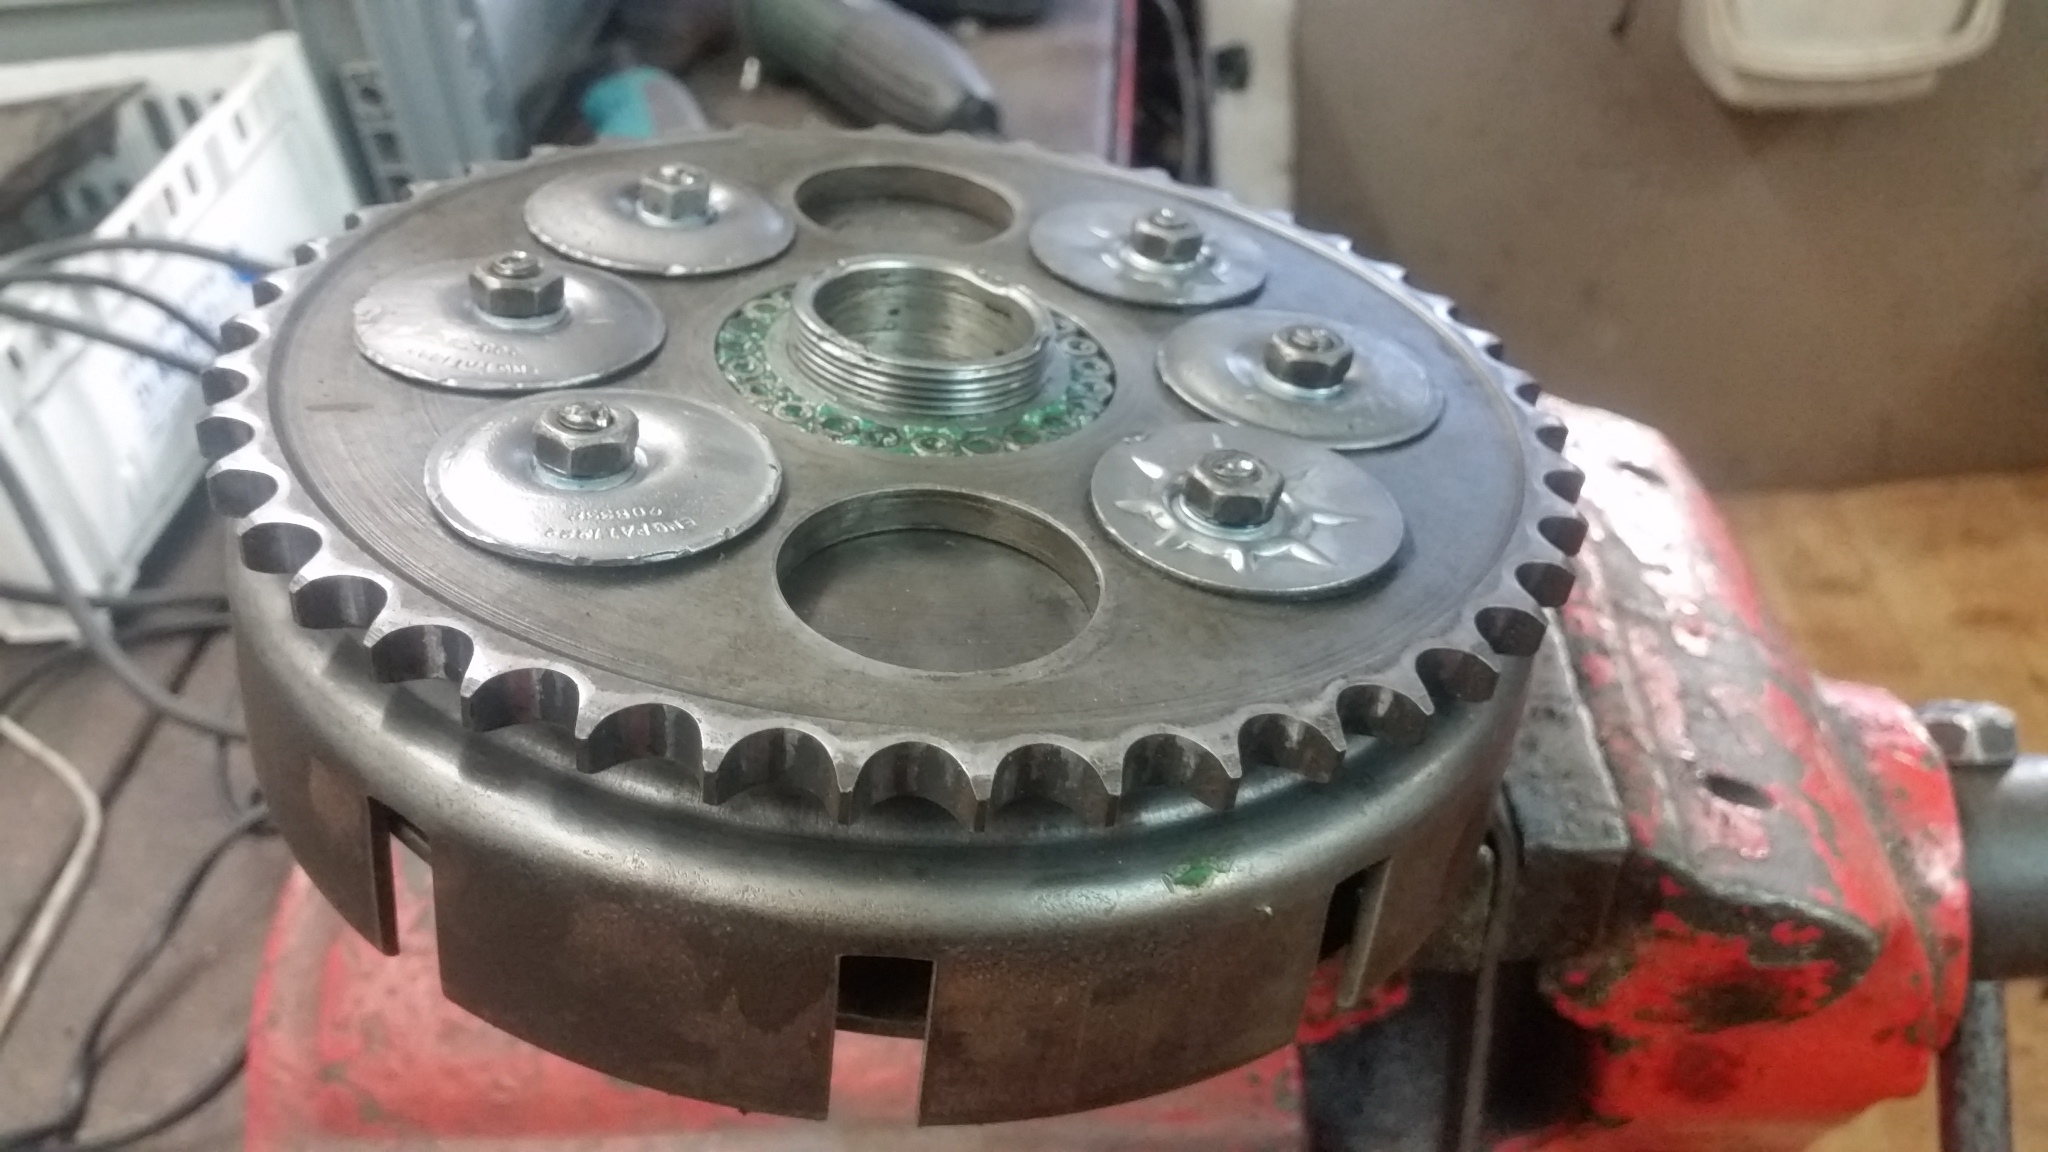
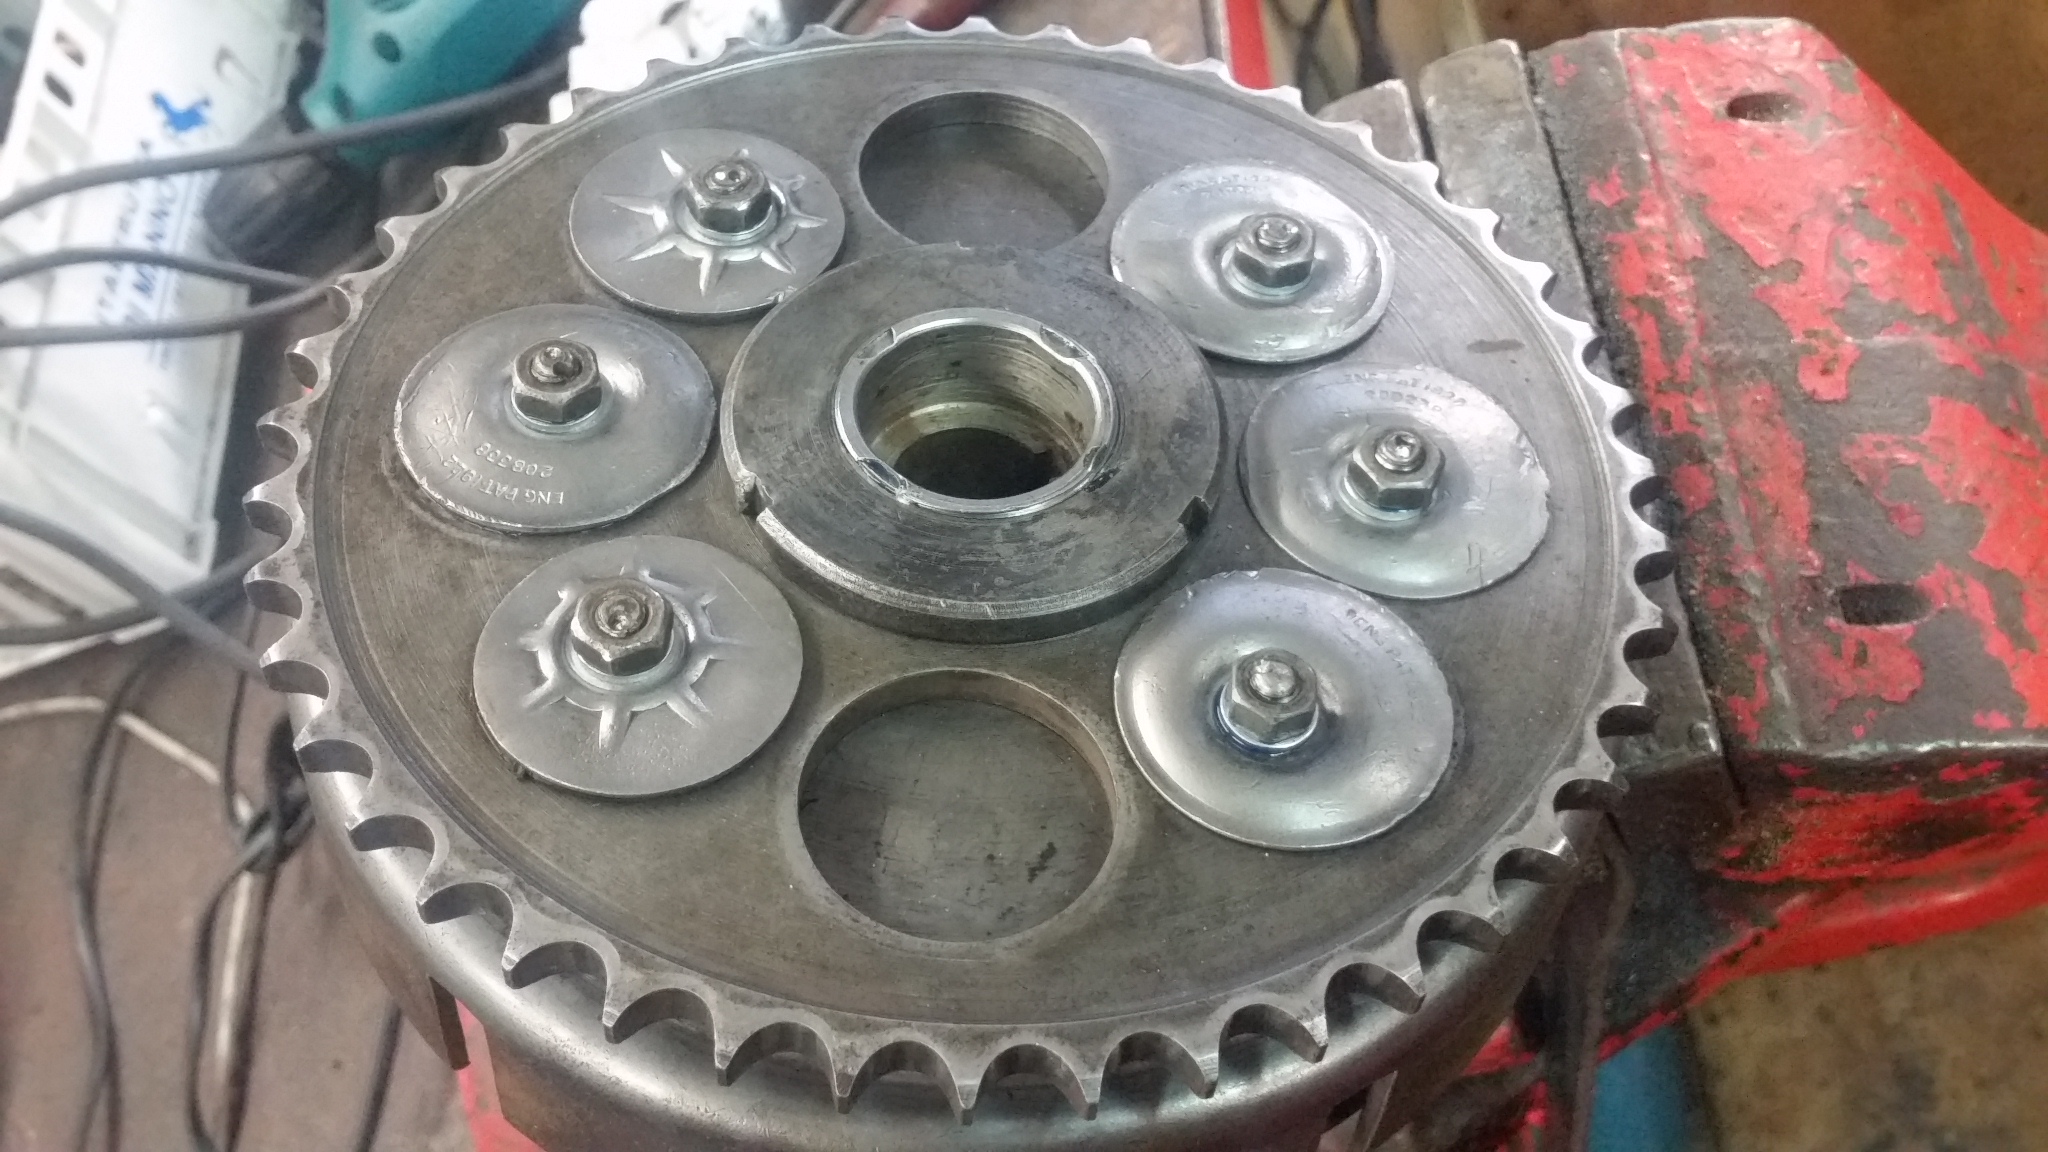
Ak teda máme všetko skontrolované, môžeme začať skladať. Najprv zmontujte kôš s ozubeným kolesom pomocou 6 ks gumových odpružení. Skrutky je potrebné dobre dotiahnúť a závit zaistiť lepidlom. Dbajte na to, aby bolo odpruženie dobre nasadené a správne pootočené.
When all is checked we can proceed with reasembly. First assemble the clutch basket with a gear wheel by 6 rubber cushions. The screws need to be tightened and the threads secured with a thread lock glue. Be sure that the cushions are placed and turned correctly.
Potom vložte stredový unášač s podložkou a vnútorným krúžkom ložiska. Vložte mazivo a valčeky.Pritiahnite maticou spojkového ložiska a nezabudnite zaistiť. Je na Vás či použijete dnešné moderné lepidlo, alebo starý spôsob zaklepania závitu. Zaistiť maticu je však veľmi dôležité. Rada sa povoľuje.
Then insert the inner hub with a spacer and inner ring of the bearing. Apply the grease on the rollers. Tighten the clutch bearing nut and do not forget to secure it. It is upon you whether you will use the modern thread lock glue or a hole punch. It is very necessary to secure the nut, it likes to get loose with time.
Teraz môžeme pristúpiť k vloženiu pripravených lamiel. Začíname aj končíme plechovou. Posledná lamela nesmie vystúpiť z drážky stredového unášača. Ak už lamela nesedí dostatočne hlboko vo vodiacich drážkach, je potrebné ubrať z hrúbky lamiel. Pôvodné lamely mali hrúbku 6,35 mm. Hrúbka plechov bola 2,2 mm . Treba počítať s tým, že dnes zakúpené náhrady majú hrúbku 2,5 mm. Prítlačný tanier bude možné namontovať až po priskrutkovaní spojky k prevodovke.
Now we can proceed and insert the clutch plates. We start with the metal one. The final plate can´t get out of the centre hub groove. If the plate does not fit deeply in the guiding grooves then is is necessary to reduce the plates thickness. The original plates were 6.35 mm thick. The metal plates were 2.2 mm thick. You have to take into consideration that todays replacements have a thickness of 2.5 mm. The pressure plate will be installed only after the clutch is screwed on to the gearbox.
V tomto článku sme zámerne použili fotografie z renovácie viacerých spojok. Môžete sa tak sami rozhodnúť akým spôsobom postupovať pri vašej oprave. Niekedy stačí spojku len poriadne vyčistiť, premazať a znova zložiť. No v inom prípade Vás oprava môže stáť poriadne veľa. Veríme, že u tej Vašej pôjde všetko ako po masle. Veľa úspechov pri práci a mnoho šťastných kilometrov za Slovenský Arielklub prajú.
Burger Karol a Patrik Lehotský
In this article we intentionally used photographs from renovation of various clutches. You can then decide which procedures to use while your work. Sometimes all it takes is to clean, lubricate and reasemble the clutch. But in other cases the clutch repair can cost much more. We hope that everything will work fine for you. We wish you luck with your restoration and many happy miles on the bike.
Burger Karol and Patrik Lehotský
Translated by Rastislav Chmelár
Komentáre
Pridať komentár